JavaWeb Web后端开发
2025.05.08
JavaWeb学习之JavaWebWeb后端开发
一、SpringBootWeb入门
1.1 Spring简介
- 官网:spring.io
- Spring是一个开源的Java企业级应用开发框架,提供了大量的功能模块,简化了Java企业级应用的开发
- Spring Boot可以帮助我们非常快速地构建应用程序、简化开发、提高效率
1.2 SpringBootWeb快速入门
-
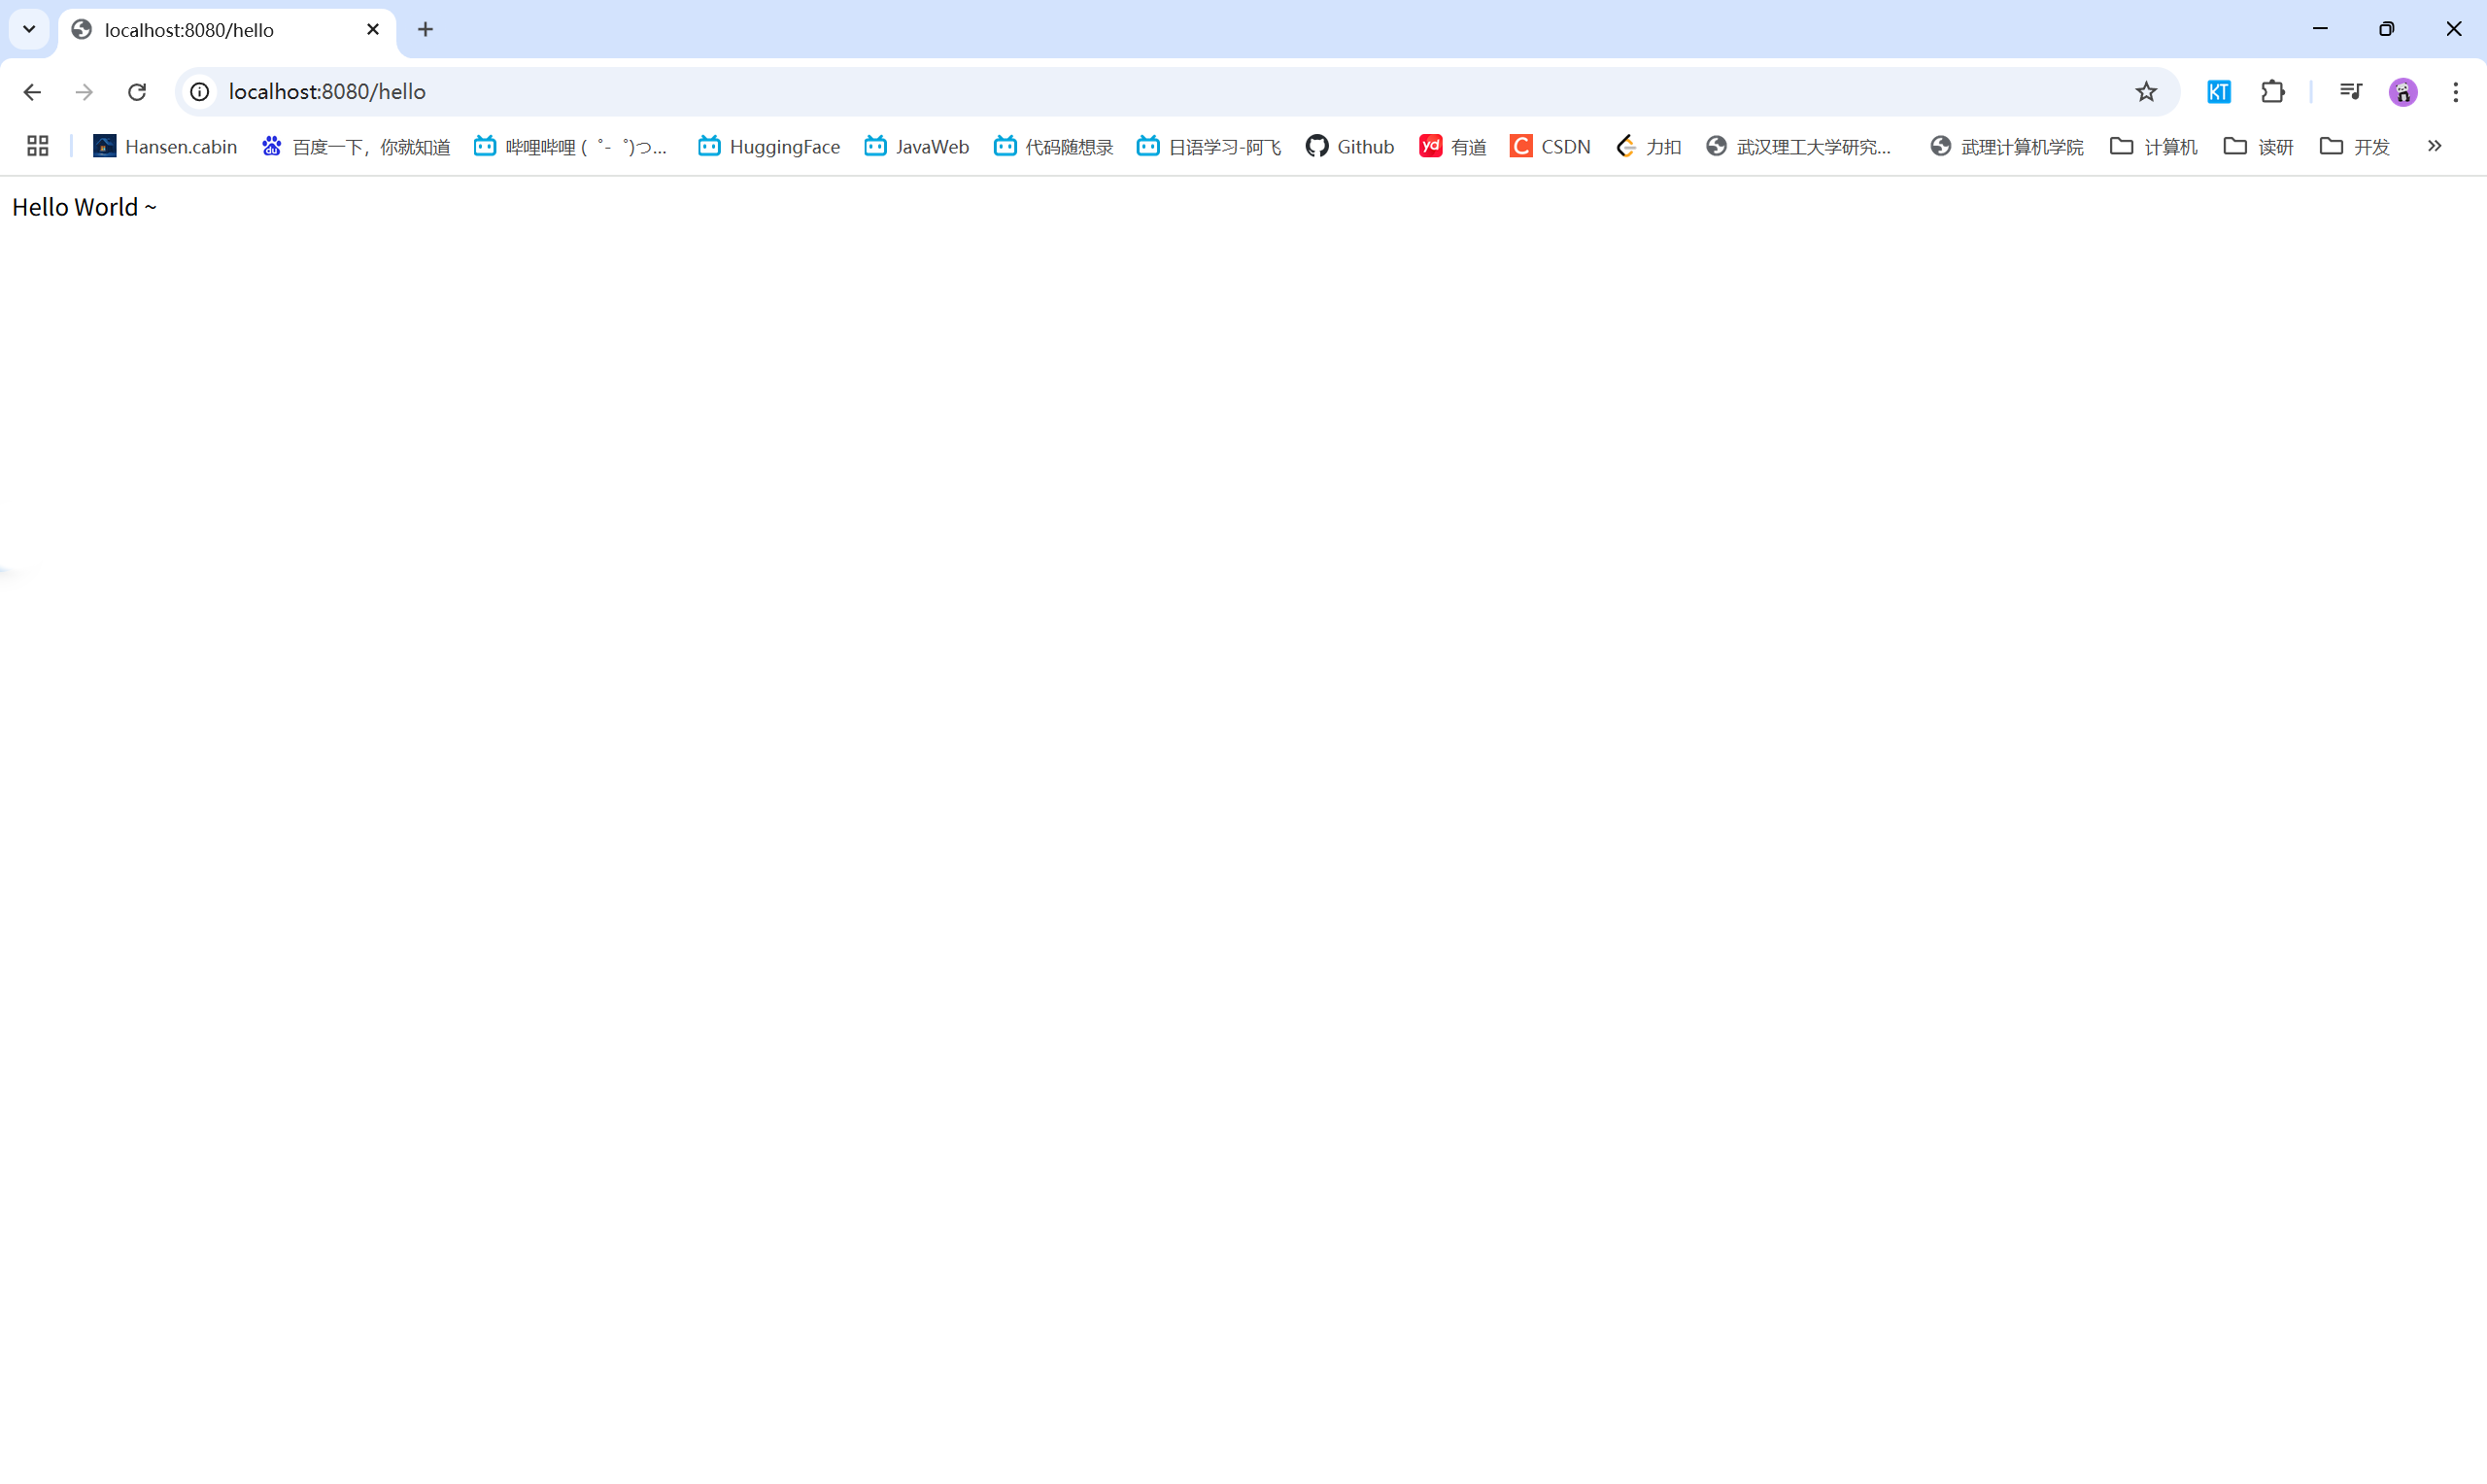
需求:使用SpringBoot开发一个web应用,浏览器发起请求/hello后,给浏览器返回字符串“hello world ~”

-
步骤:
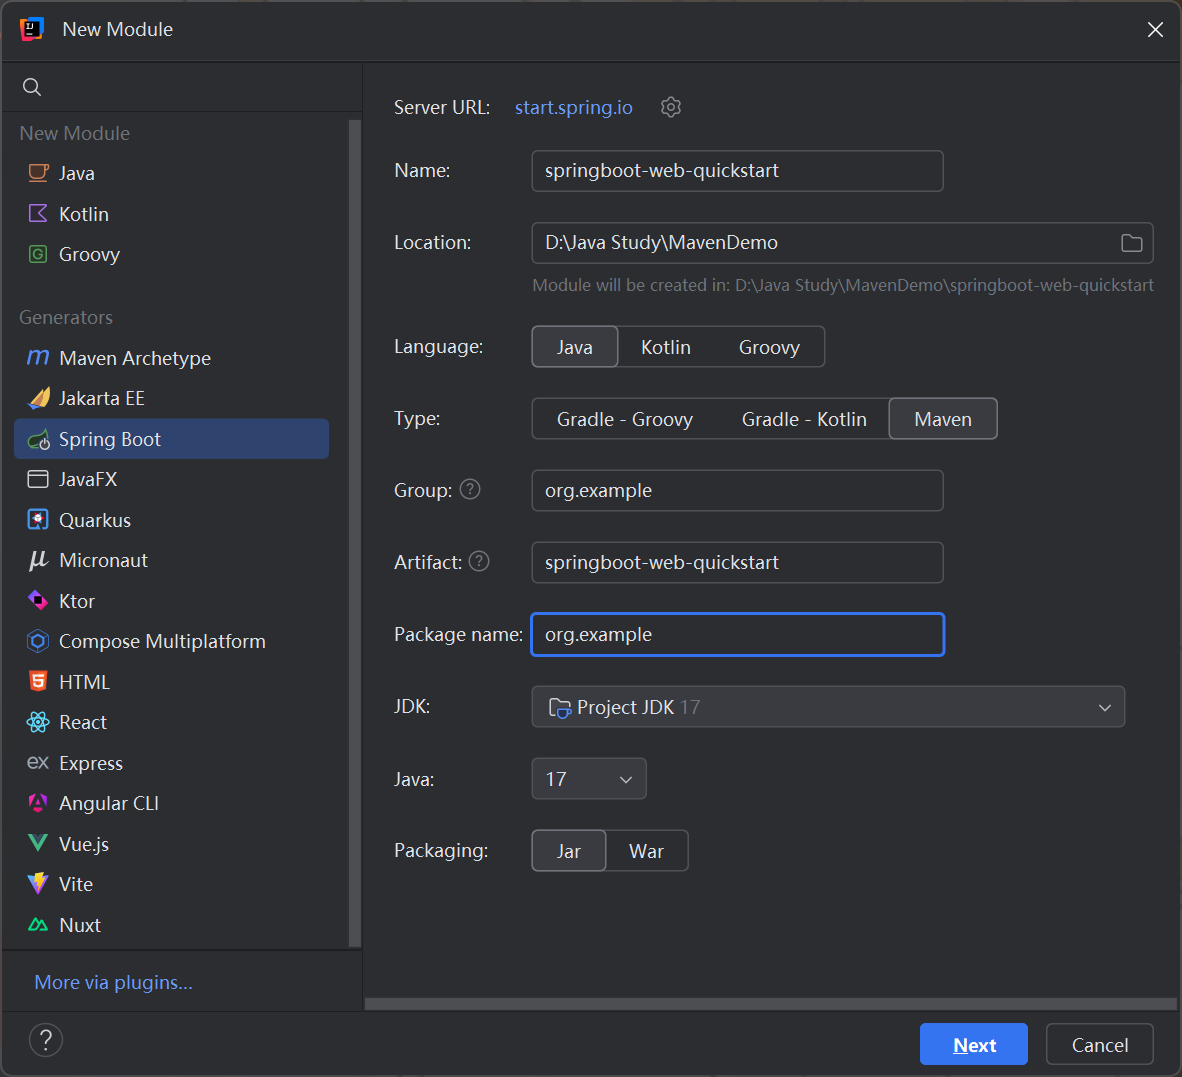
- 创建SpringBoot工程,并勾选web开发相关依赖
- 定义HelloController类,添加方法hello,并添加注解
- 运行测试

1 | package org.example; |
1 | package org.example.controller; |
实现效果:
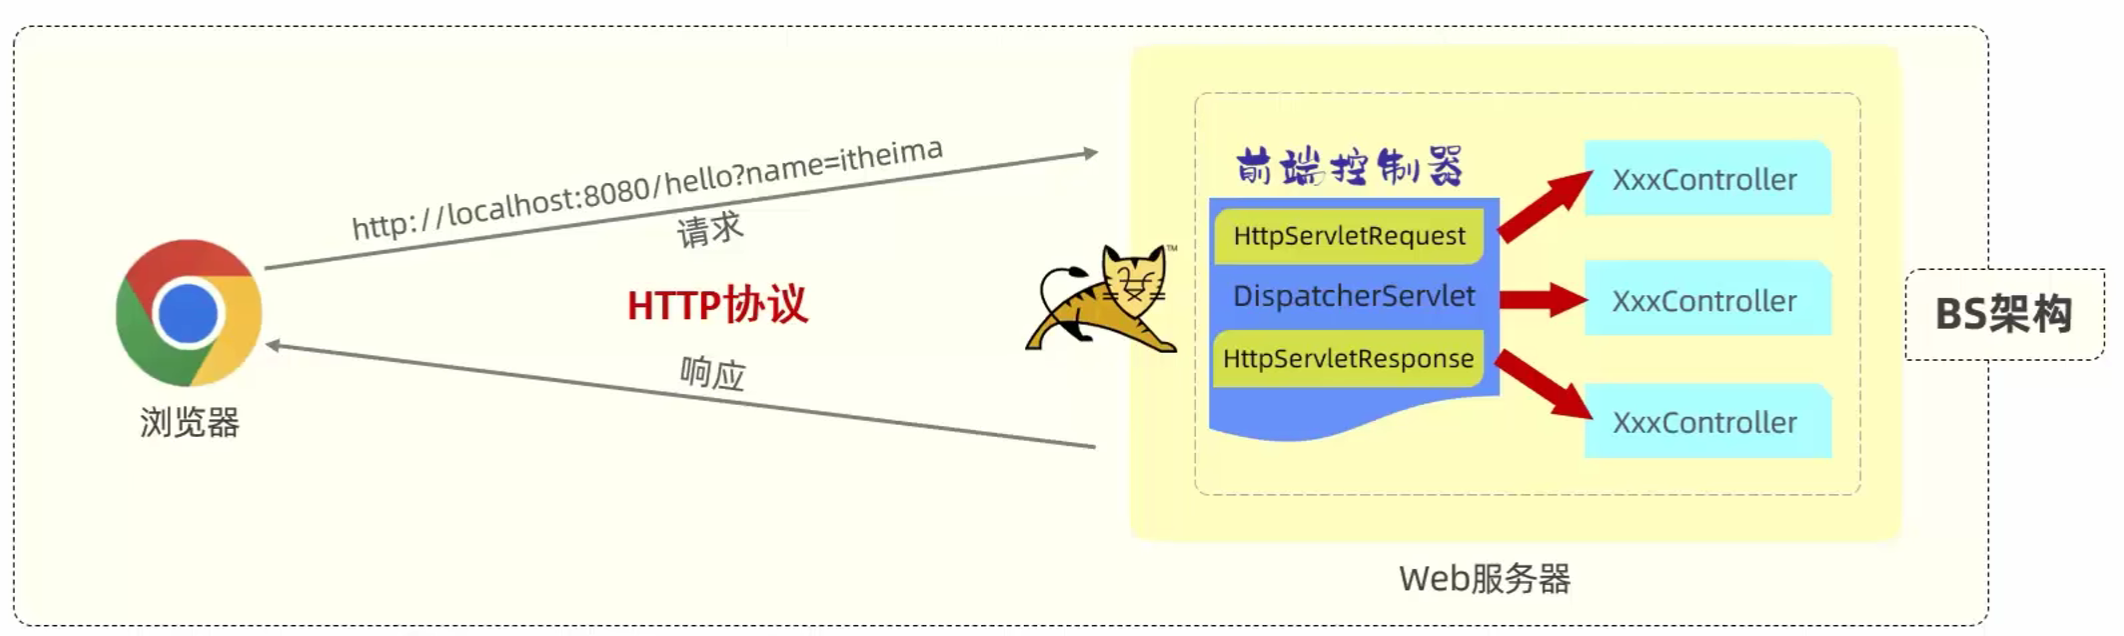
二、HTTP协议
2.1 HTTP协议概述
- 概念:超文本传输协议(HyperText Transfer Protocol),规定了浏览器和服务器之间数据传输的规则
- 特点:
- 基于TCP协议:面向连接,安全
- 基于请求-响应模型的:一次请求对应一次响应
- HTTP协议是无状态的协议:对于事务处理没有记忆能力。每次请求-响应都是独立的。
- 缺点:多次请求间不能共享数据。
- 优点:速度快
2.2 HTTP请求协议
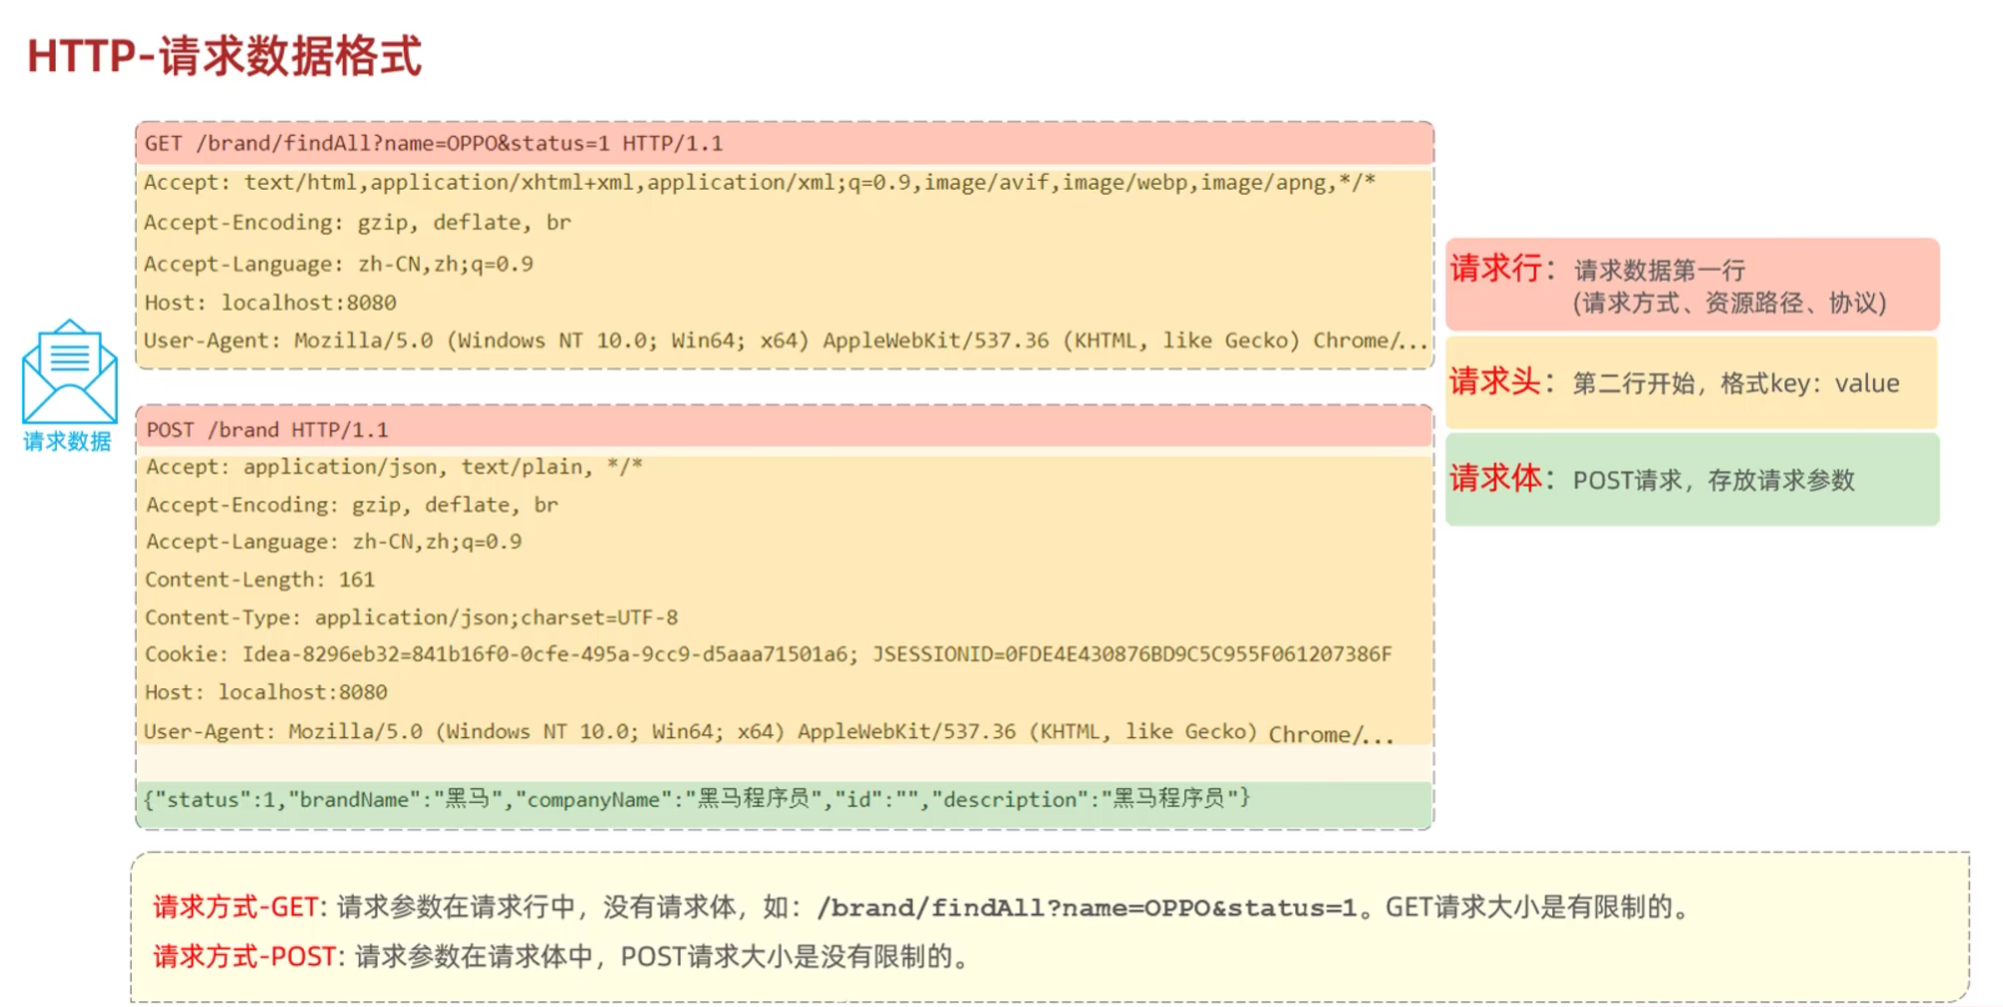
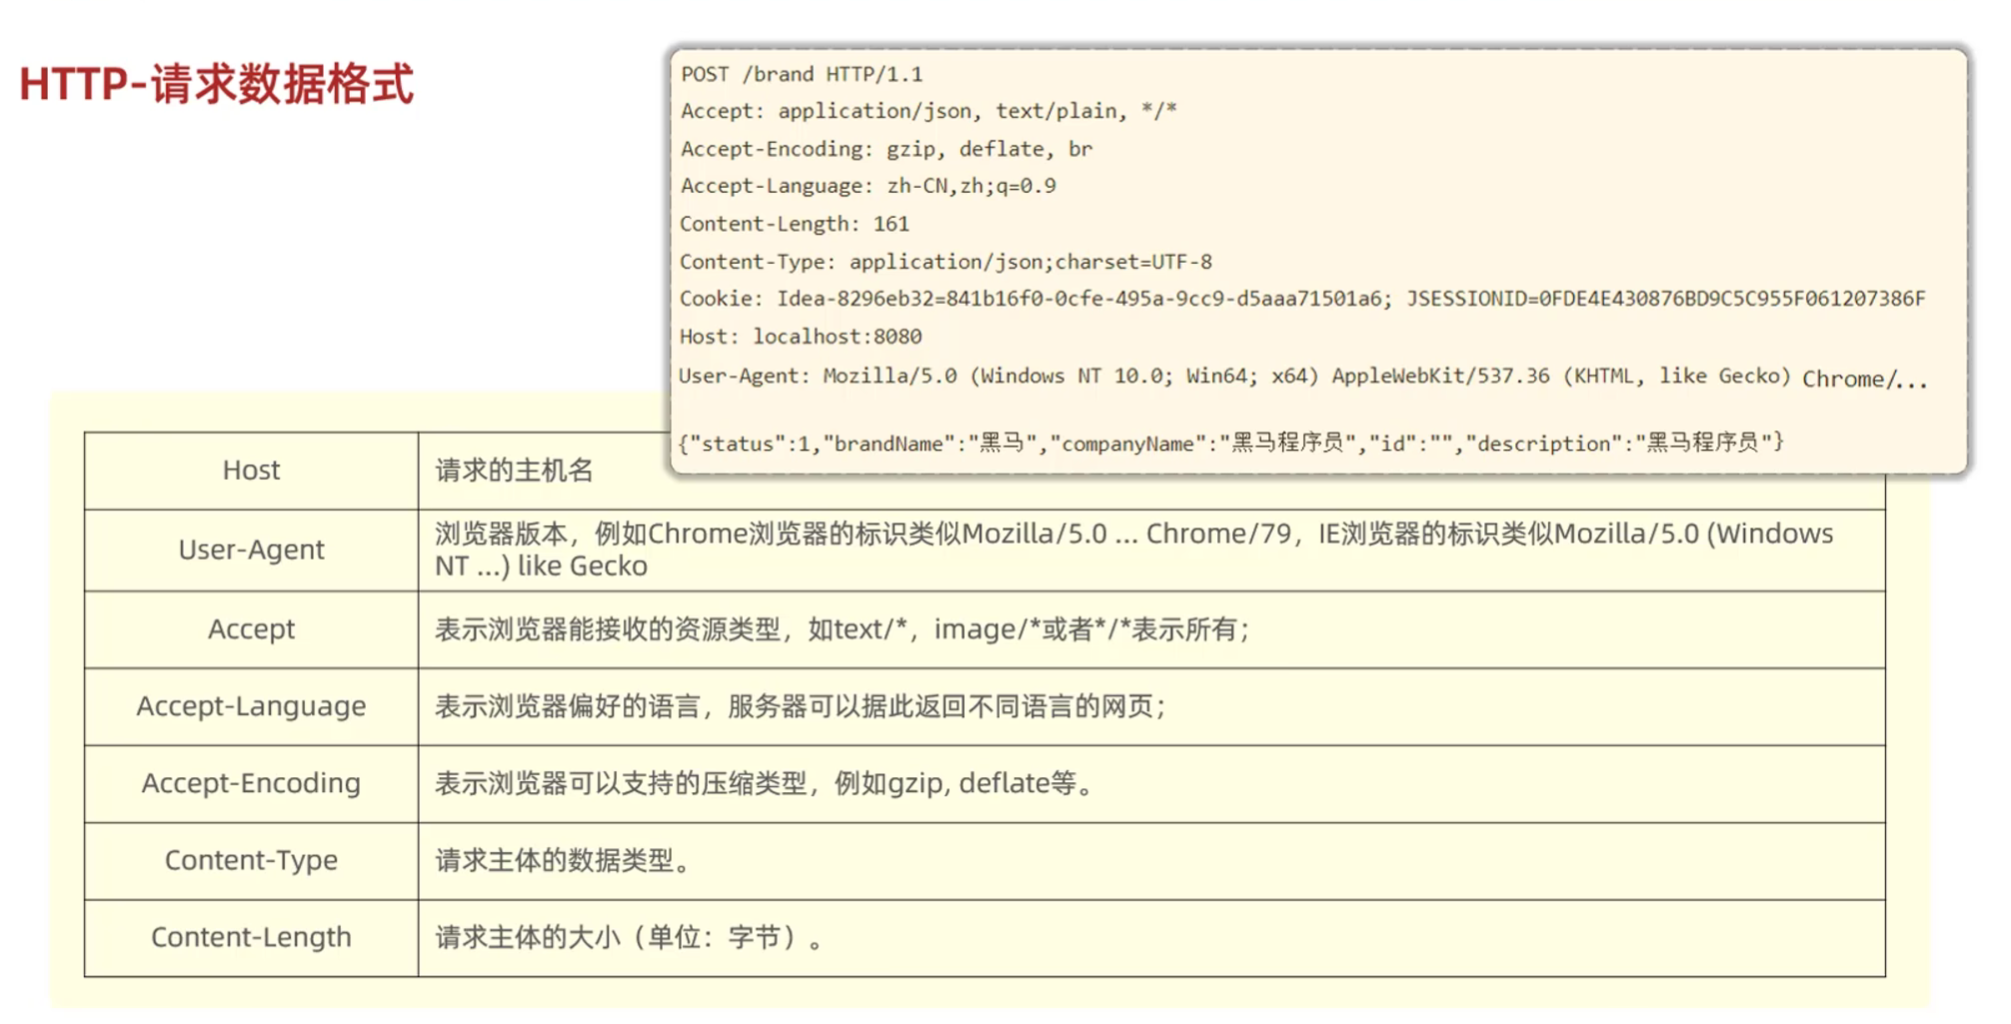
- HTTP请求数据格式:
- 请求行:请求数据第一行:请求方式、资源路径、协议
- 请求头:第二行开始,格式key:value
- 请求体:POST请求,存放请求参数
- 请求方式
- GET:请求参数在请求行中,没有请求体,如: /brand/findAll?name=OPPO&status=1。 GET请求大小是有限制的
- POST:请求参数在请求体中,POST请求大小是没有限制的
2.3 HTTP响应协议
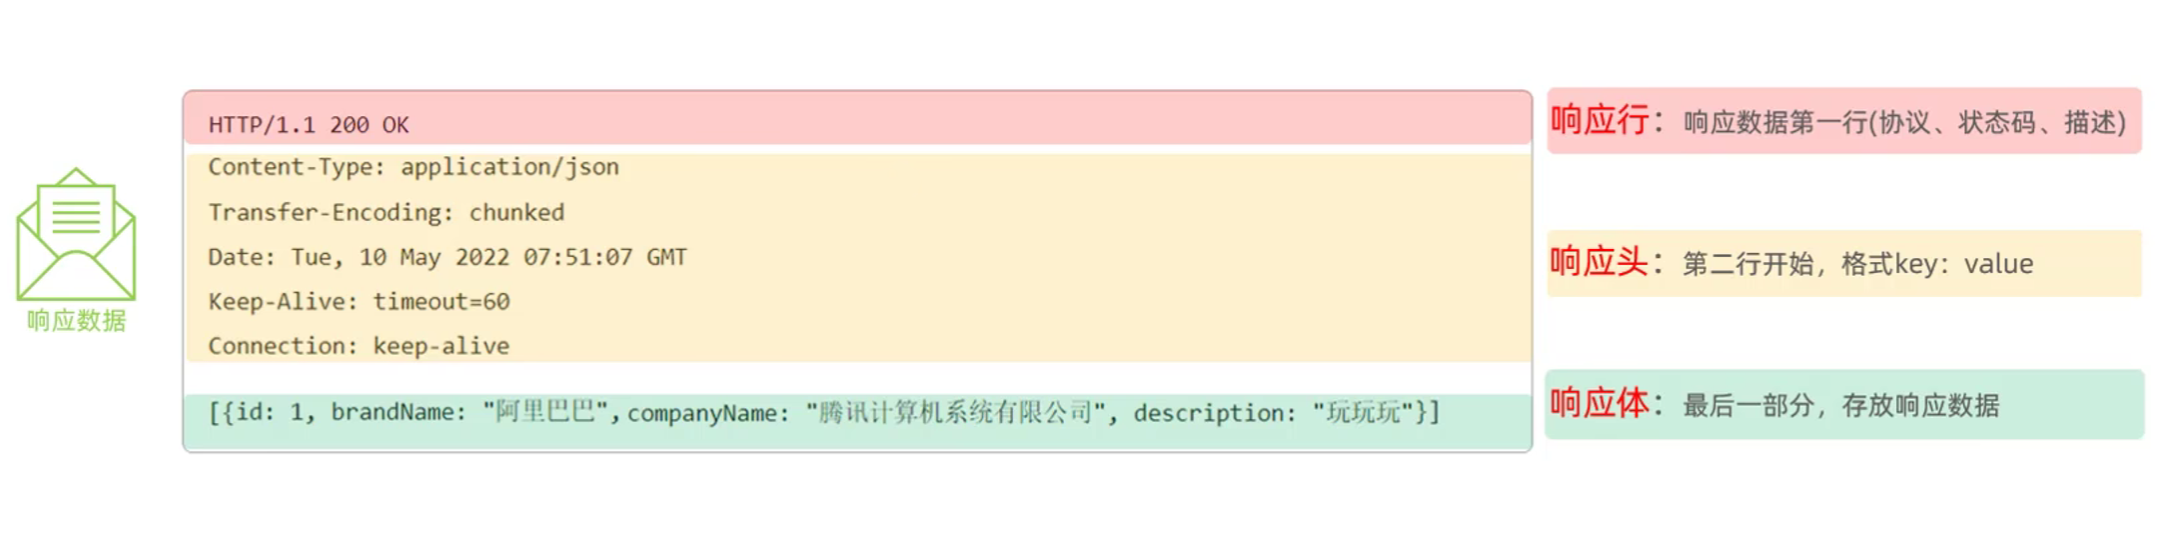
- HTTP响应数据格式:
- 响应行:响应数据第一行:协议、状态码、状态描述
- 响应头:第二行开始,格式key:value
- 响应体:存放响应数据
状态码大类
| 状态码分类 | 说明 |
|---|---|
| 1xx | 响应中——临时状态码,表示请求已经接受,告诉客户端应该继续请求或者如果它已经完成则忽略它 |
| 2xx | 成功——表示请求已经被成功接收,处理已完成 |
| 3xx | 重定向——重定向到其它地方:它让客户端再发起一个请求以完成整个处理。 |
| 4xx | 客户端错误——处理发生错误,责任在客户端,如:客户端的请求一个不存在的资源,客户端未被授权,禁止访问等 |
| 5xx | 服务器端错误——处理发生错误,责任在服务端,如:服务端抛出异常,路由出错,HTTP版本不支持等 |
常见的响应状态码
| 状态码 | 英文描述 | 解释 |
|---|---|---|
200 |
OK |
客户端请求成功,即处理成功,这是我们最想看到的状态码 |
| 302 | Found |
指示所请求的资源已移动到由Location响应头给定的 URL,浏览器会自动重新访问到这个页面 |
| 304 | Not Modified |
告诉客户端,你请求的资源至上次取得后,服务端并未更改,你直接用你本地缓存吧。隐式重定向 |
| 400 | Bad Request |
客户端请求有语法错误,不能被服务器所理解 |
| 403 | Forbidden |
服务器收到请求,但是拒绝提供服务,比如:没有权限访问相关资源 |
404 |
Not Found |
请求资源不存在,一般是URL输入有误,或者网站资源被删除了 |
| 405 | Method Not Allowed |
请求方式有误,比如应该用GET请求方式的资源,用了POST |
| 428 | Precondition Required |
服务器要求有条件的请求,告诉客户端要想访问该资源,必须携带特定的请求头 |
| 429 | Too Many Requests |
指示用户在给定时间内发送了太多请求(“限速”),配合 Retry-After(多长时间后可以请求)响应头一起使用 |
| 431 | Request Header Fields Too Large |
请求头太大,服务器不愿意处理请求,因为它的头部字段太大。请求可以在减少请求头域的大小后重新提交。 |
500 |
Internal Server Error |
服务器发生不可预期的错误。服务器出异常了,赶紧看日志去吧 |
| 503 | Service Unavailable |
服务器尚未准备好处理请求,服务器刚刚启动,还未初始化好 |
状态码大全:https://cloud.tencent.com/developer/chapter/13553
常见响应头
| 响应头 | 描述 |
|---|---|
| Content-Type | 表示该响应内容的类型,例如text/html, application/json |
| Content-Length | 表示该响应内容的长度(字节数) |
| Content-Encoding | 表示该响应压缩算法,例如gzip |
| Cache-Control | 指示客户端应如何缓存,例如max-age=300表示可以最多缓存300秒 |
| Set-Cookie | 告诉浏览器为当前页面所在的域设置cookie |
2.4 HTTP协议解析
- 使用Tomcat进行解析
三、Tomcat
3.1 Tomcat概述
- Web服务器:Web服务器是一个软件程序,对HTTP协议的操作进行封装,使得程序员不必直接对协议进行操作,让Web开发更加便捷。主要功能是“提供网上信息浏览服务”
- 概念:Tomcat是Apache 软件基金会一个核心项目,是一个开源免费的轻量级Web服务器,支持Servlet/JSP少量JavaEE规范
- JavaEE:Java Enterprise Edition,Java企业版。指Java企业级开发的技术规范总和。包含13项技术规范:JDBC、JNDI、EJB、RMI、JSP、Servlet、XML、JMS、Java IDL、JTS、JTA、JavaMail、JAF
- Tomcat也被称为Web容器、Servlet容器。Servlet程序需要依赖于Tomcat才能运行
- 官网:https://tomcat.apache.org/
3.2 Tomcat基本使用
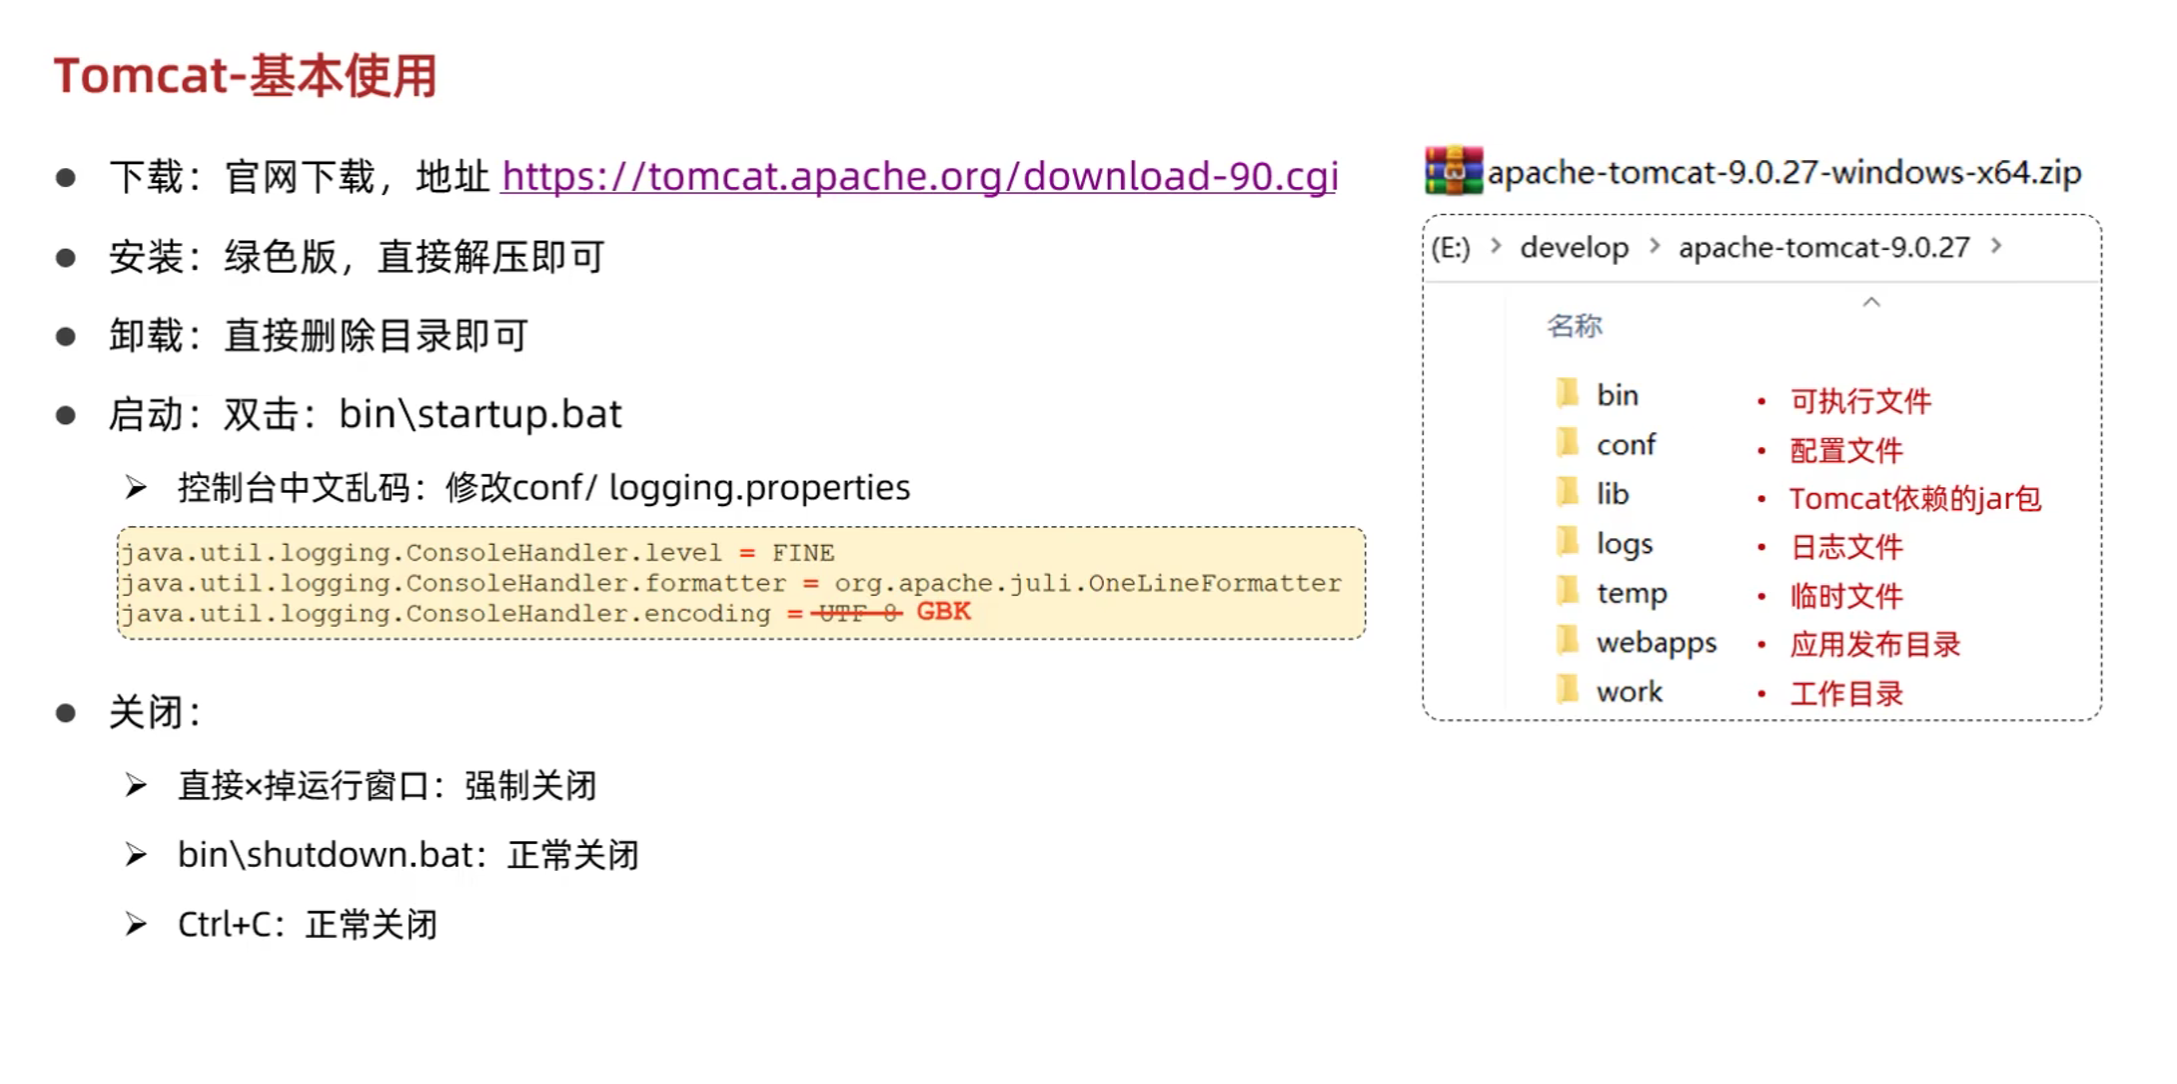
- 配置Tomcat端口号(conf/server.xml)
1 | <Connector port="8080" protocol="HTTP/1.1" |
- HTTP协议默认端口号为80,如果将Tomcat端口号改为80,则将来访问Tomcat时可以不输入端口号
- Tomcat部署项目
- 将项目放置到webapps目录下,即部署完成
3.3 入门程序解析
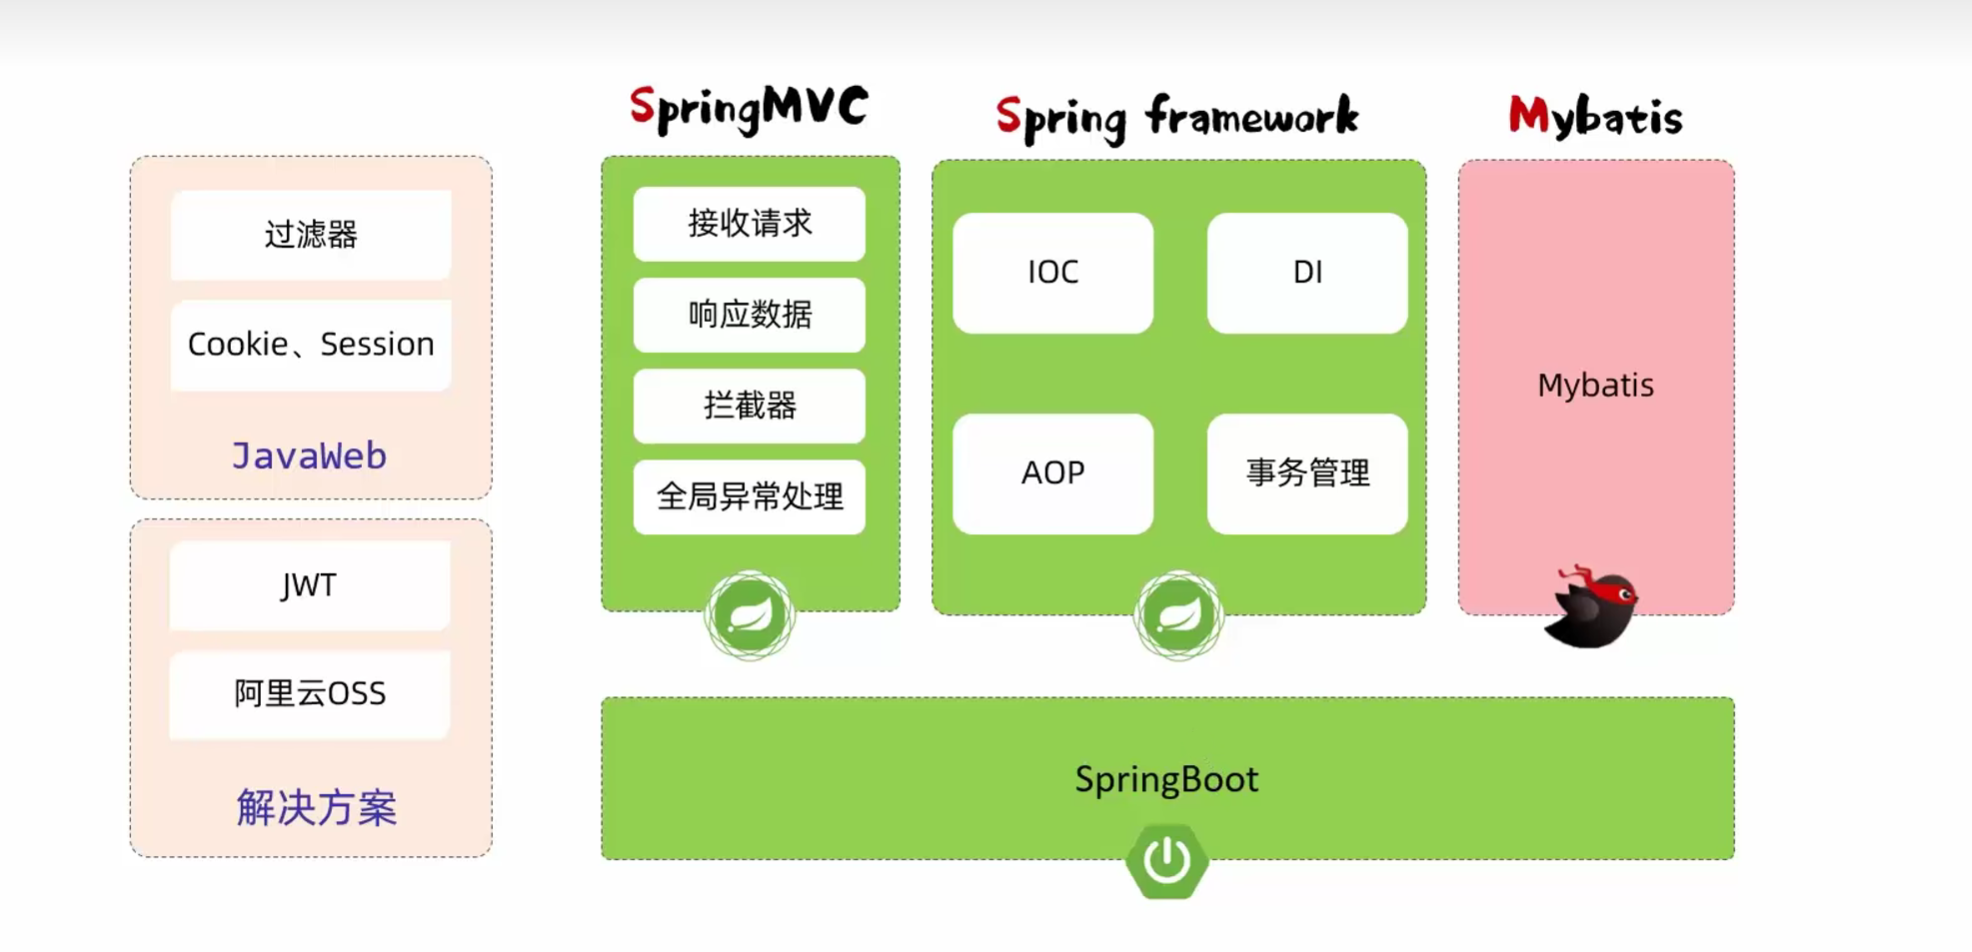
- 起步依赖:
- spring-boot-starter-web:SpringBoot的web开发相关依赖,包含了SpringMVC、Tomcat等
- spring-boot-starter-test:SpringBoot的测试相关依赖,包含了JUnit、Mockito等
- 官方提供的starter:https://docs.spring.io/spring-boot/docs/2.7.4/reference/htmlsingle/#using.build-systems.starters
- 内嵌Tomcat服务器
- 基于Springboot开发的web应用程序,内置了tomcat服务器,当启动类运行时,会自动启动内嵌的tomcat服务器
2025.05.10
四、请求响应
4.1 请求响应概述
- 请求(httpServletRequest):获取请求数据
- 响应(httpServletResponse):设置响应数据
- BS架构:Browser/Server,浏览器/服务器架构模式。客户端只需要浏览器,应用程序的逻辑和数据都存储在服务端
- CS架构:Client/Server,客户端/服务器架构模式。客户端需要安装应用程序,应用程序的逻辑和数据都存储在服务端
4.2 请求参数
4.2.1 简单参数
- 原始方式
- 在原始的web程序中,获取请求参数,需要通过HttpServletRequest对象手动获取
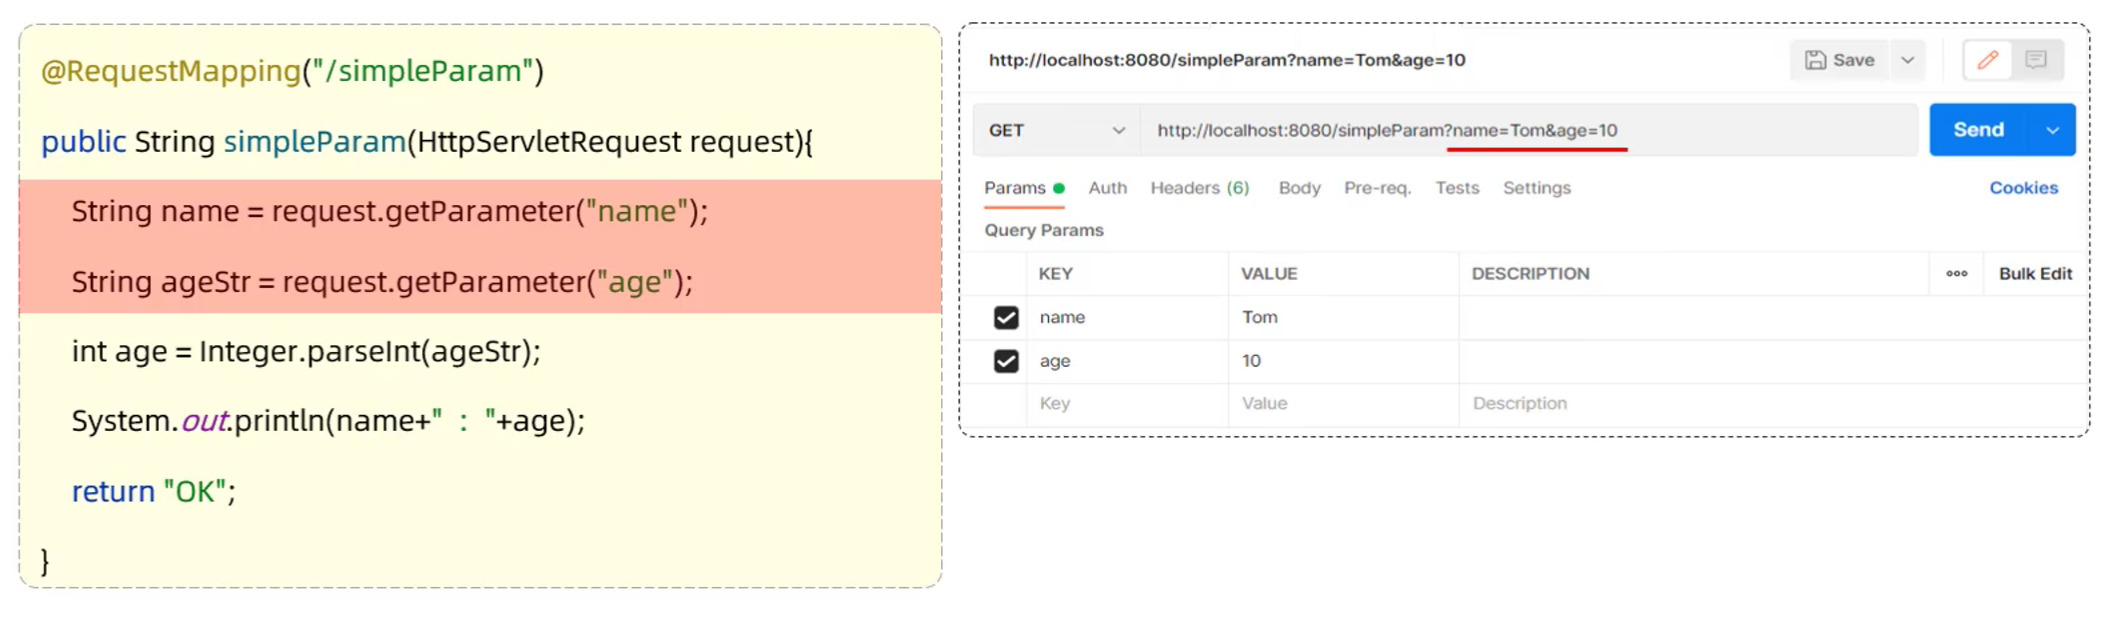
- 在原始的web程序中,获取请求参数,需要通过HttpServletRequest对象手动获取
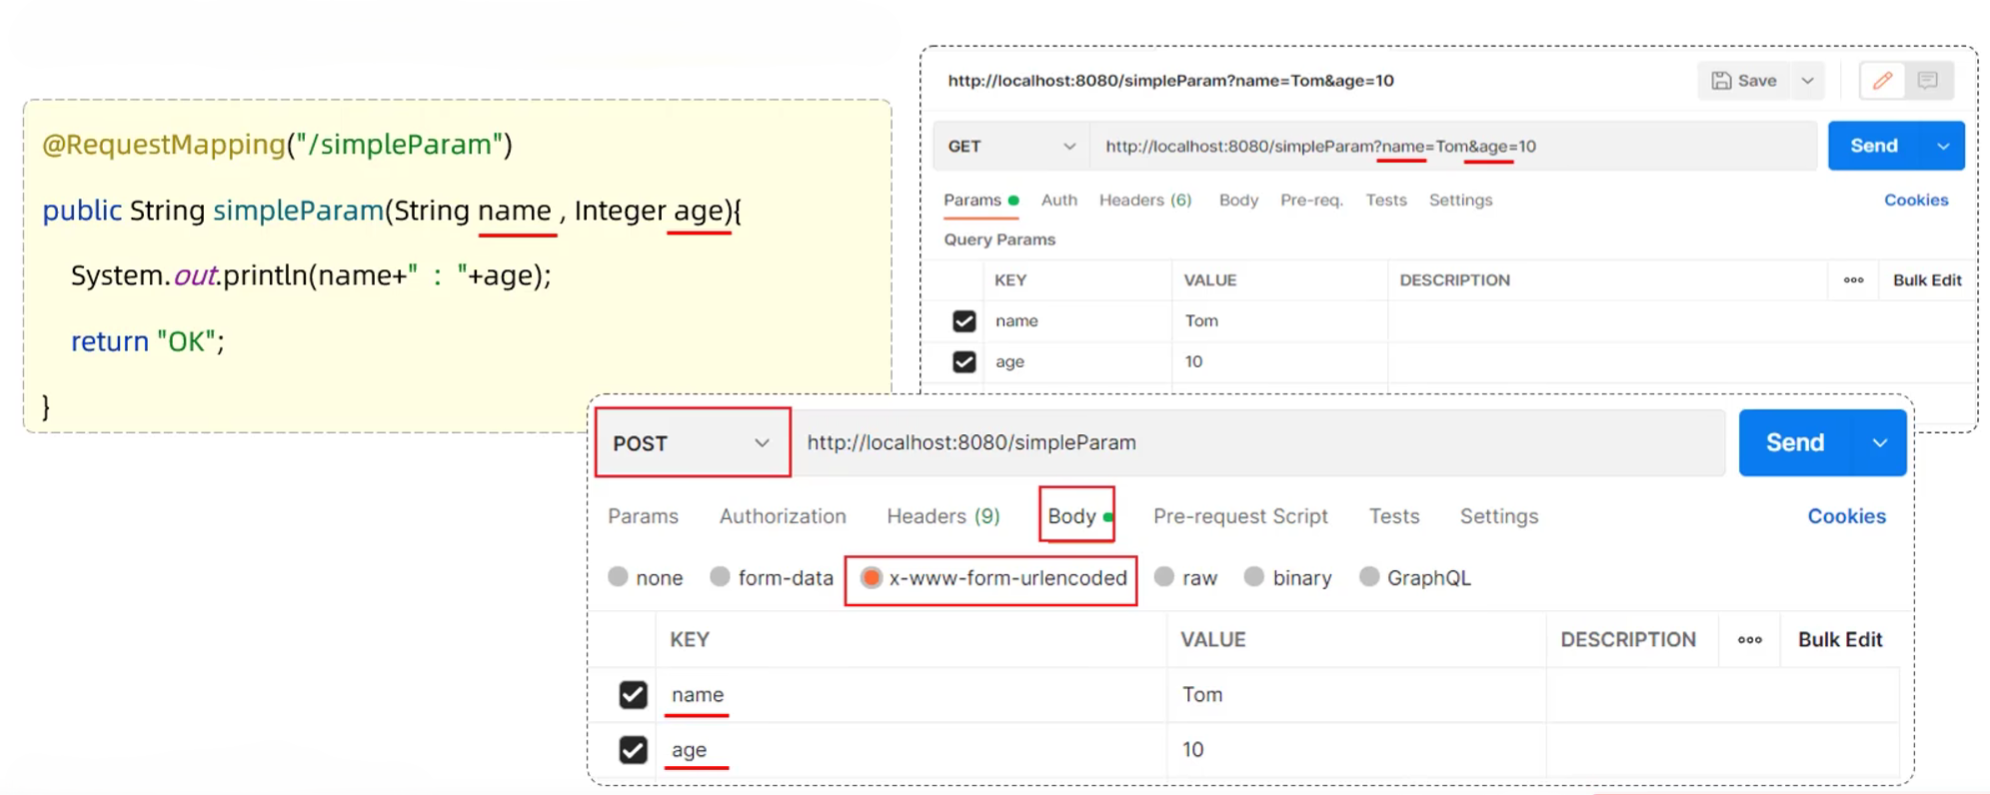
- SpringBoot方式
- 简单参数:参数名与形参变量名相同,定义形参即可接收参数
- 如果方法形参名称与请求参数名称不匹配,可以使用@RequestParam完成映射
- RequestParam中的required属性默认为true,代表该请求参数必须传递,如果不传递将报错。如果该参数是可选的,可以将required属性设置为false

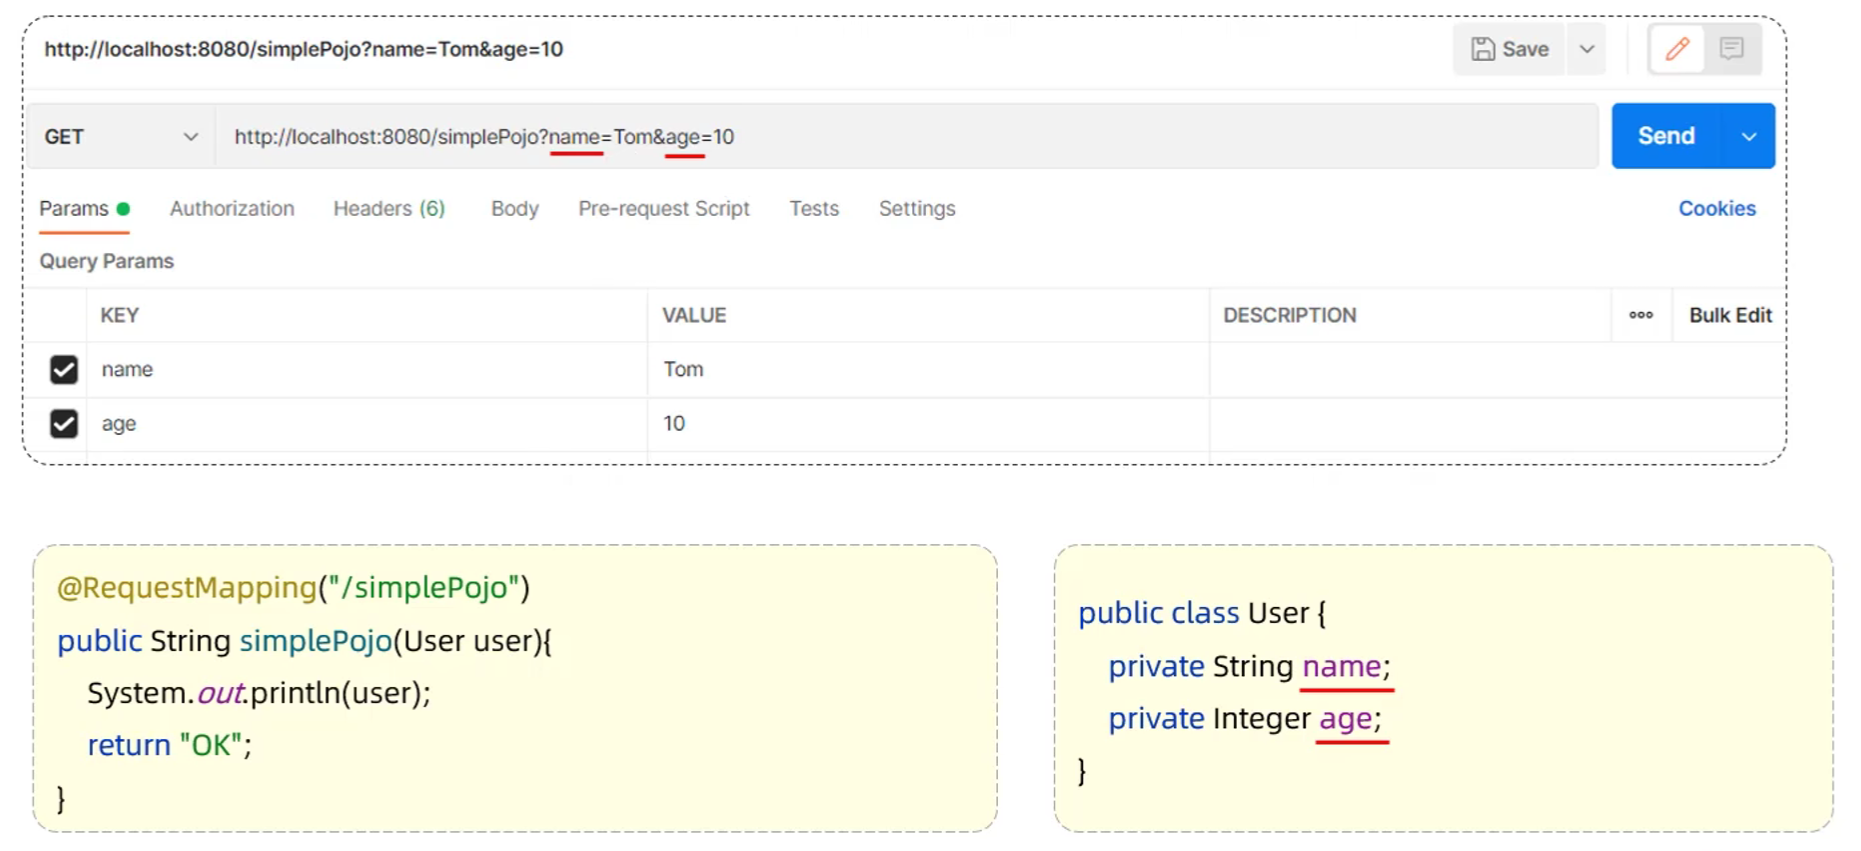
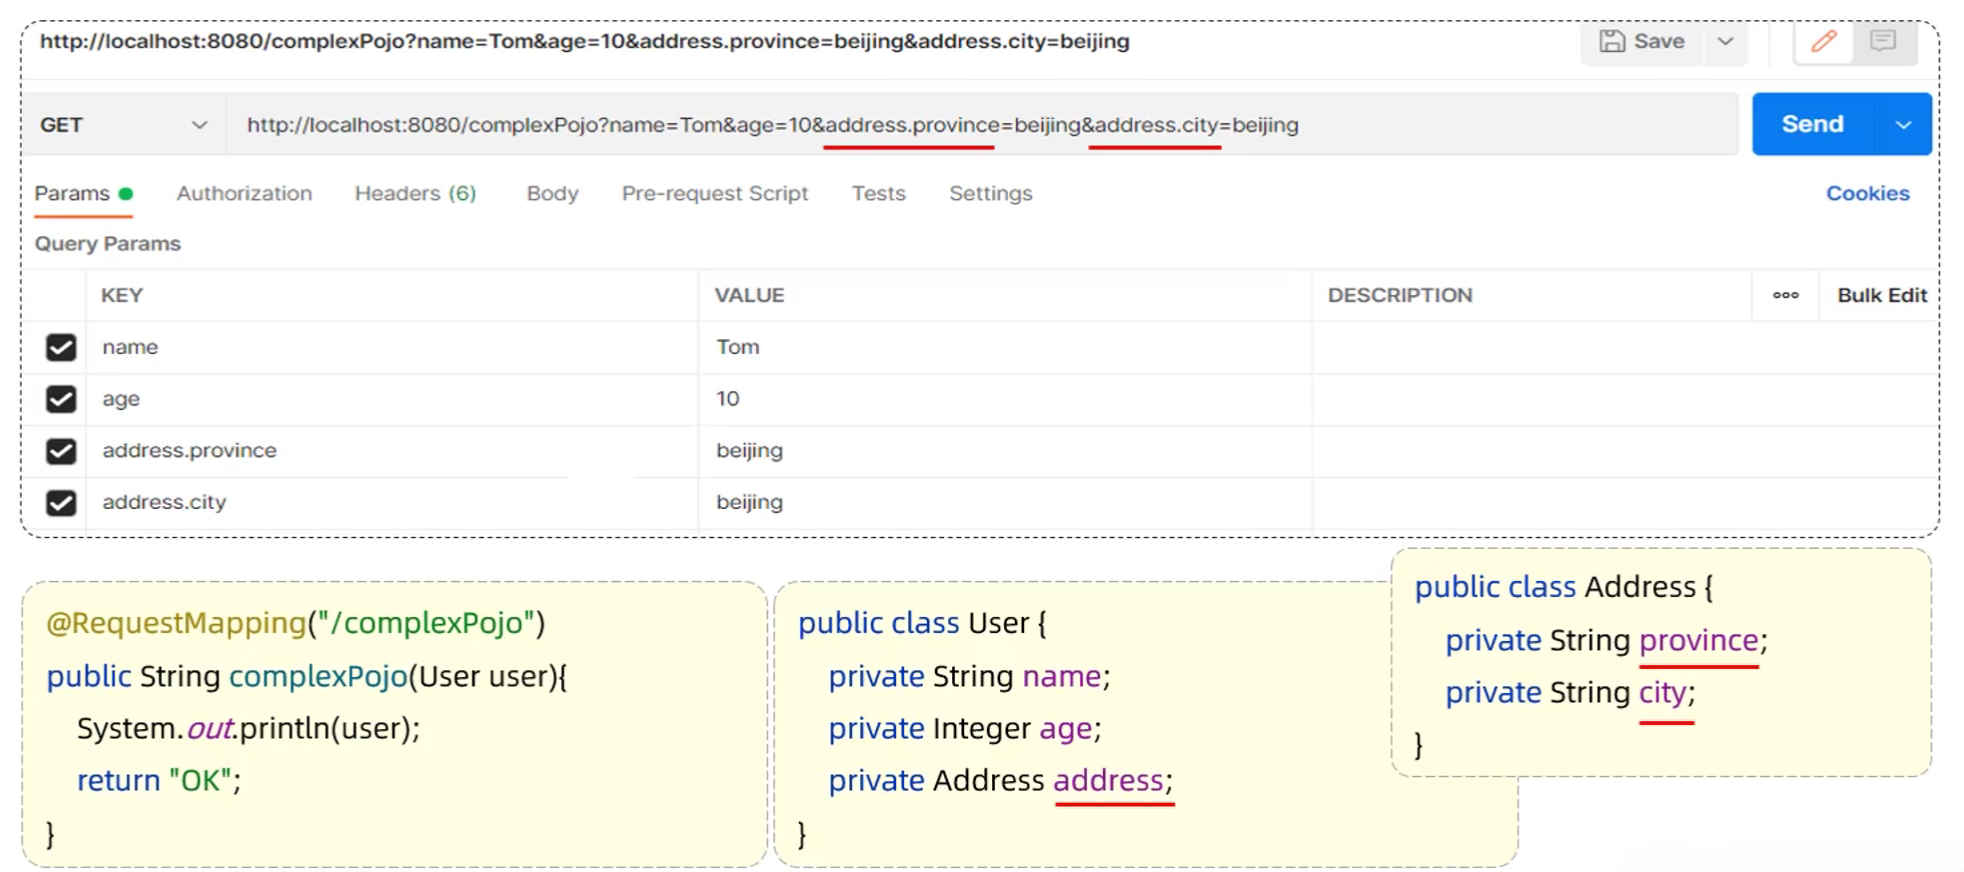
4.2.2 实体参数
- 简单实体对象:请求参数名与形参对象属性名相同,定义POJO接收即可
- 复杂实体对象:请求参数名与形参对象属性名相同,按照对象层次结构关系即可接收嵌套POJO属性参数
4.2.3 数组集合参数
- 数组参数:请求参数名与形参数组名称相同且请求参数为多个,定义数组类型形参即可接收参数
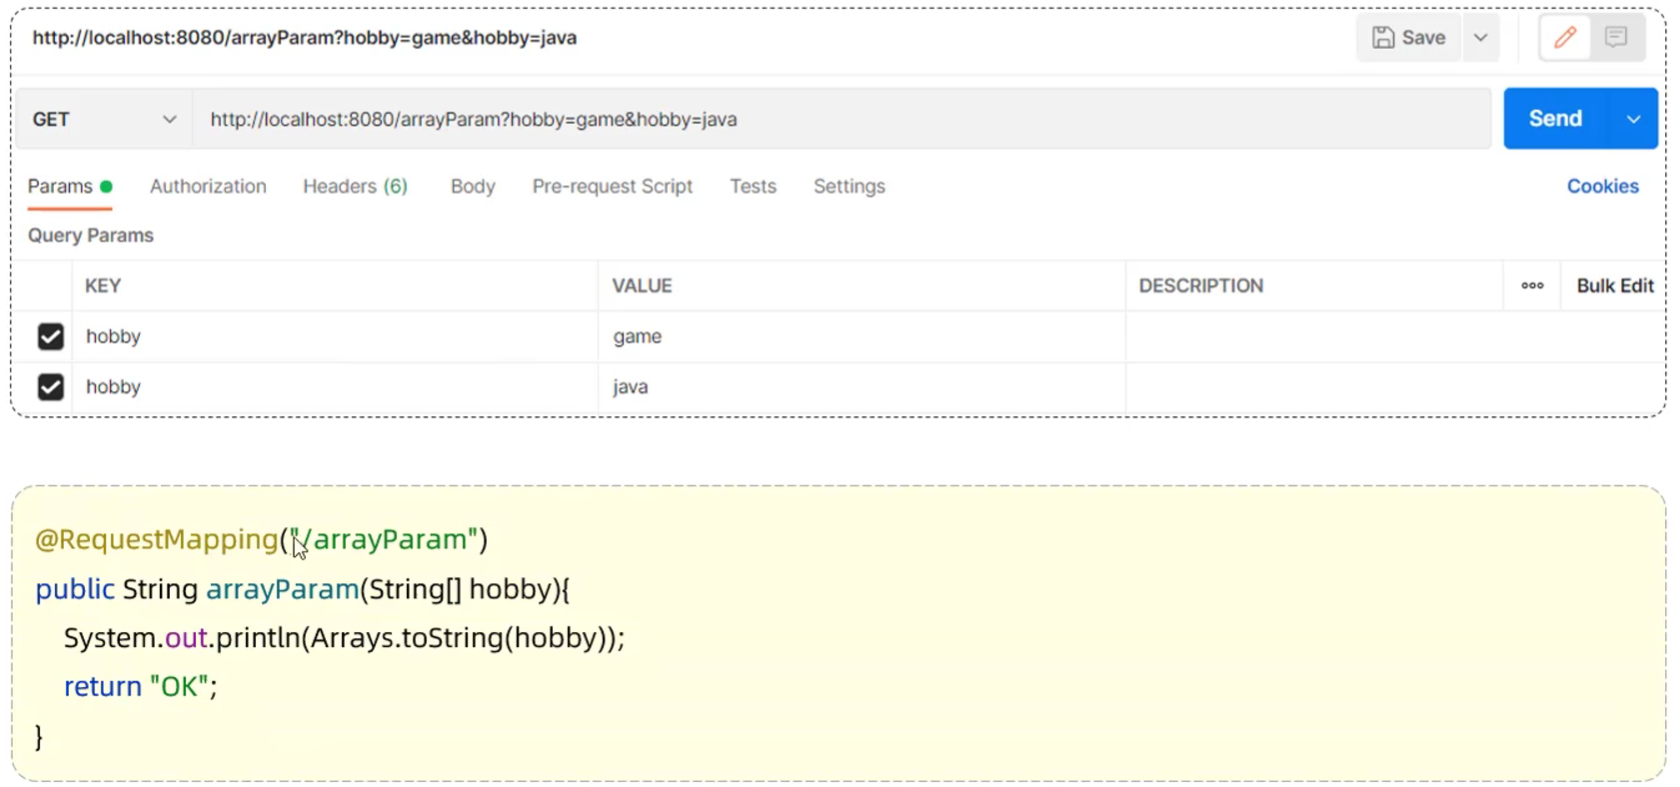
- 集合参数:请求参数名与形参集合名称相同且请求参数为多个,@RequestParam绑定参数关系

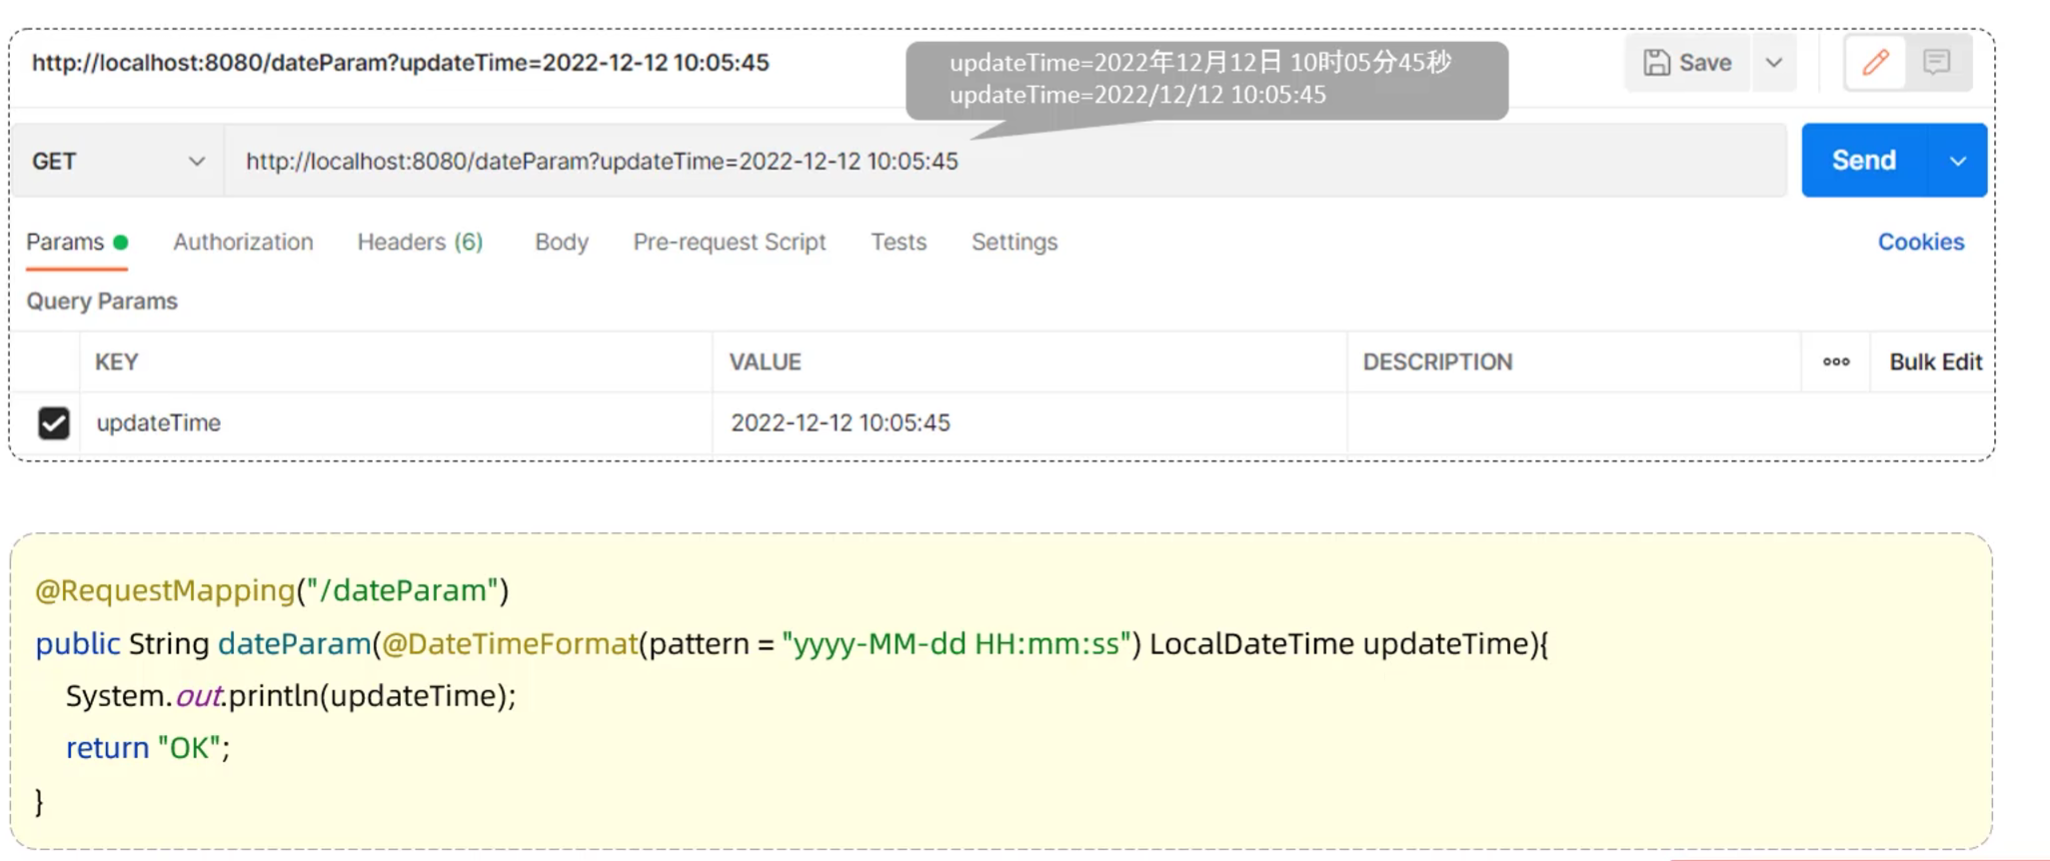
4.2.4 日期参数
- 日期参数:使用@DateTimeFormat注解完成日期参数格式转换
4.2.5 JSON参数
- JSON参数:JSON 数据键名与形参对象属性名相同,定义POJO类型形参即可接收参数,需使用@RequestBody标识

4.2.6 路径参数
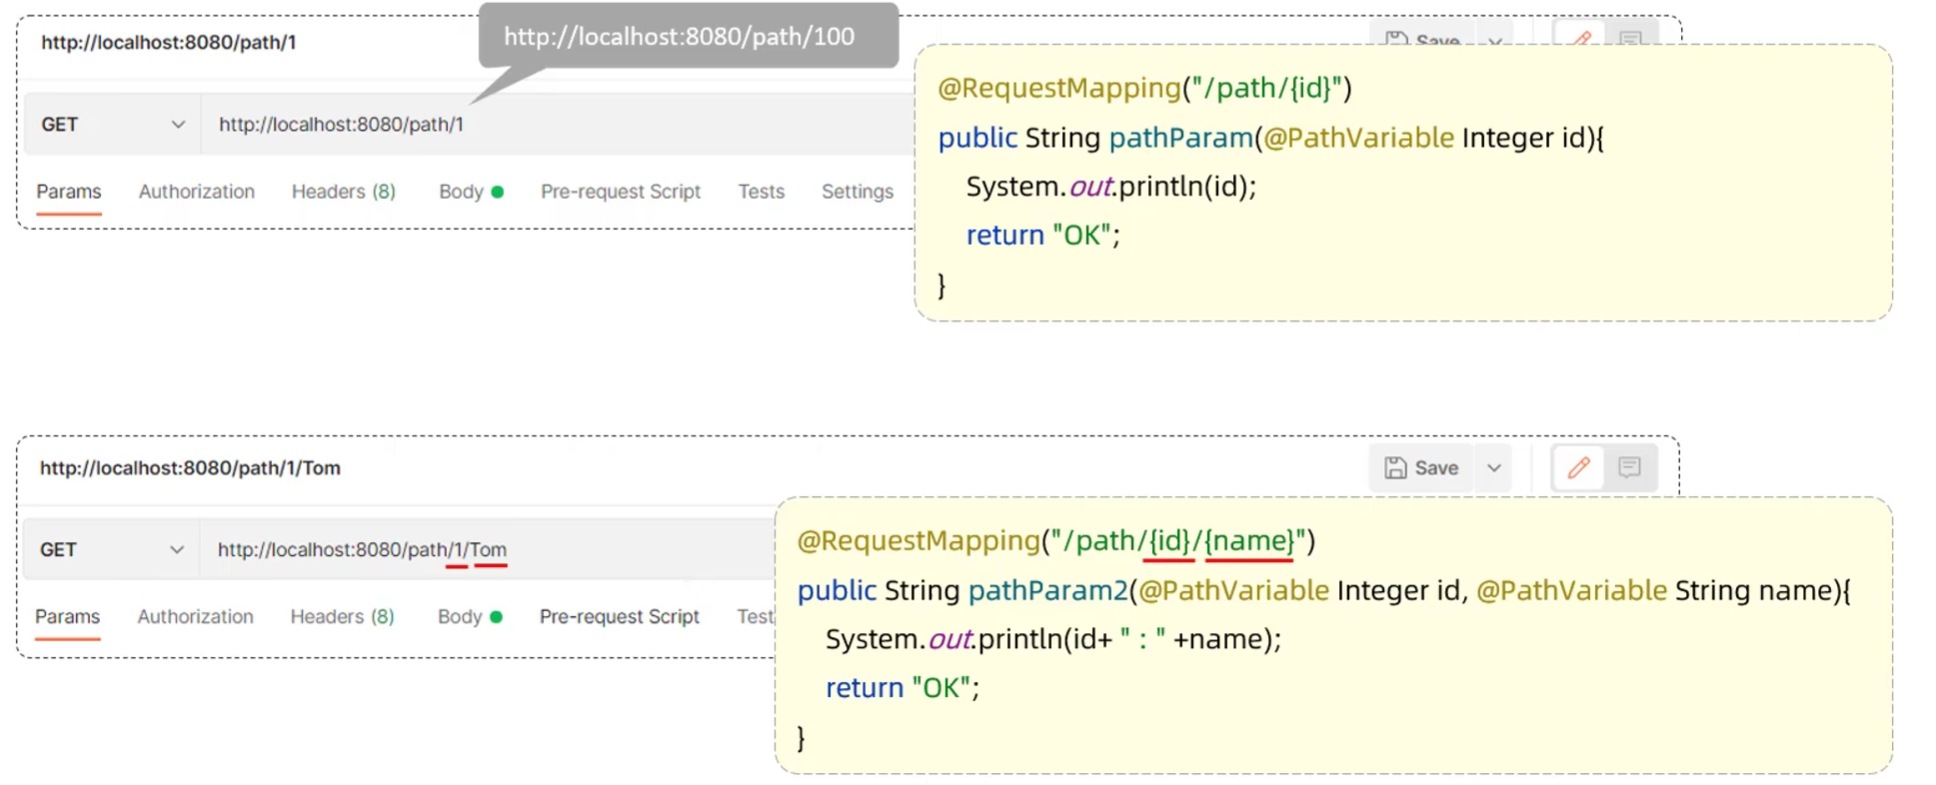
- 路径参数:通过请求URL直接传递参数,使用{…}来标识该路径参数,需要使用@PathVariable获取路径参数
4.3 响应数据
-
@ResponseBody
- 类型:方法注解、类注解
- 位置:Controller方法/类上
- 作用:将方法返回值直接响应,如果返回值类型是实体对象/集合,将会转换为JSON格式响应
- 说明:@RestController = @Controller + @ResponseBody

-
统一响应结果
- 使用Result类封装响应结果
- Result类
- 响应码code:1代表成功,0代表失败
- 提示信息msg:提示信息
- 响应数据data:返回的数据
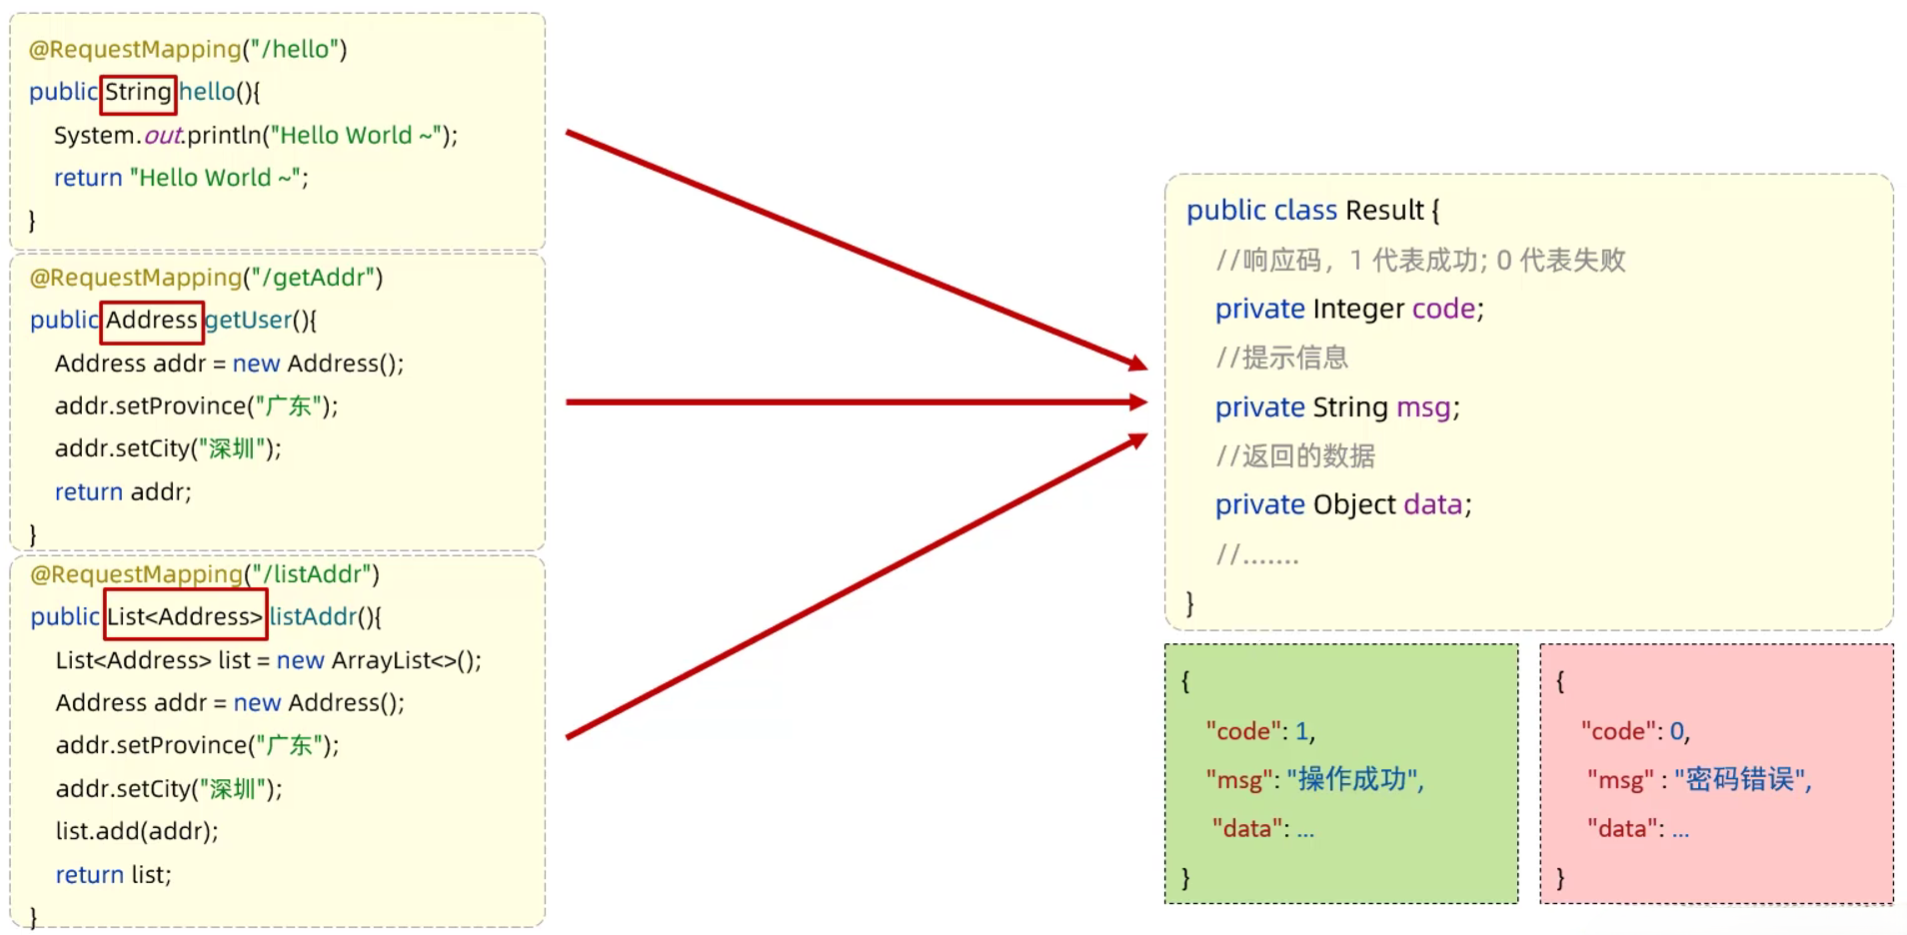
1 | // Result.java |
4.4 请求响应案例
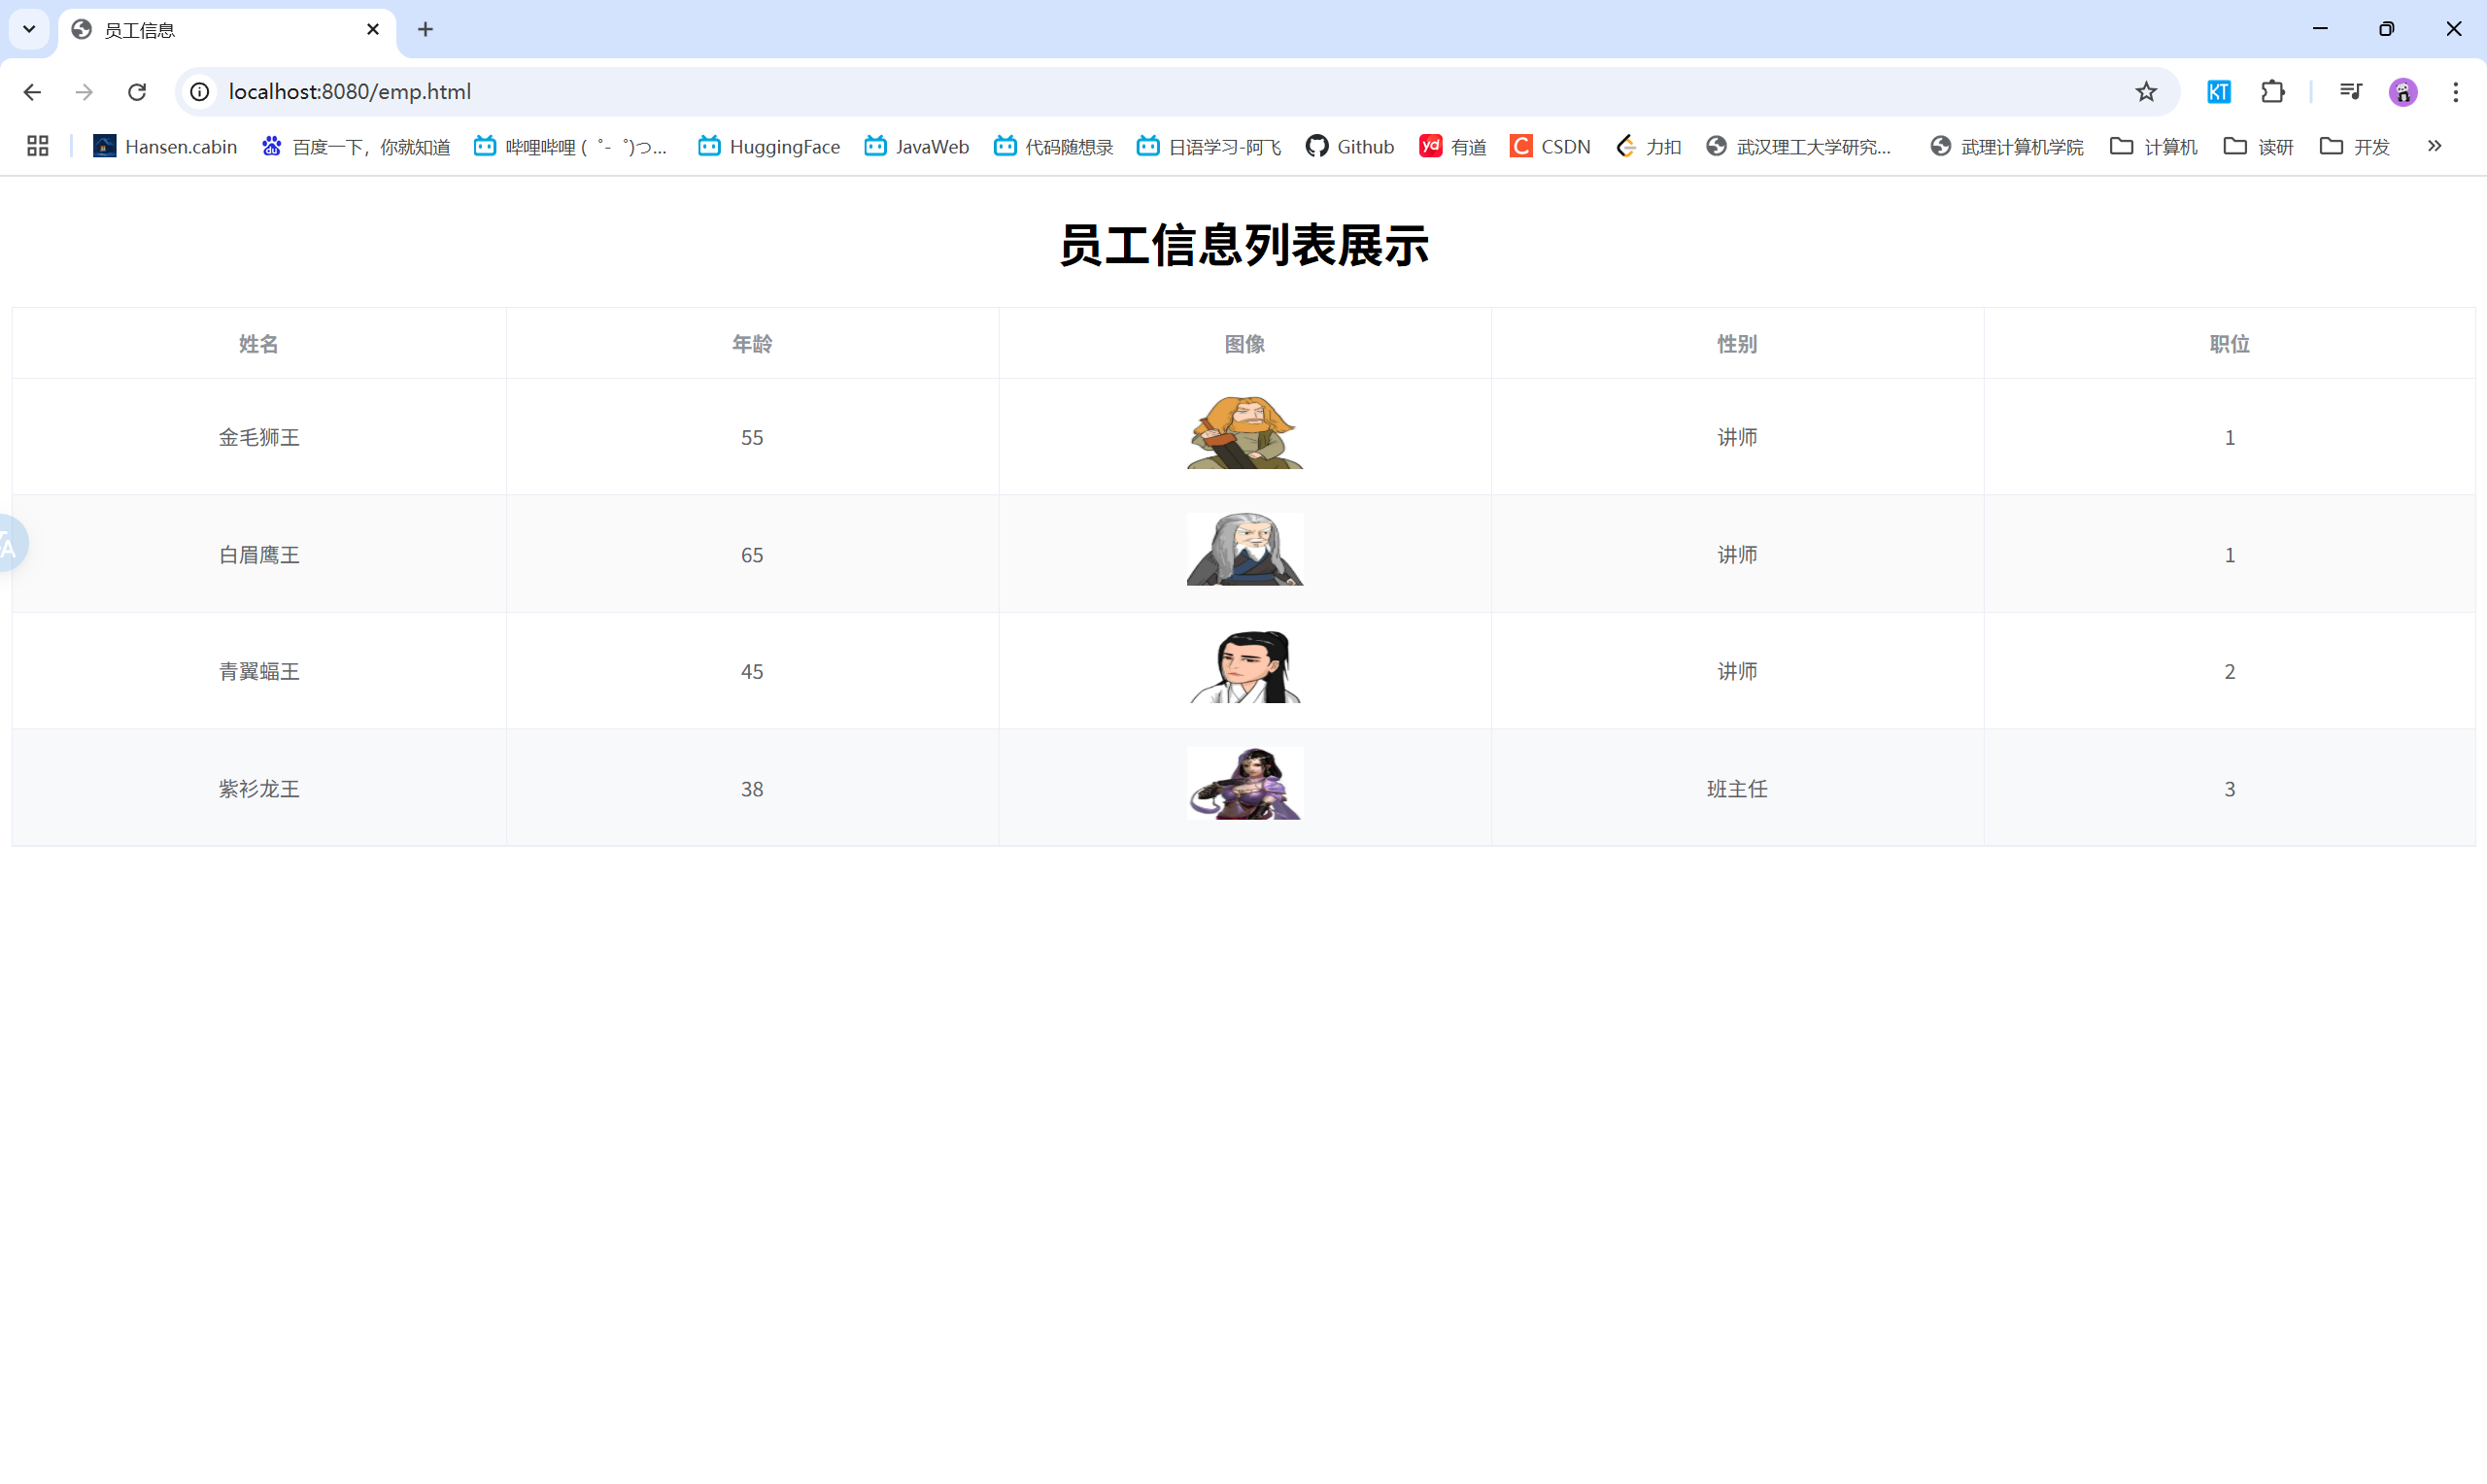
- 需求:获取员工数据,返回统一响应结果,在页面渲染展示
- 步骤:
- 在pom.xml文件中引入dom4j的依赖,用于解析XML文件
- 引入资料中提供的解析XML的工具类XMLParserUtils.对应的实体类Emp.XML文件emp.xml
- 引入资料中提供的静态页面文件,放在resources 下的static目录下
- 编写Controller程序,处理请求,响应数据
1 | // EmpController.java |
1 | <!-- 前端页面emp.html --> |
效果展示:
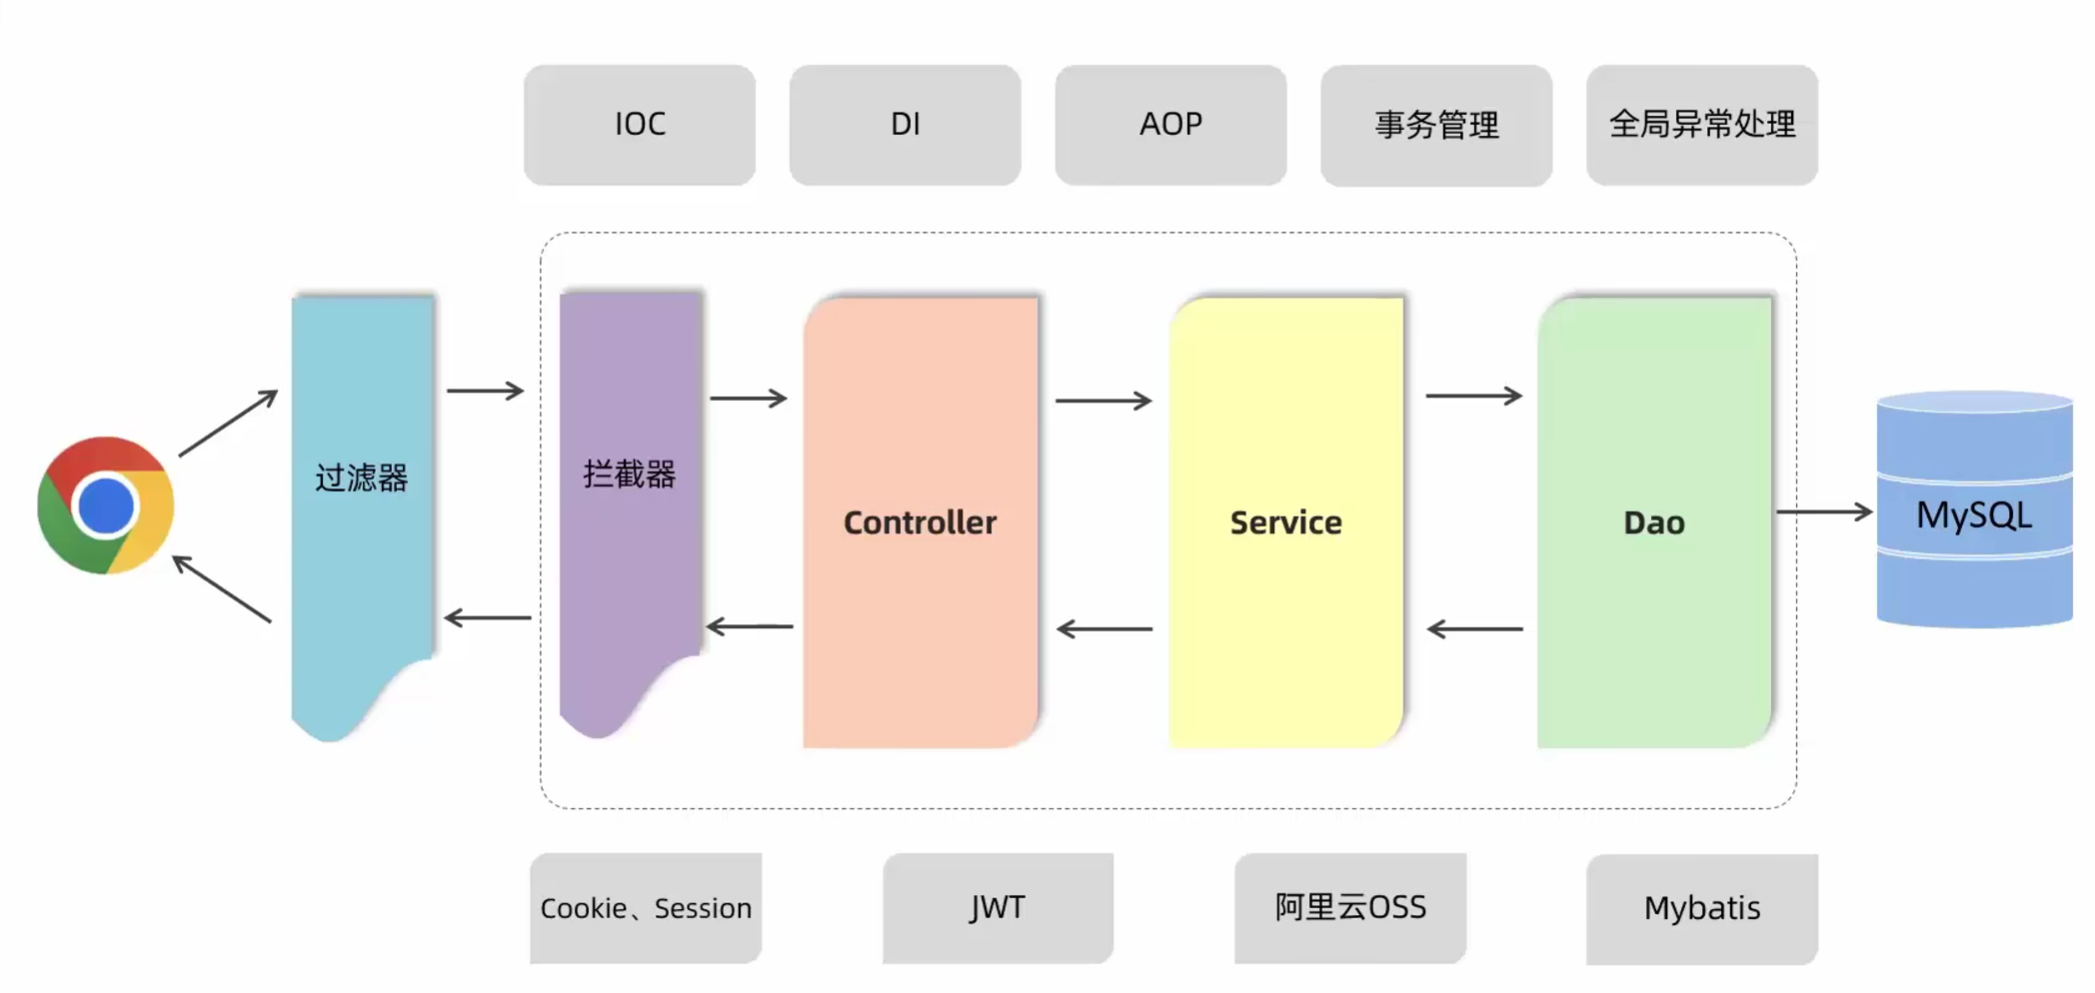
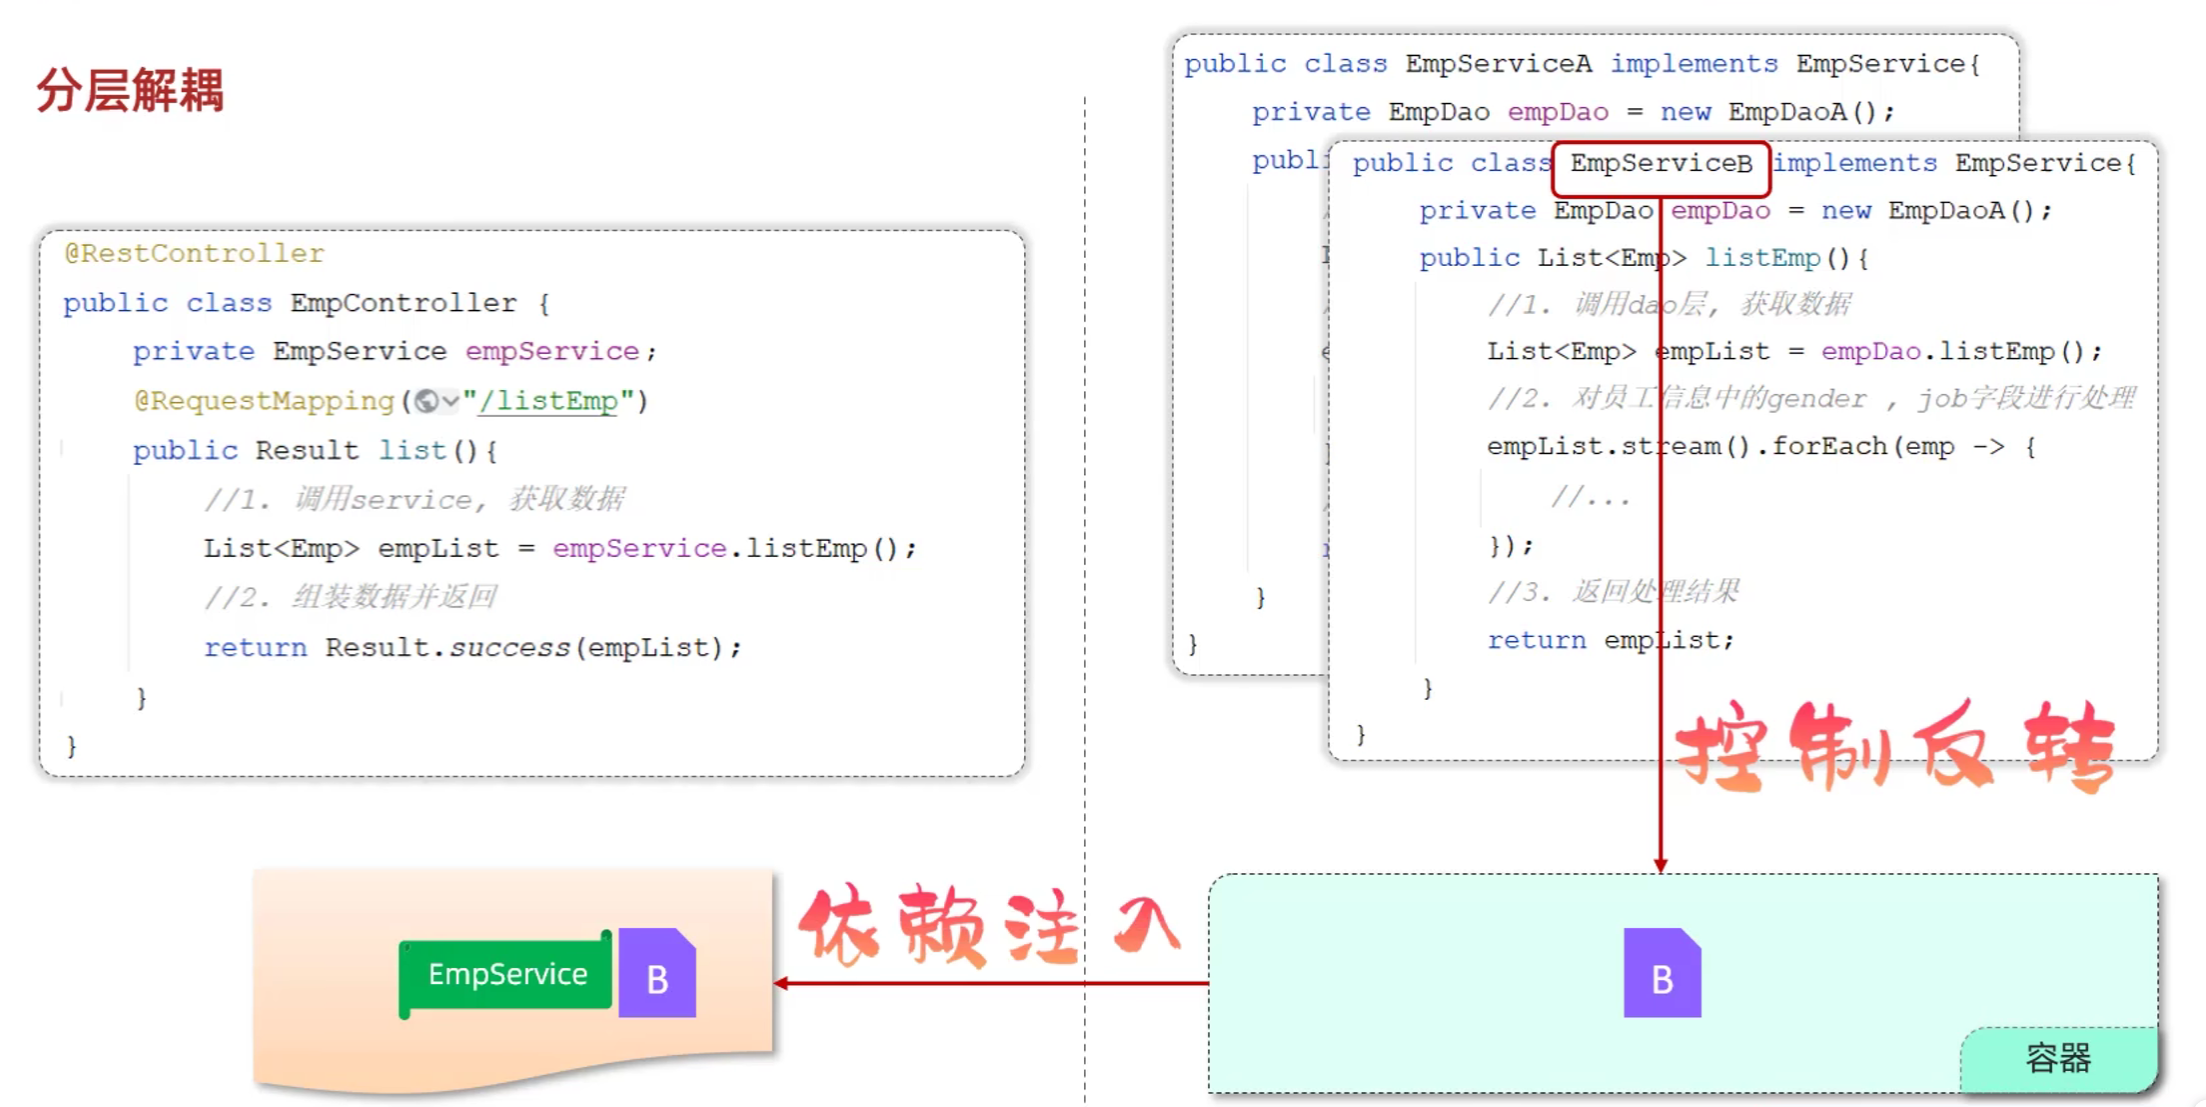
五、分层解耦
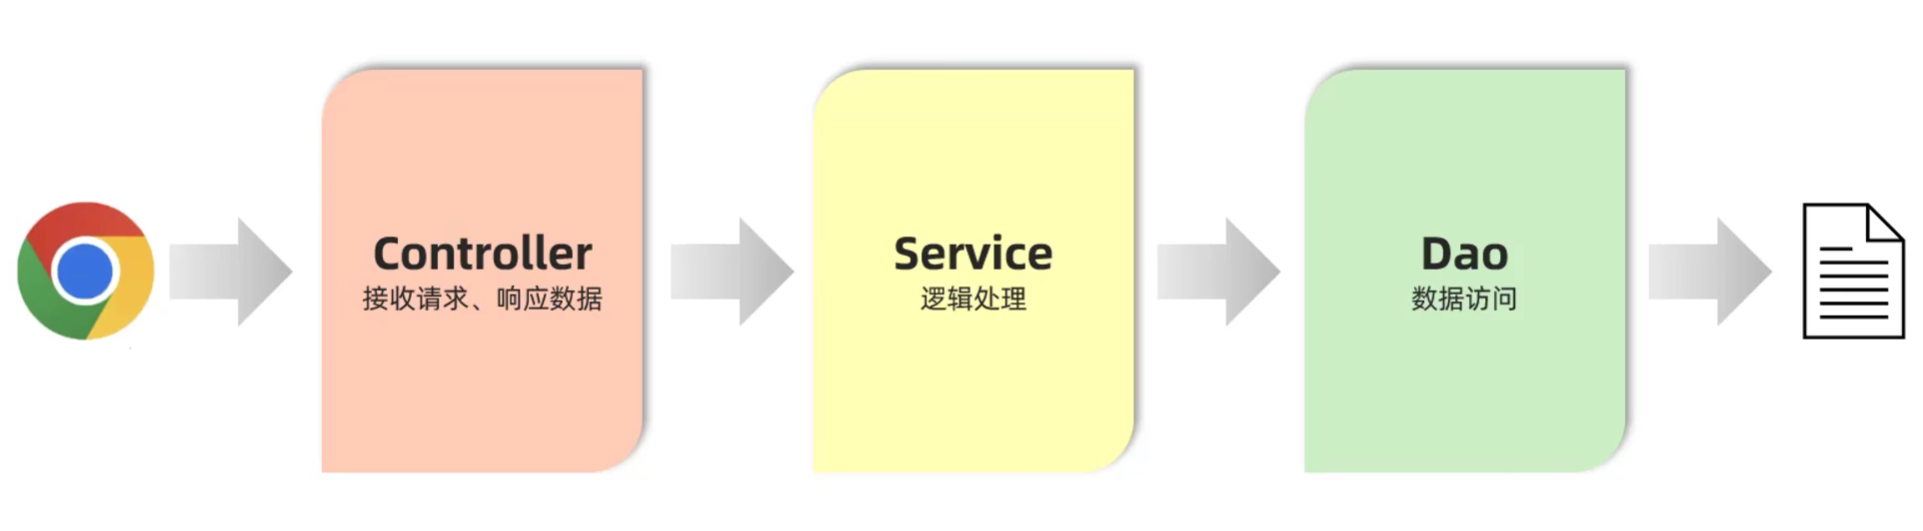
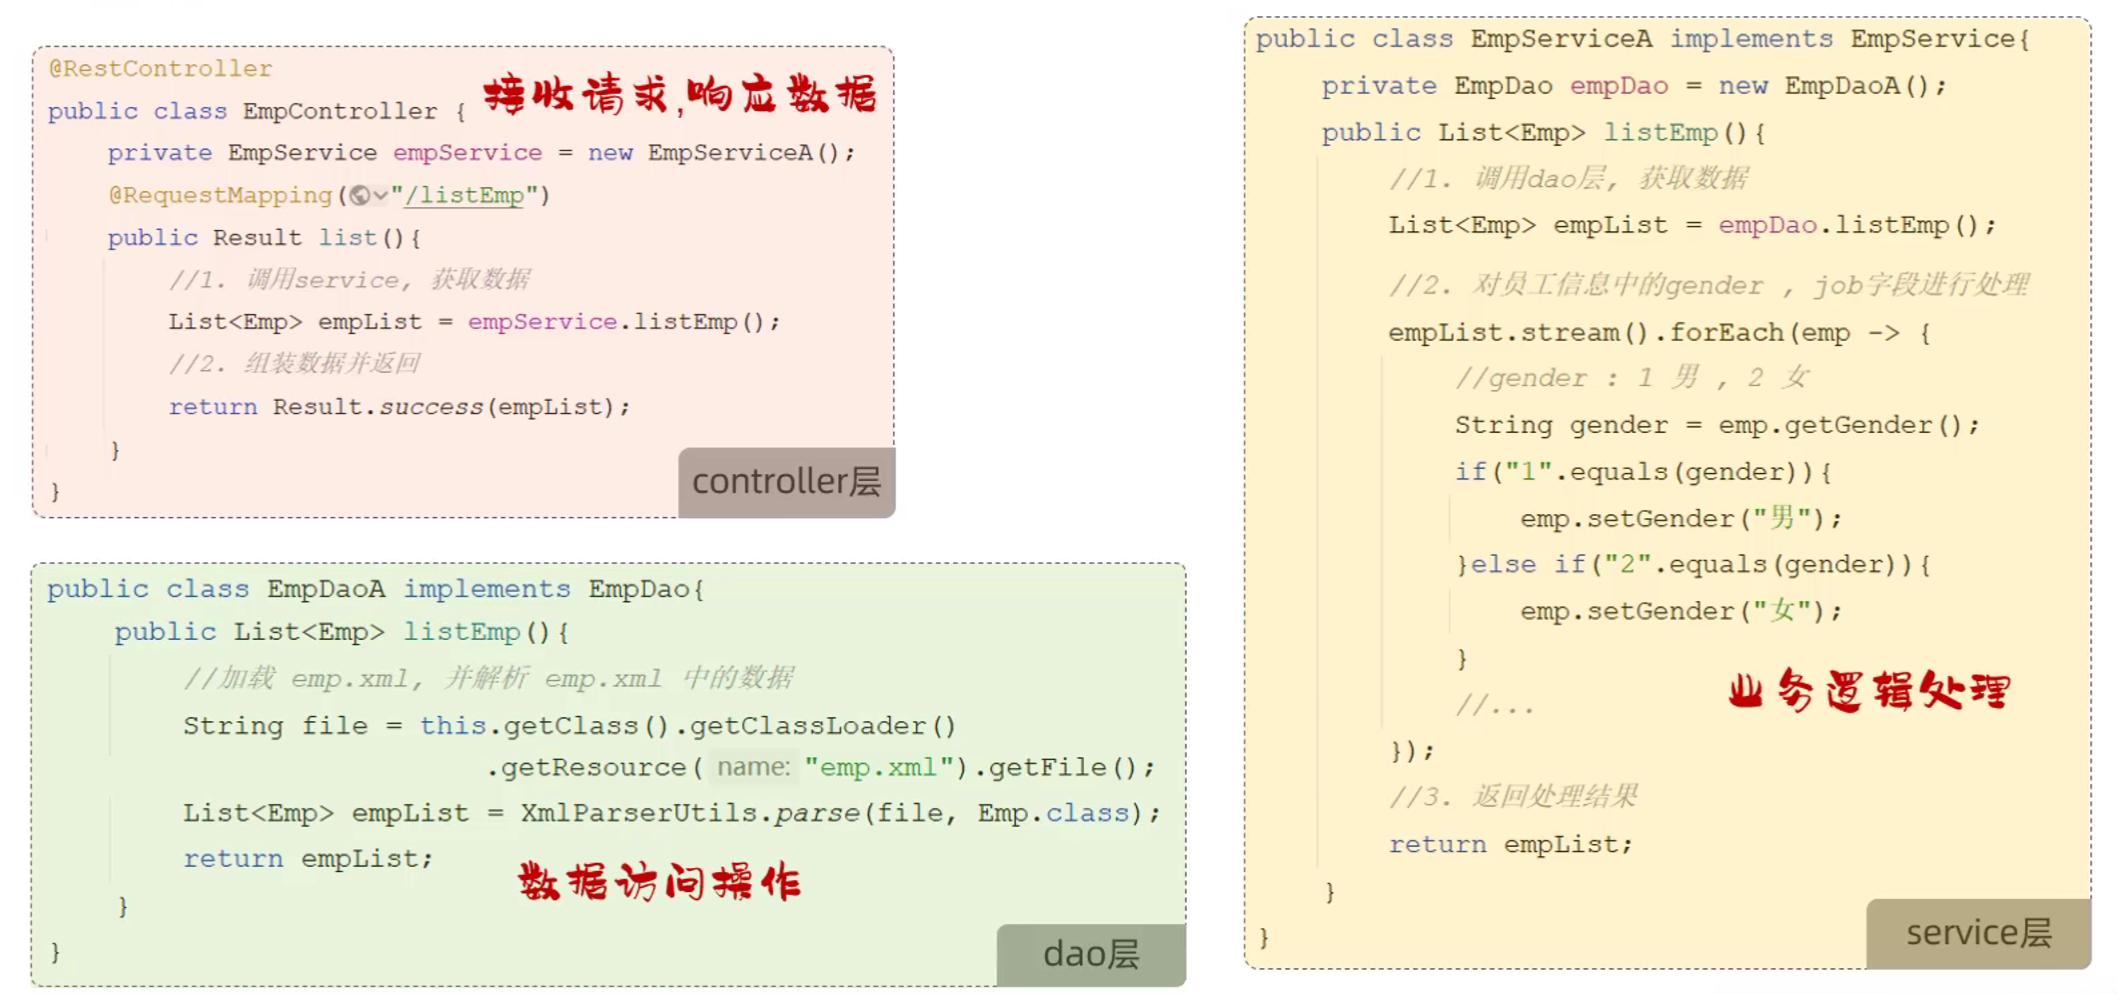
5.1 三层架构
- 三层架构
- controller:控制层,接收前端发送的请求,对请求进行处理,并响应数据
- service:业务逻辑层,处理具体的业务逻辑
- dao:数据访问层(Data Access Object) (持久层) ,负责数据访问操作,包括数据的增、删、改、查
5.2 分层解耦
-
内聚:软件中各个功能模块内部的功能联系
-
耦合:衡量软件中各个层/模块之间的依赖、关联程度
-
软件设计原则:高内聚低耦合
-
控制反转:Inversion Of Control,简称IOC。对象的创建控制权由程序自身转移到外部(容器),这种思想称为控制反转
-
依赖注入: Dependency Injection,简称DI。容器为应用程序提供运行时,所依赖的资源,称之为依赖注入
-
Bean对象: IOC容器中创建、管理的对象,称之为bean
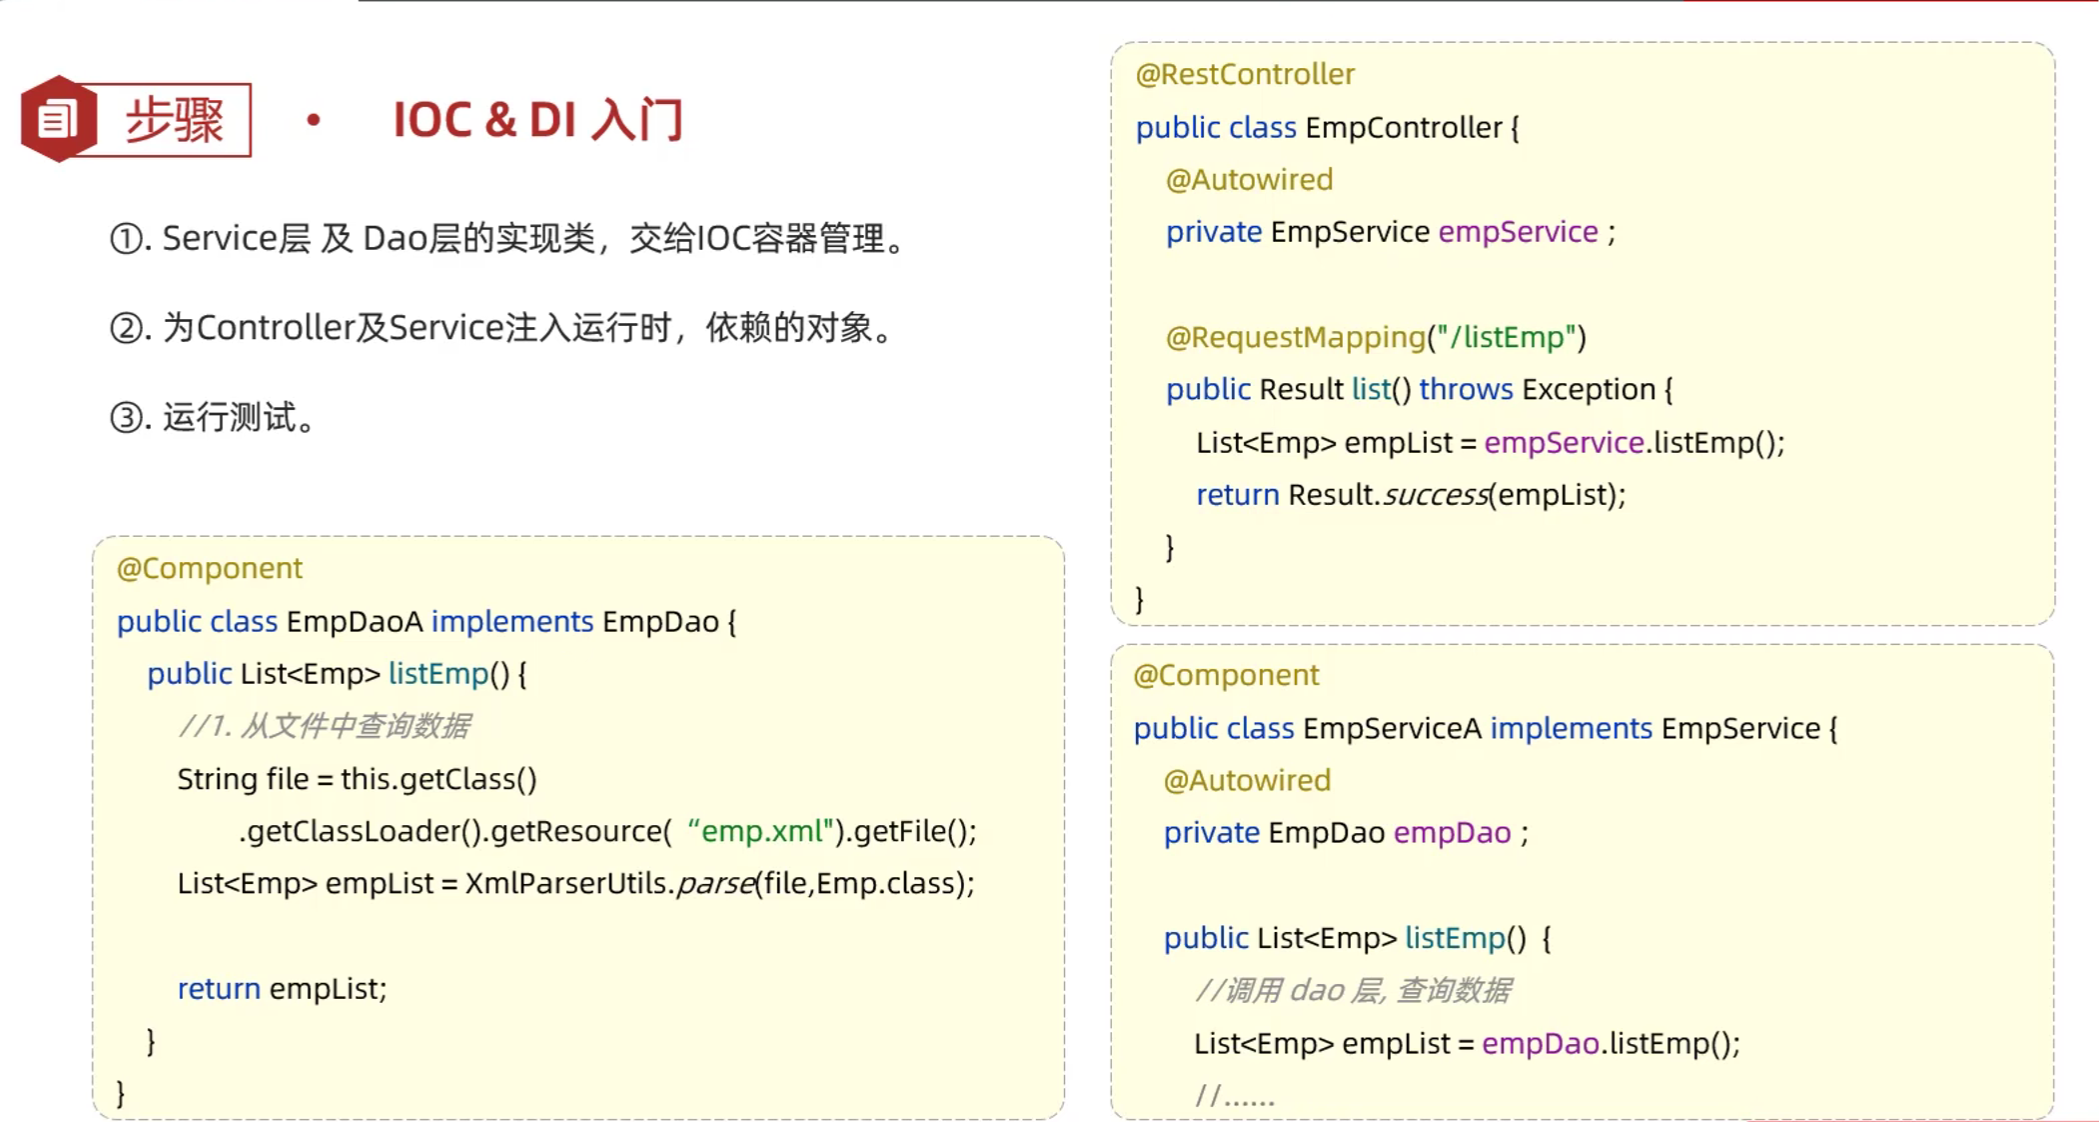
5.3 IOC&DI入门
- Service层及Dao层的实现类,交给IOC容器管理
- 使用@Component注解实现控制反转:将当前类交给IOC容器,成为IOC容器中的bean
- 为Controller及Service注入运行时依赖的对象
- 使用@Autowired注解实现依赖注入:运行时,IOC容器会提供该类型的bean对象,并赋值给该变量
- 运行测试
5.4 IOC详解
- Bean的声明:要把某个对象交给IOC容器管理,需要在对应的类上加上如下注解之一:
| 注解 | 说明 | 位置 |
|---|---|---|
| @Component | 声明bean的基础注解 | 不属于以下三类时用此注解 |
| @Controller | @Component的衍生注解 | 标注在控制器类上 |
| @Service | @Component的衍生注解 | 标注在业务类上 |
| @Repository | @Component的衍生注解 | 标注在数据访问类上(由于与mybatis整合,用的少) |
- 注意事项
- 声明bean时,可以通过value属性指定bean的名称,如果没有指定,默认是类名首字母小写
- 使用以上四个注解都可以声明bean,但是在springboot中,声明控制器bean只能使用@Controller
- Bean组件扫描
- 前面声明bean的四大注解,要想生效,还需要被组件扫描注解@ComponentScan扫描
- @ComponentScan注解虽然没有显式配置,但是实际上已经包含在了启动类声明注解@SpringBootApplication中,默认扫描的范围是启动类所在包及其子包
5.4 DI详解
- Bean注入:
- @Autowired注解,默认是按照类型进行,如果存在多个相同类型的bean,将会出现报错
- 通过以下几种方案来解决
- @Primary——优先注入
- 作用:当一个接口有多个实现类时,使用@Primary标注的Bean会被优先注入
- 示例:
1
2
3
4
5
6
7
8
9
10
11
12
13
14
15
16
17
18
19
20
21
22
23
24public interface MessageService {
void send(String msg);
}
public class EmailService implements MessageService {
public void send(String msg) {
System.out.println("Email: " + msg);
}
}
public class SmsService implements MessageService {
public void send(String msg) {
System.out.println("SMS: " + msg);
}
}
public class NotificationService {
private MessageService messageService; // 注入的是 EmailService,因为它被 @Primary 标记了
} - @Qualifier——明确指定 Bean名称
- 作用:当存在多个实现类时,通过@Qualifier指定你要注入哪一个Bean
- 示例:
1
2
3
4
5
6
7
public class NotificationService {
private MessageService messageService;
} - @Resource——JSR 规范注解(来自Java而不是Spring)
- 作用:和@Autowired类似,用来注入依赖,但注入方式稍有不同。
- 示例:
1
2
3
4
5
6
public class NotificationService {
private MessageService messageService;
}
- @Primary——优先注入
| 注解 | 来源 | 注入方式 | 用法特点 |
|---|---|---|---|
@Autowired |
Spring | 默认按类型 | 最常用,配合 @Qualifier |
@Qualifier |
Spring | 配合 @Autowired 使用,指定注入哪个 Bean |
|
@Primary |
Spring | 当有多个 Bean 时优先使用 | |
@Resource |
JDK(JSR 250) | 默认按名称,再按类型 | 不能配合 @Qualifier,适合简单场景 |

2025.06.01
六、JavaWeb后端开发原理篇
6.1 配置优先级
- 配置:Springboot中支持三种格式的配置文件
- properties格式:
1
server.port=8081
- yml格式
1
2server:
port: 8081- yaml格式
1
2server:
port: 8081- 默认优先级:properties > yml > yaml
- SpringBoot除了支持配置文件属性配置,还支持Java系统属性和命令行参数的方式进行属性配置
- Java系统属性:-Dserver.port=8081
- 命令行参数:–server.port=8081
- 优先级:命令行参数 > Java系统属性
6.2 Bean管理
6.2.1 获取bean
- 默认情况下,Spring项目启动时,会把bean都创建好放在IOC容器中,如果想要主动获取这些bean,可以通过如下方式获取:
- 根据name获取bean:Object getBean(String name)
- 根据类型获取bean:<T> T getBean(Class<T> requiredType)
- 根据name获取bean(带类型转换):<T> T getBean(String name, Class<T> requiredType)
- 示例:
1 |
|
6.2.2 bean的作用域
- Bean的作用域:Spring支持五种作用域,后三种在web环境才生效
| 作用域 | 说明 |
|---|---|
| singleton | 单例模式,默认值,容器中只会存在一个bean实例 |
| prototype | 多例模式,每次获取bean都会创建一个新的实例 |
| request | 请求模式,每次请求都会创建一个新的实例,适用于web环境 |
| session | 会话模式,每个会话都会创建一个新的实例,适用于web环境 |
| application | 应用模式,整个应用中只会存在一个实例,适用于web环境 |
- 可以通过@Scope注解来设置bean的作用域
1 |
|
- 注意事项
- 默认singleton的bean,在容器启动时被创建,可以使用@Lazy注解来延迟初始化(延迟到第一次使用时)
- prototype的bean,每一次使用该bean的时候都会创建一个新的实例
- 实际开发当中,绝大部分的Bean是单例的,也就是说绝大部分Bean不需要配置scope属性
6.2.3 第三方bean
- 如果要管理的bean对象来自于第三方(不是自定义的),是无法用@Component及衍生注解声明bean的,就需要用到@Bean注解
- 若要管理第三方bean对象,建议对这些bean进行集中分类配置,可以通过@Configuration注解声明一个配置类
- 示例:
1 | package com.itheima.config; |
- @Component及衍生注解与@Bean注解使用场景
- 项目中自定义的,使用@Component及衍生注解
- 第三方的,使用@Bean注解
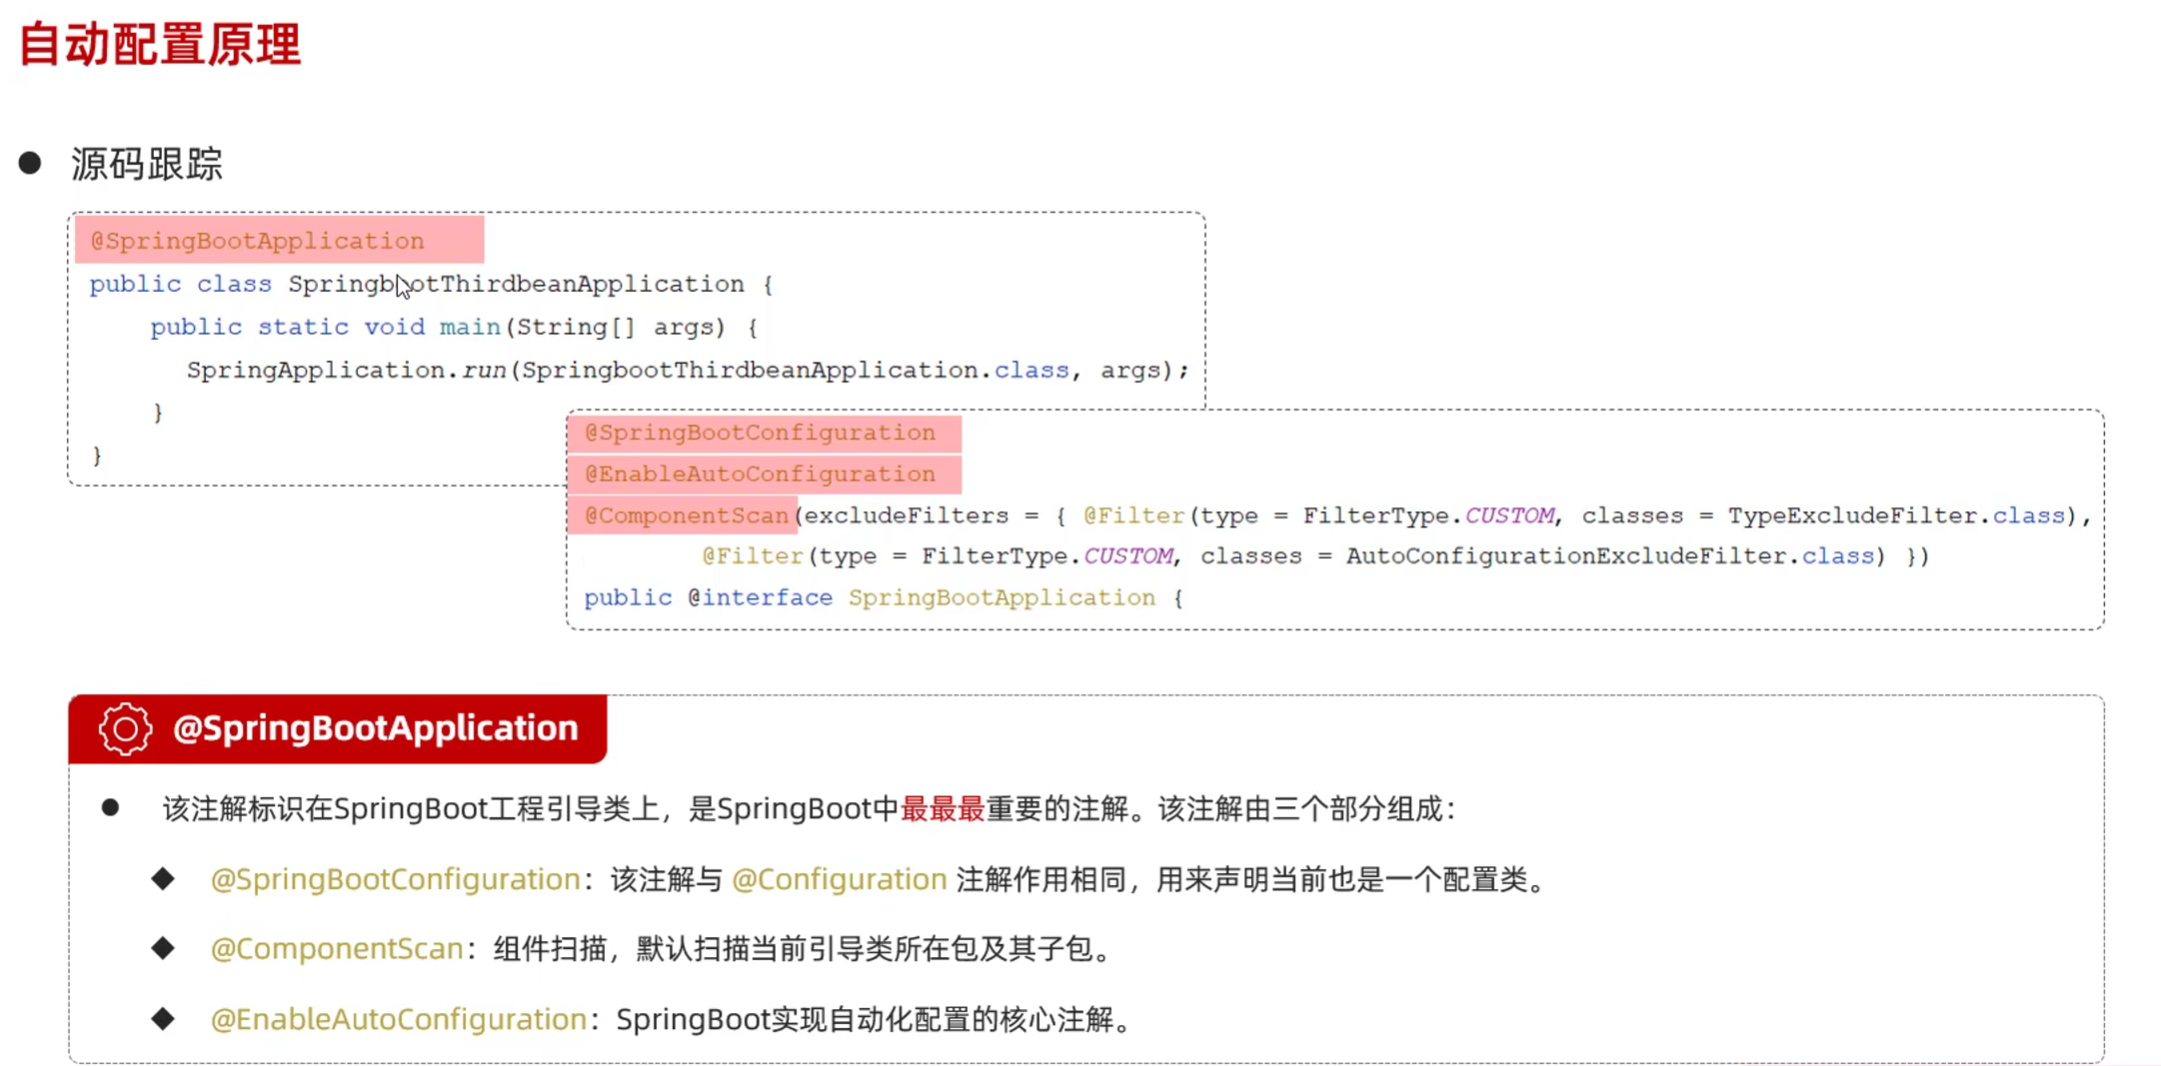
6.4 Springboot原理-自动配置
6.4.1 自动配置概述
- 自动配置
- SpringBoot的自动配置就是当spring容器启动后,一些配置类、bean对象就自动存入到了I0C容器中,不需要我们手动去声明,从而简化了开发,省去了繁琐的配置操作
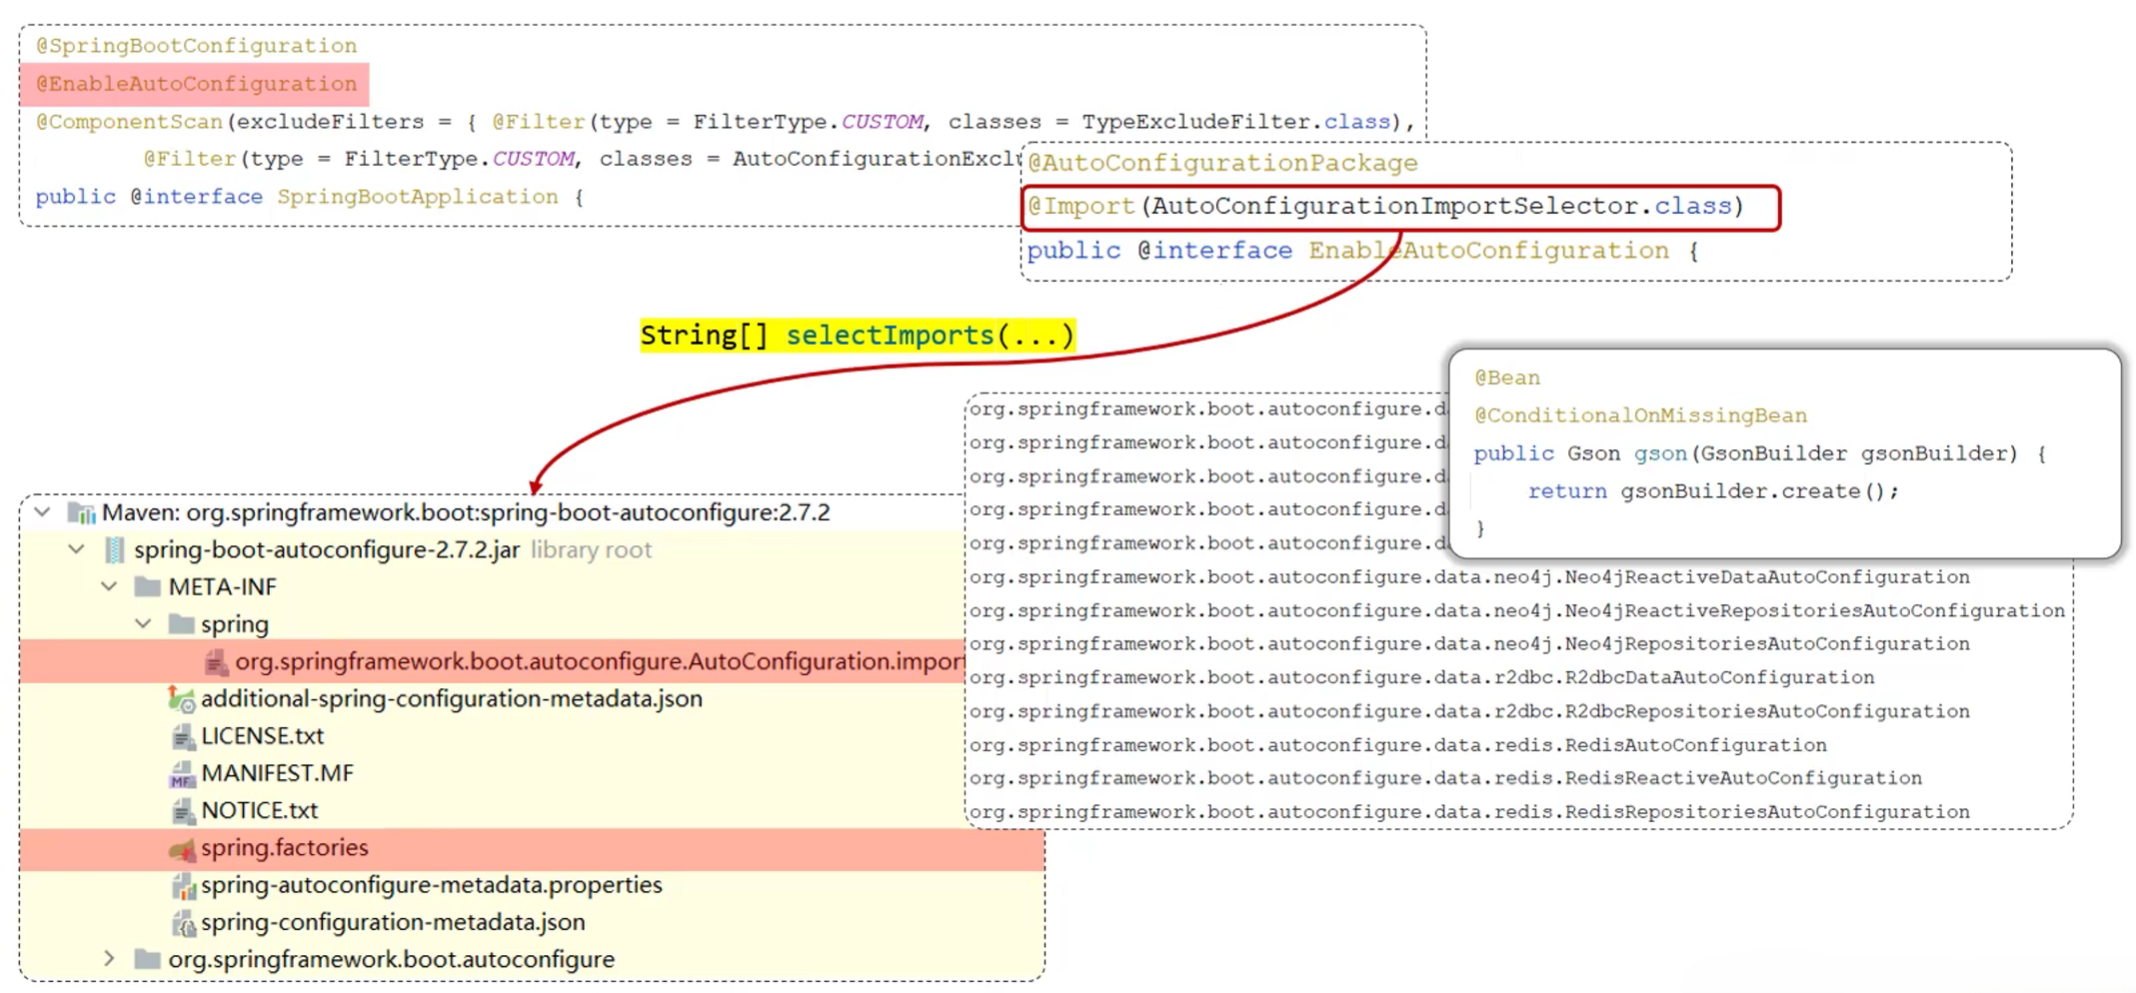
6.4.2 自动配置原理
- 自动配置原理
- 方案一:@ComponentScan组件扫描
1
2
3
4
public class SpringbootTliasApplication {
}- 方案二:@Import导入。使用@Import导入的类会被Spring加载到IOC容器中,导入形式主要有以下几种
- 导入普通类
- 导入配置类
- 导入ImportSelector接口实现类
- @EnableXxxx注解,封装@Import注解(第三方依赖提供)
1
2
3
4
5
6
7// @Import(TokenParser.class) // 导入普通类
// @Import(HeaderConfig.class) // 导入配置类
// @Import({MyImportSelector.class}) // 导入ImportSelector接口实现类
// 导入@EnableXxxx注解,封装@Import注解
public class SpringbootTliasApplication {
} - 源码跟踪
6.4.3 @Conditional注解
- @Conditional注解
- 作用:按照条件注册对应的bean对象到IOC容器中
- 位置:方法、类
- @Conditional本身是一个父注解,派生出大量的子注解
- @ConditionalOnClass:判断环境中是否有指定类(不是需要注入的类)的字节码文件,才注册bean到IOC容器中
- @ConditionalOnMissingClass:判断环境中是否没有对应(需要注入的类或指定类)的字节码文件,才注册bean到IOC容器中
- @ConditionalOnProperty:判断配置文件中有对应属性和值,才注册bean到IOC容器中
- 示例
1 |
|
6.5 案例
- 需求:自定义aliyun-oss-spring-boot-starter,完成阿里云OSS操作工具类AliyunOSSUtils的自动配置
- 目标:引入起步依赖后,要想使用阿里云OSS,注入AliyunOSSUtils直接使用即可
- 步骤
- 创建aliyun-oss-spring-boot-starter模块
- 创建aliyun-oss-spring-boot-autoconfigure模块,在starter中引入该模块
- 在aliyun-oss-spring-boot-autoconfigure模块中定义自动配置功能,并定义自动配置文件META-INF/spring/xxxx.imports
实现:
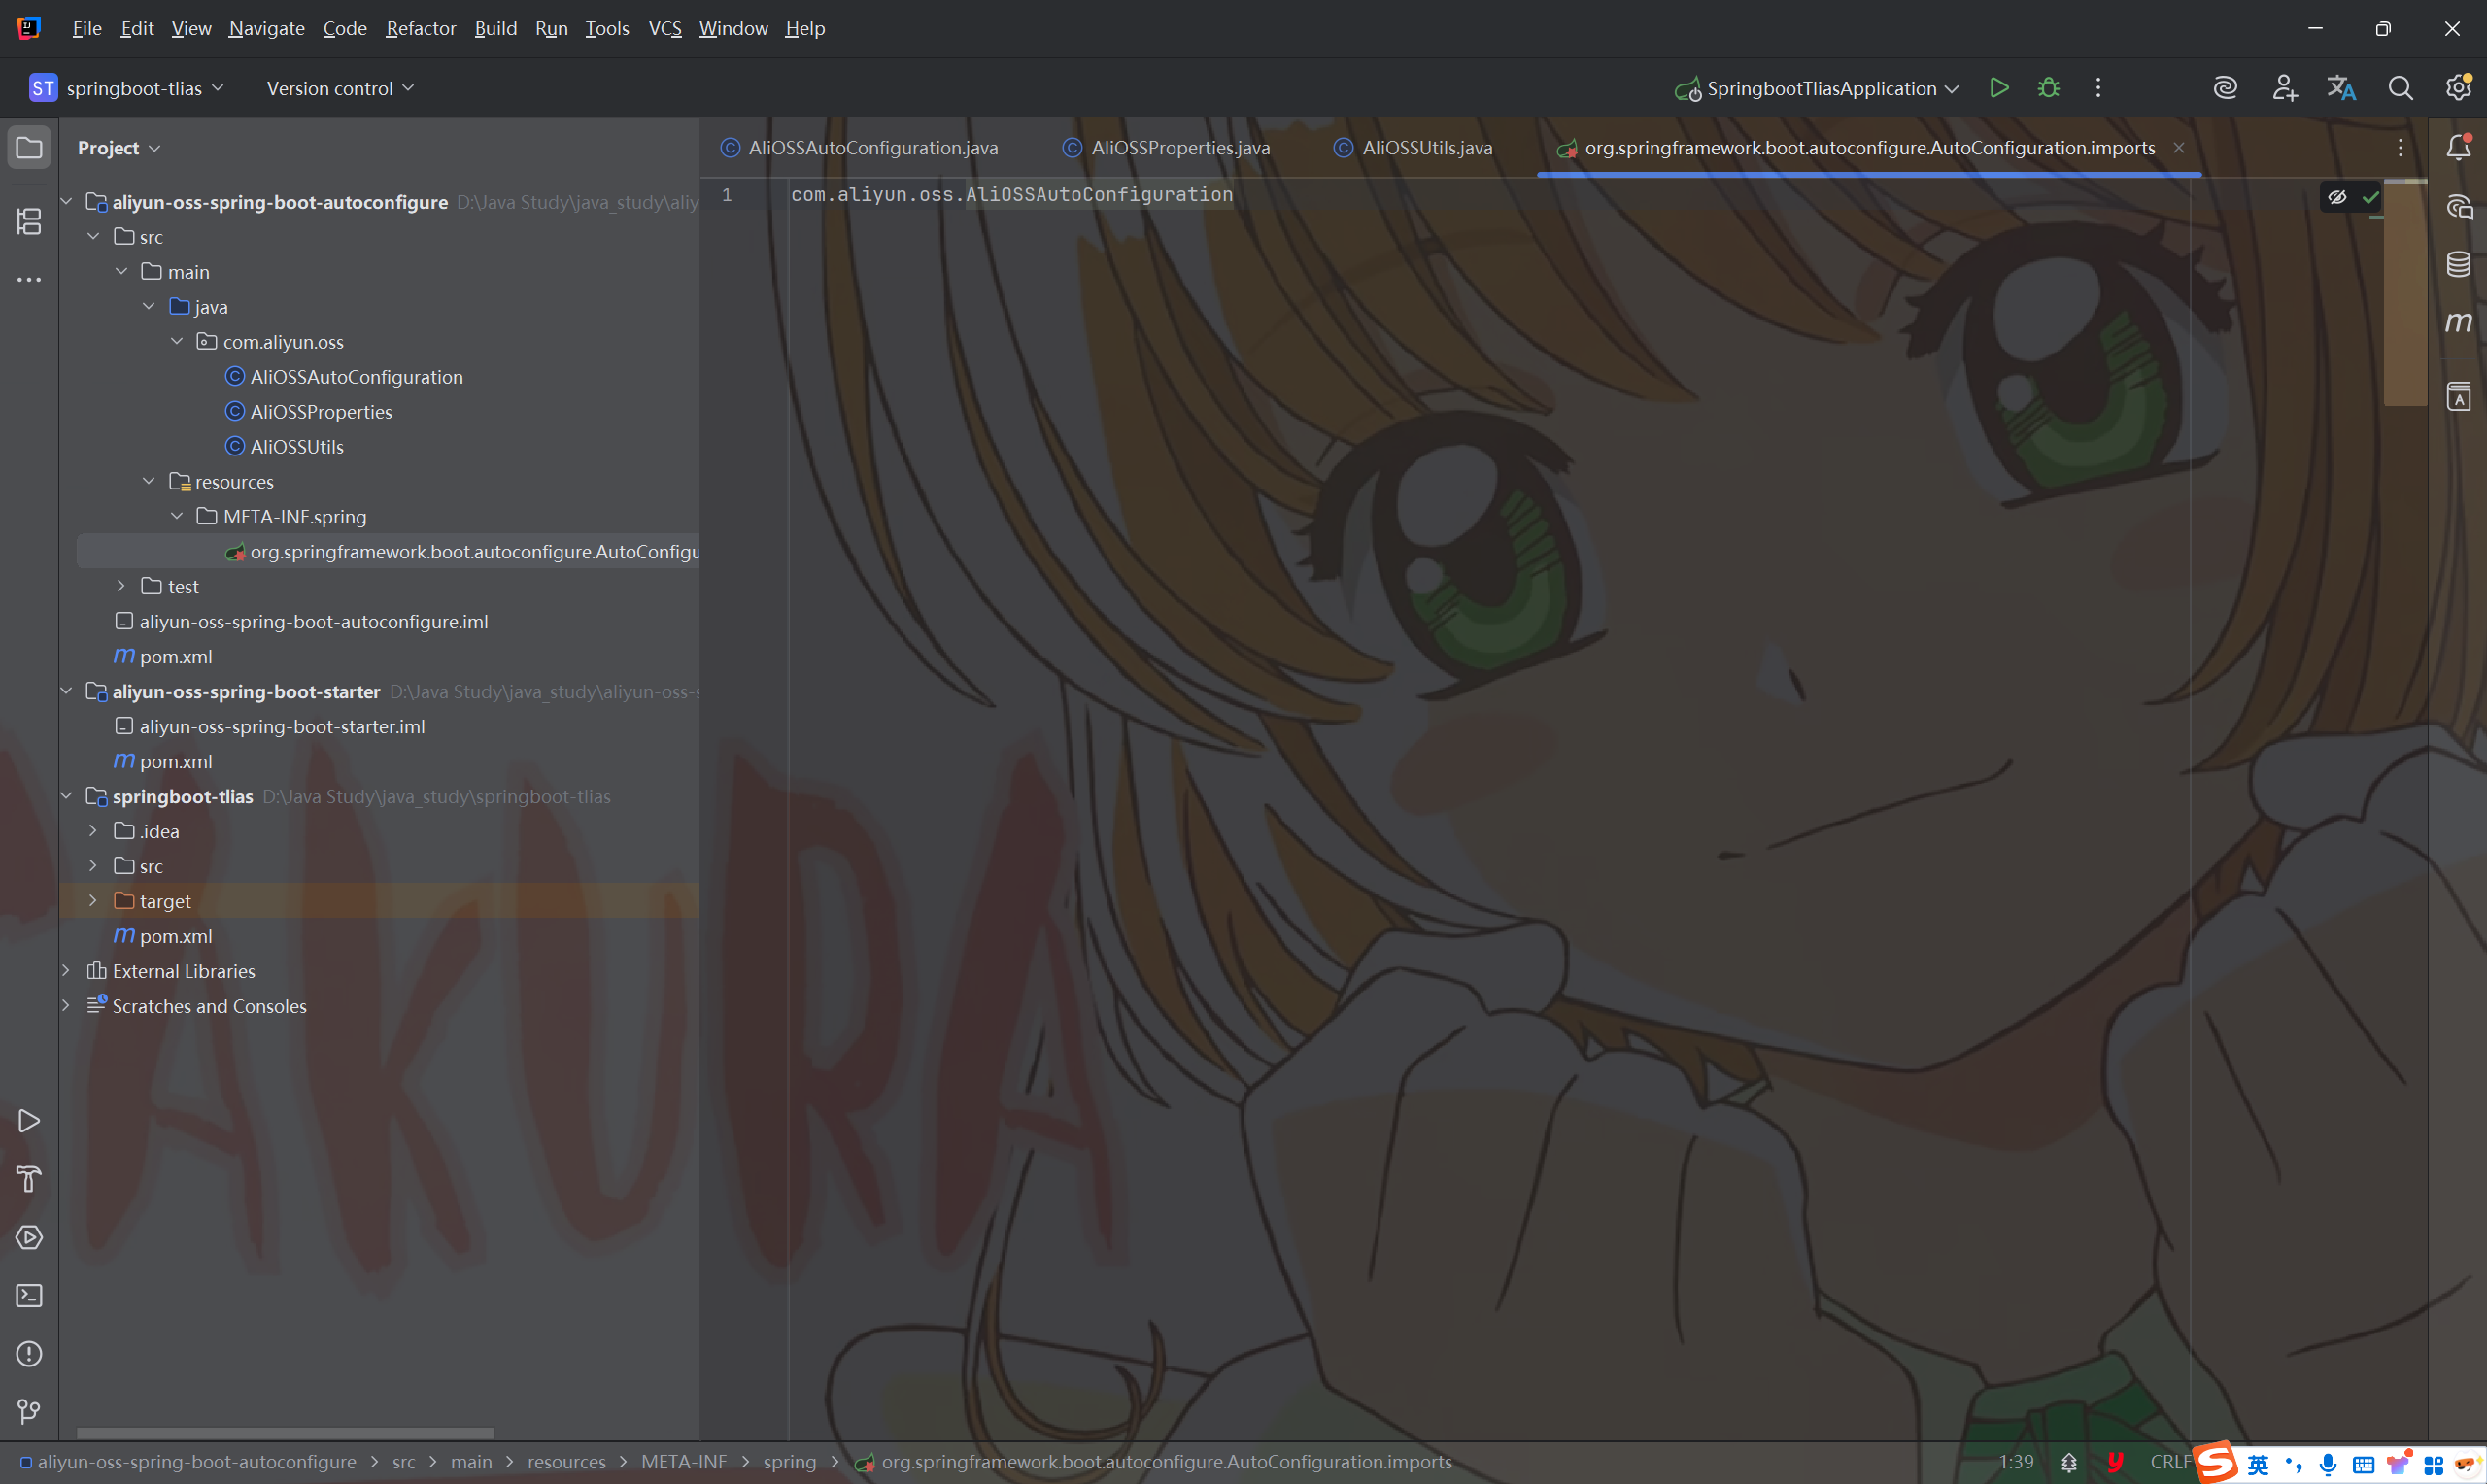
- AliOSSAutoconfigure.java
1 | package com.aliyun.oss; |
七、JavaWeb总结