2025.04.24
Java 多线程&JUC
一、多线程概述
1.1 多线程的概念
线程:线程是操作系统能够进行运算调度的最小单位。它被包含在进程之中,使进程中的实际运作单位
进程:进程是程序的基本执行实体
多线程:多线程是指在同一进程中并发执行多个线程的技术。多线程可以提高程序的执行效率和响应能力
多线程的应用场景
软件中的耗时操作
所有的聊天软件
所有的后台服务器
1.2 并发和并行
并发:在同一时刻,有多个指令在单个CPU上交替执行
并行:在同一时刻,有多个指令在多个CPU上同时执行
二、多线程的实现方式
2.1 继承Thread类
继承Thread类的方式实现多线程
步骤:
自己定义一个类继承Thread
重写run方法
创建子类的对象,并启动线程
示例:
1 2 3 4 5 6 7 8 9 public class MyThread extends Thread { @Override public void run () { for (int i = 0 ; i < 3 ; i++) { System.out.println(getName() + "Hello, World!" ); } } }
1
2
3
4
5
6
7
8
9
10
11
12
13
14
15
16
17
18
19
20
21
22
23
24
25
26
27
public class ThreadDemo1 { public static void main (String[] args) { MyThread myThread1 = new MyThread (); MyThread myThread2 = new MyThread (); myThread1.setName("线程1" ); myThread2.setName("线程2" ); myThread1.start(); myThread2.start(); } }
2.2 实现Runnable接口
实现Runnable接口的方式实现多线程
步骤:
自己定义一个类实现Runnable接口
重写run方法
创建Runnable接口的实现类对象,并将其作为参数传递给Thread类的构造方法
调用Thread类的start方法启动线程
示例:
1 2 3 4 5 6 7 8 9 public class MyRun implements Runnable { @Override public void run () { for (int i = 0 ; i < 3 ; i++) { System.out.println(Thread.currentThread().getName() + "Hello, World!" ); } } }
1
2
3
4
5
6
7
8
9
10
11
12
13
14
15
16
17
18
19
20
21
22
23
24
25
26
27
28
29
30
public class Main { public static void main (String[] args) { MyRun myRun = new MyRun (); Thread t1 = new Thread (myRun); Thread t2 = new Thread (myRun); t1.setName("线程1" ); t2.setName("线程2" ); t1.start(); t2.start(); } }
2.3 Callable接口和Future接口
Callable接口和Future接口的方式实现多线程
特点:
Callable接口可以有返回值,而Runnable接口不能有返回值
Callable接口可以抛出异常,而Runnable接口不能抛出异常
步骤:
自己定义一个类MyCallable实现Callable接口
重写call方法(有返回值,表示多线程运行的结果)
创建Callable接口的实现类对象(表示多线程要执行的任务)
创建FutureTask对象(用于管理多线程运行的结果)
创建Thread对象,并启动线程
示例:
1 2 3 4 5 6 7 8 9 10 11 12 13 import java.util.concurrent.Callable;public class MyCallable implements Callable <Integer> { @Override public Integer call () throws Exception { int sum = 0 ; for (int i = 0 ; i <= 100 ; i++) { sum += i; } return sum; } }
1
2
3
4
5
6
7
8
9
10
11
12
13
14
15
16
17
18
19
20
21
22
23
24
25
26
27
import java.util.concurrent.ExecutionException;import java.util.concurrent.FutureTask;public class Main { public static void main (String[] args) throws ExecutionException, InterruptedException { MyCallable mc = new MyCallable (); FutureTask<Integer> ft = new FutureTask <Integer>(mc); Thread t1 = new Thread (ft); t1.start(); Integer result = ft.get(); System.out.println(result); } }
2.4 三种实现方式对比
优点
缺点
继承Thread类
编程比较简单,可以直接使用Thread类中的方法
可以扩展性较差,不能再继承其他类
实现Runnable接口
扩展性强,实现该接口的同时还可以继承其他类
编程相对复杂,不能直接使用Thread类中的方法
实现Callable接口
扩展性强,实现该接口的同时还可以继承其他类
编程相对复杂,不能直接使用Thread类中的方法
三、常见的成员方法
String getName():返回此线程的名称
void setName(String name):设置此线程的名称
static Thread currentThread():返回对当前正在执行的线程对象
static void sleep(long millis):使当前线程休眠指定的毫秒数
setPriority(int newPriority):设置线程的优先级
final int getPriority():返回线程的优先级
final void setDaemon(boolean on):将线程设置为守护线程
public static void yield():出让线程/礼让线程
public static void join():插入线程/插队线程
3.1 getName()、setName()、currentThread()和sleep()
String getName():返回此线程的名称
如果没有设置名字,默认名字为Thread-X,X为序号,从0开始
void setName(String name):设置此线程的名称
线程名称也可以使用构造方法设置
使用构造方法时需要在子类中继承父类的构造方法
static Thread currentThread():返回对当前正在执行的线程对象
当JVM虚拟机启动之后会自动启动多条线程,其中有一条线程叫做main线程
main线程作用就是调用main方法,并执行里面的代码
static void sleep(long millis):使当前线程休眠指定的毫秒数
哪条线程执行到这个方法,就会在这里停留对应的时间
时间到了之后线程会自动醒来,继续执行后面的代码
示例:
1 2 3 4 5 6 7 8 9 10 11 12 13 14 15 16 17 public class MyThread extends Thread { public MyThread () { } public MyThread (String name) { super (name); } @Override public void run () { for (int i = 0 ; i < 10 ; i++) { System.out.println(getName() + "@" + i); } } }
1
2
3
4
5
6
7
8
9
10
11
12
13
14
15
16
17
18
19
20
21
22
23
24
25
26
27
28
29
30
31
32
33
34
35
36
37
38
39
40
public class Main { public static void main (String[] args) throws InterruptedException { MyThread t1 = new MyThread ("线程1" ); MyThread t2 = new MyThread ("线程2" ); t1.start(); t2.start(); } }
3.2 setPriority()和getPriority()
抢占式调度:线程的优先级越高,越有可能获得CPU的使用权
非抢占式调度:线程的优先级越高,越有可能获得CPU的使用权,但不一定会获得CPU的使用权
优先级范围:1-10
1:MIN_PRIORITY:最低优先级
5:NORM_PRIORITY:默认优先级
10:MAX_PRIORITY:最高优先级
线程的优先级只是一个概率,优先级高的线程不一定会先执行
setPriority(int newPriority):设置线程的优先级
final int getPriority():返回线程的优先级
示例:
1 2 3 4 5 6 7 8 9 public class MyRunnable implements Runnable { @Override public void run () { for (int i = 0 ; i < 10 ; i++) { System.out.println(Thread.currentThread().getName() + "@" + i); } } }
1
2
3
4
5
6
7
8
9
10
11
12
13
14
15
16
17
18
19
20
21
22
23
24
25
26
27
28
29
30
31
32
33
34
35
36
37
38
39
40
41
42
43
public class Main { public static void main (String[] args) { MyRunnable myRunnable = new MyRunnable (); Thread t1 = new Thread (myRunnable, "线程1" ); Thread t2 = new Thread (myRunnable, "线程2" ); t1.setPriority(10 ); t2.setPriority(1 ); System.out.println(t1.getPriority()); System.out.println(t2.getPriority()); t1.start(); t2.start(); } }
3.3 setDaemon()
final void setDaemon(boolean on):将线程设置为守护线程
当其他的非守护线程执行完毕之后,守护线程会陆续结束
示例:
1 2 3 4 5 6 7 8 9 public class MyThread1 extends Thread { @Override public void run () { for (int i = 0 ; i < 10 ; i++) { System.out.println(getName() + "@" + i); } } }
1 2 3 4 5 6 7 8 9 public class MyThread2 extends Thread { @Override public void run () { for (int i = 0 ; i < 100 ; i++) { System.out.println(getName() + "@" + i); } } }
1
2
3
4
5
6
7
8
9
10
11
12
13
14
15
16
17
18
19
20
21
22
23
24
25
26
27
28
29
30
31
32
33
34
35
36
37
38
public class Main { public static void main (String[] args) { MyThread1 t1 = new MyThread1 (); MyThread2 t2 = new MyThread2 (); t1.setName("线程1" ); t2.setName("线程2" ); t2.setDaemon(true ); t1.start(); t2.start(); } }
3.4 yield()
public static void yield():出让线程/礼让线程
让当前线程出让CPU的使用权,当前线程会进入就绪状态
示例:
1 2 3 4 5 6 7 8 9 10 11 public class MyThread extends Thread { @Override public void run () { for (int i = 0 ; i < 10 ; i++) { System.out.println(getName() + "@" + i); Thread.yield (); } } }
1
2
3
4
5
6
7
8
9
10
11
12
13
14
15
16
17
18
19
20
21
22
23
24
25
26
27
28
29
30
31
32
33
34
35
36
public class Main { public static void main (String[] args) { MyThread t1 = new MyThread (); MyThread t2 = new MyThread (); t1.setName("线程1" ); t2.setName("线程2" ); t1.start(); t2.start(); } }
3.5 join()
public static void join():插入线程/插队线程
将当前线程插入到指定线程的后面,等待指定线程执行完毕之后,当前线程才会继续执行
示例:
1 2 3 4 5 6 7 8 9 10 11 public class MyThread extends Thread { @Override public void run () { for (int i = 0 ; i < 5 ; i++) { System.out.println(getName() + "@" + i); Thread.yield (); } } }
1
2
3
4
5
6
7
8
9
10
11
12
13
14
15
16
17
18
19
20
21
22
23
24
25
26
27
28
public class Main { public static void main (String[] args) throws InterruptedException { MyThread t = new MyThread (); t.setName("线程1" ); t.start(); t.join(); for (int i = 0 ; i < 5 ; i++) { System.out.println("main线程" + "@" + i); } } }
四、线程的生命周期和安全问题
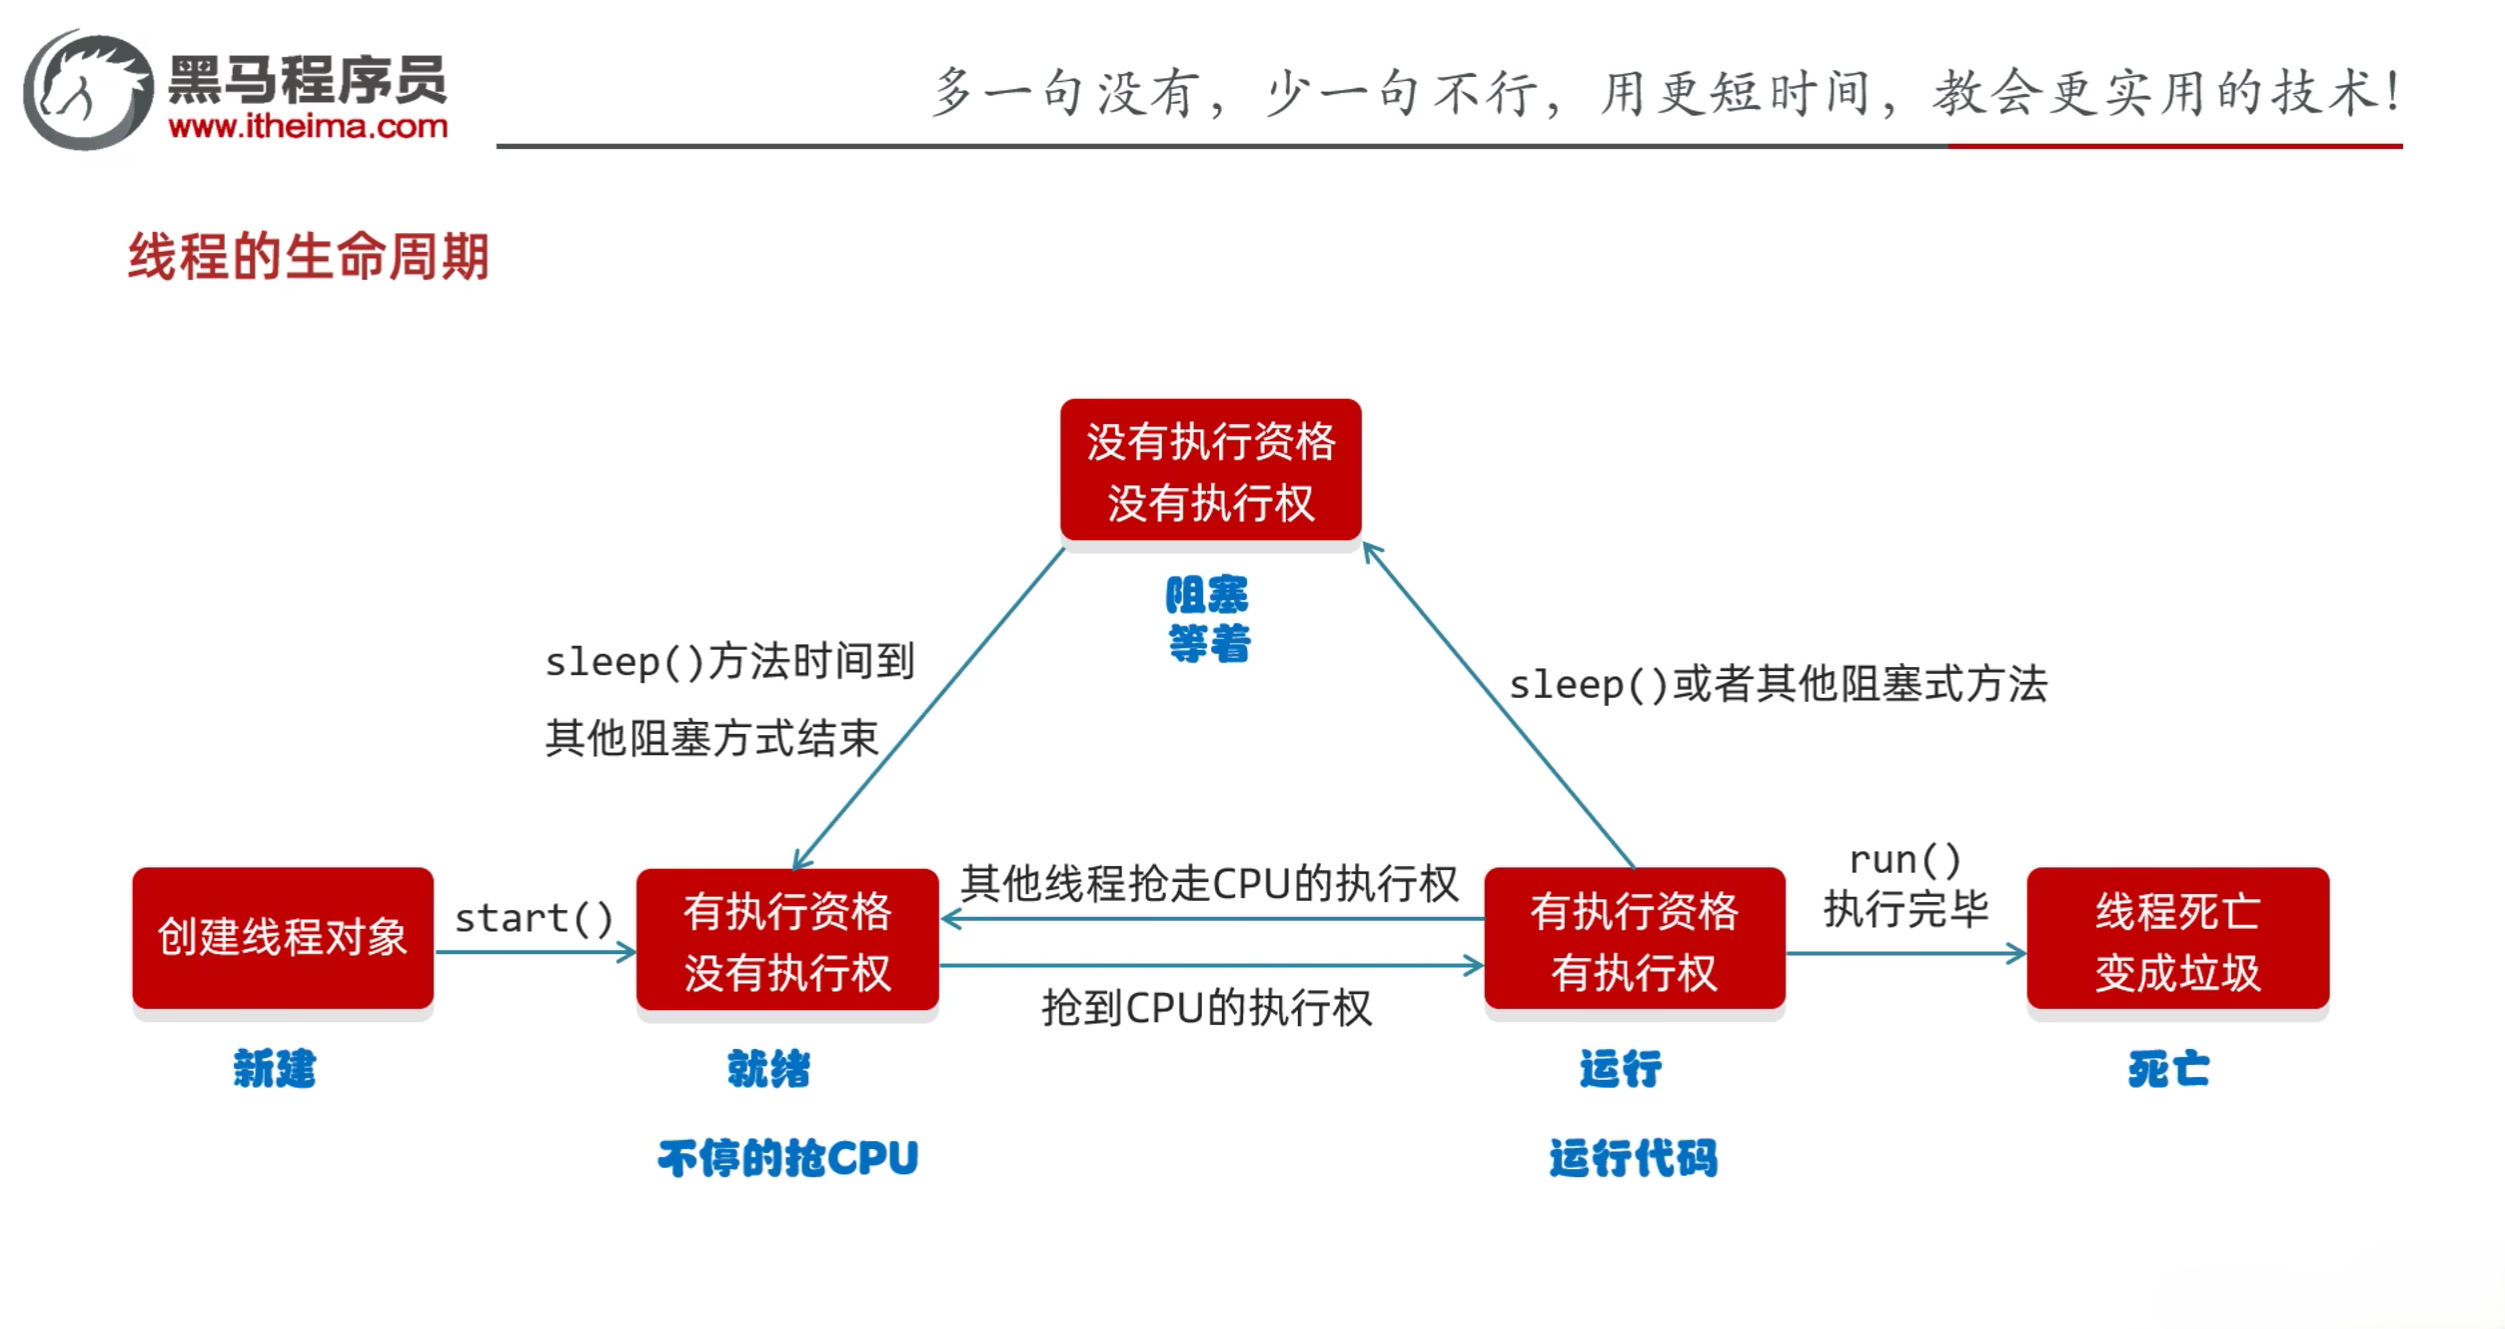
4.1 线程的生命周期
线程的生命周期
新建状态:创建线程对象,调用start方法之前
就绪状态:调用start方法之后,等待CPU分配时间片
运行状态:获得CPU的使用权,正在执行run方法
阻塞状态:调用sleep、wait、join等方法,等待其他线程执行完毕
死亡状态:run方法执行完毕,线程结束
4.2 线程的安全问题
线程的安全问题:多个线程同时访问同一个资源,可能会导致数据不一致的问题
解决方式:使用同步代码块
4.2.1 同步代码块
1
2
3
synchronized (锁对象) { 操作共享数据的代码 }
特点
锁默认打开,有一个线程进去了,锁自动关闭
里面的代码全部执行完毕,线程出来,锁自动打开
示例:
1 2 3 4 5 6 7 8 9 10 11 12 13 14 15 16 17 18 19 20 21 22 23 24 25 public class MyThread extends Thread { static int ticket = 0 ; @Override public void run () { while (true ) { synchronized (Mythread.class) { if (ticket < 20 ) { try { Thread.sleep(10 ); } catch (InterruptedException e) { e.printStackTrace(); } ticket++; System.out.println(getName() + "正在卖第" + ticket + "张票" ); } else { break ; } } } } }
1
2
3
4
5
6
7
8
9
10
11
12
13
14
15
16
public class Main { public static void main (String[] args) { MyThread t1 = new MyThread (); MyThread t2 = new MyThread (); MyThread t3 = new MyThread (); t1.setName("窗口1" ); t2.setName("窗口2" ); t3.setName("窗口3" ); t1.start(); t2.start(); t3.start(); } }
4.2.2 同步方法
同步方法:就是把synchronized关键字放在方法上面
格式:
1
2
3
public synchronized void method () { }
特点:
同步方法是锁住方法里面的所有代码
锁对象不能自己指定
非静态:this
静态:当前类的字节码文件对象MyThread.class
示例:
1 2 3 4 5 6 7 8 9 10 11 12 13 14 15 16 17 18 19 20 21 22 23 24 25 26 27 28 29 30 31 32 public class MyRunnable implements Runnable { int ticket = 0 ; @Override public void run () { while (true ) { if (method()) break ; } } private synchronized boolean method () { if (ticket == 100 ) { return true ; }else { try { Thread.sleep(100 ); } catch (InterruptedException e) { throw new RuntimeException (e); } ticket++; System.out.println(Thread.currentThread().getName() + "在卖" + ticket + "张票" ); } return false ; } }
1
2
3
4
5
6
7
8
9
10
11
12
13
14
15
16
17
18
public class Main { public static void main (String[] args) { MyRunnable mr = new MyRunnable (); Thread t1 = new Thread (mr); Thread t2 = new Thread (mr); Thread t3 = new Thread (mr); t1.setName("窗口1" ); t2.setName("窗口2" ); t3.setName("窗口3" ); t1.start(); t2.start(); t3.start(); } }
2025.04.25
4.3 Lock锁
虽然我们可以理解同步代码块和同步方法的锁对象问题,但是我们并没有直接看到在哪里加上了锁,在哪里释放了锁
为了更清晰的表达如何加锁和释放锁,JDK5以后提供了一个新的锁对象Lock
Lock实现提供比synchronized方法和语句可以获得更广泛的锁定操作
Lock中提供了获得锁和释放锁的方法
void lock():获得锁
void unlock():释放锁
Lock是接口不能直接实例化,这里采用的是它的实现类ReentrantLock来实例化
ReentrantLock的构造方法
ReentrantLock():创建一个ReantrantLock实例
示例:
1 2 3 4 5 6 7 8 9 10 11 12 13 14 15 16 17 18 19 20 21 22 23 24 25 26 27 28 29 30 31 32 33 import java.util.concurrent.locks.Lock;import java.util.concurrent.locks.ReentrantLock;public class MyThread extends Thread { static int ticket = 0 ; static Lock lock = new ReentrantLock (); @Override public void run () { while (true ) { lock.lock(); if (ticket == 10 ) { break ; }else { try { Thread.sleep(10 ); }catch (InterruptedException e) { e.printStackTrace(); }finally { lock.unlock(); } ticket++; System.out.println(getName() + "在卖第" + ticket + "张票" ); } } } }
1
2
3
4
5
6
7
8
9
10
11
public class Main { public static void main (String[] args) { MyThread t1 = new MyThread (); MyThread t2 = new MyThread (); MyThread t3 = new MyThread (); t1.start(); t2.start(); t3.start(); } }
4.4 死锁
死锁:两个或多个线程在执行过程中,因为争夺资源而造成的一种互相等待的现象
死锁的产生条件
互斥条件:一个资源只能被一个线程使用
请求与保持条件:一个线程已经持有了一个资源,但又请求其他资源
不剥夺条件:已经获得资源的线程在未使用完之前,不能被其他线程剥夺
循环等待条件:多个线程之间形成一种头尾相接的循环等待关系
4.5 生产者和消费者(等待唤醒机制)
生产者和消费者问题
生产者和消费者常见方法
void wait():当前线程等待,直到被其他线程唤醒
void notify():随机唤醒在此对象监视器上等待的单个线程
void notifyAll():唤醒在此对象监视器上等待的所有线程
生产者实现:
1
2
3
4
5
6
7
8
9
10
11
12
13
14
15
16
17
18
19
20
21
22
23
24
25
26
27
public class Cook extends Thread { @Override public void run () { while (true ) { synchronized (Desk.lock) { if (Desk.count == 0 ) { break ; }else { if (Desk.flag == 1 ) { try { Desk.lock.wait(); } catch (InterruptedException e) { throw new RuntimeException (e); } }else { System.out.println("厨师做了一碗面" ); Desk.flag = 1 ; Desk.lock.notify(); } } } } } }
消费者实现:
1
2
3
4
5
6
7
8
9
10
11
12
13
14
15
16
17
18
19
20
21
22
23
24
25
26
27
28
29
30
public class Foodie extends Thread { @Override public void run () { while (true ) { synchronized (Desk.lock) { if (Desk.count == 0 ){ break ; }else { if (Desk.flag == 0 ) { try { Desk.lock.wait(); } catch (InterruptedException e) { throw new RuntimeException (e); } }else { Desk.count--; System.out.println("吃货在吃面条,还能再吃" + Desk.count + "碗" ); Desk.flag = 0 ; Desk.lock.notify(); } } } } } }
桌子实现:
1
2
3
4
5
6
7
8
9
10
11
12
public class Desk { public static int flag = 0 ; public static int count = 5 ; public static Object lock = new Object (); }
Main函数
1
2
3
4
5
6
7
8
9
10
11
12
13
14
15
16
17
18
19
20
21
22
23
24
25
26
public class Main { public static void main (String[] args) { Cook cook = new Cook (); Foodie foodie = new Foodie (); cook.setName("厨师" ); foodie.setName("吃货" ); cook.start(); foodie.start(); } }
4.6 等待唤醒机制(阻塞队列方式实现)
阻塞队列:是一个线程安全的队列,支持阻塞操作
阻塞队列的继承结构
接口
Iterable
Collection
Queue
BlockingQueue
实现类
ArrayBlockingQueue
LinkedBlockingQueue
生产者实现:
1
2
3
4
5
6
7
8
9
10
11
12
13
14
15
16
17
18
19
20
21
22
23
import java.util.concurrent.ArrayBlockingQueue;public class Cook extends Thread { ArrayBlockingQueue<String> queue; public Cook (ArrayBlockingQueue<String> queue) { this .queue = queue; } @Override public void run () { while (true ) { try { queue.put("面条" ); System.out.println("厨师放了一碗面条" ); } catch (InterruptedException e) { e.printStackTrace(); } } } }
消费者实现:
1
2
3
4
5
6
7
8
9
10
11
12
13
14
15
16
17
18
19
20
21
22
23
import java.util.concurrent.ArrayBlockingQueue;public class Foodie extends Thread { ArrayBlockingQueue<String> queue; public Foodie (ArrayBlockingQueue<String> queue) { this .queue = queue; } @Override public void run () { while (true ) { try { String food = queue.take(); System.out.println(food); } catch (InterruptedException e) { e.printStackTrace(); } } } }
Main函数
1
2
3
4
5
6
7
8
9
10
11
12
13
14
15
16
17
import java.util.concurrent.ArrayBlockingQueue;public class Main { public static void main (String[] args) { ArrayBlockingQueue<String> queue = new ArrayBlockingQueue <>(1 ); Cook c = new Cook (queue); Foodie f = new Foodie (queue); c.setName("厨师" ); f.setName("吃货" ); c.start(); f.start(); } }
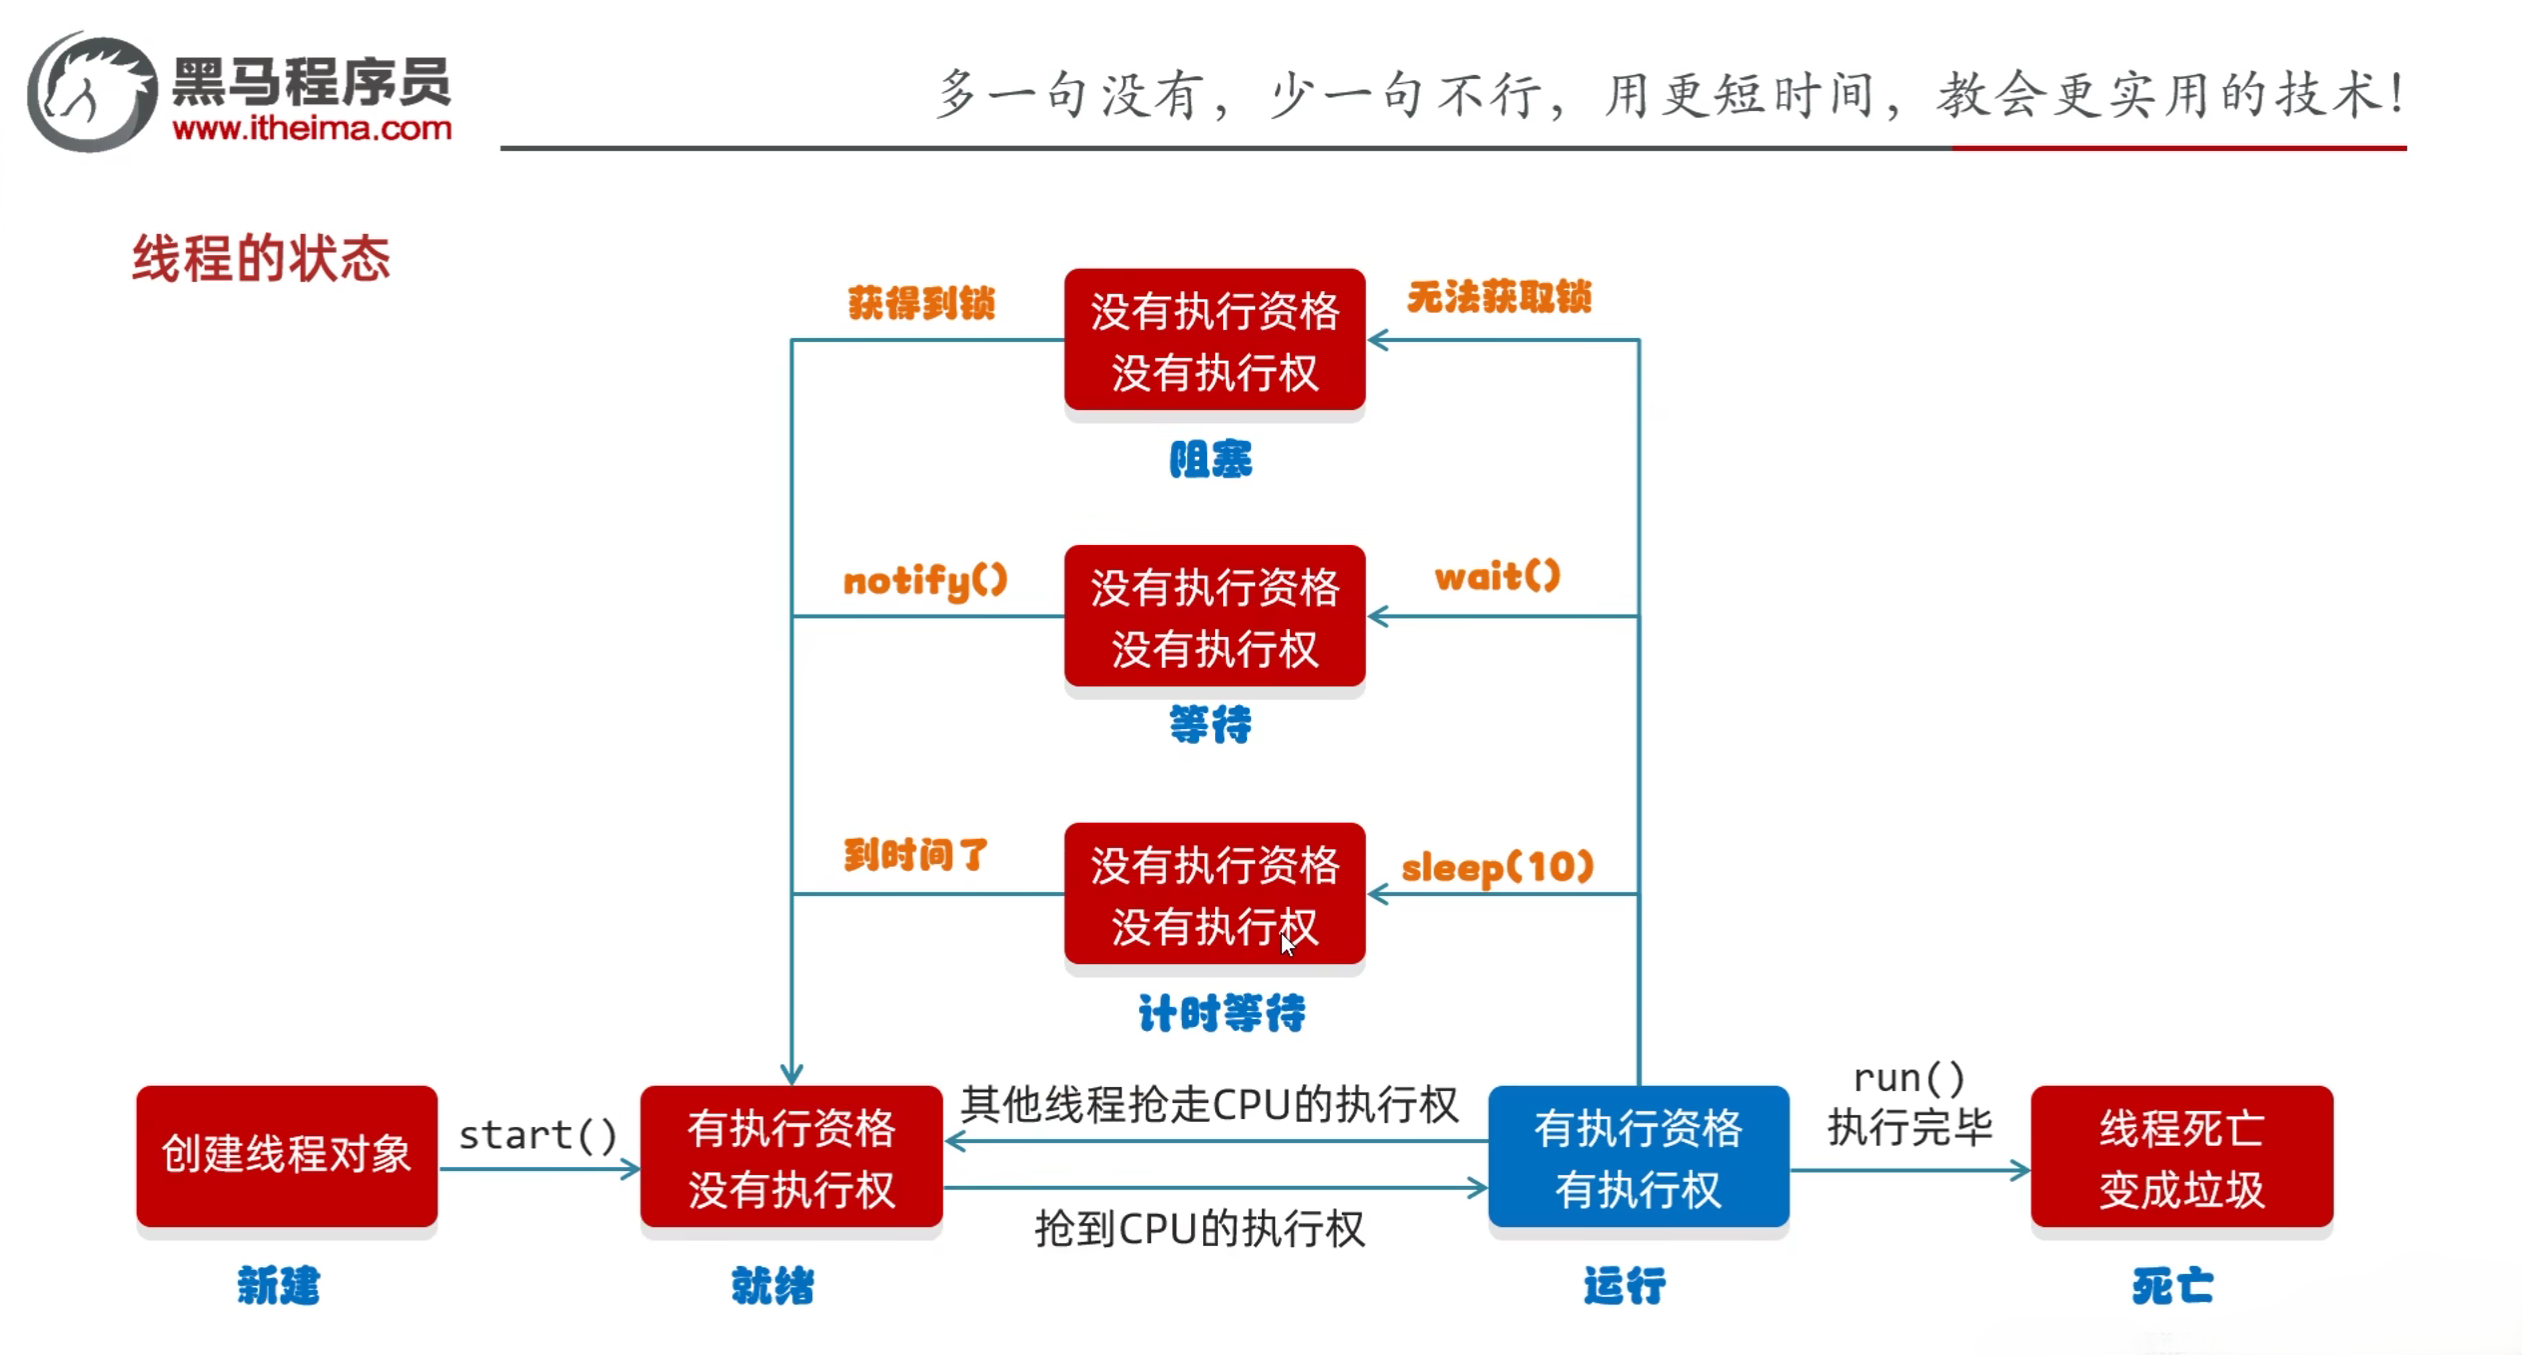
4.7 线程的状态
线程的七种状态
新建状态(NEW):创建线程对象,调用start方法之前
就绪状态(RUNNABLE):调用start方法之后,等待CPU分配时间片
运行状态:获得CPU的使用权,正在执行run方法
阻塞状态(BLOCKED):调用sleep、wait、join等方法,等待其他线程执行完毕
死亡状态(TERMINATED):run方法执行完毕,线程结束
等待状态(WAITING):调用wait方法,等待其他线程唤醒
计时等待状态(TIMED_WAITING):调用sleep方法,等待指定时间后自动唤醒
实际上Java内部并没有定义运行状态
五、练习
5.1 练习1:抢红包
需求:假设100块分成了3个红包,现在有5个人去抢
其中红包是共享数据
5个人是5条线程
打印结果如下:
XXX抢到了XXX元
XXX抢到了XXX元
XXX抢到了XXX元
XXX没抢到
XXX没抢到
1 2 3 4 5 6 7 8 9 10 11 12 13 14 15 16 17 18 19 20 21 22 23 24 25 26 27 28 29 30 31 32 33 34 import java.util.Random;public class MyThread extends Thread { static int num = 3 ; static double money = 100 ; static final double MIN = 0.01 ; @Override public void run () { synchronized (MyThread.class) { if (num == 0 ) { System.out.println(getName() + "没抢到" ); }else { double price = 0 ; if (num == 1 ) { price = money; }else { Random random = new Random (); double v = money - (num - 1 ) * MIN; price = random.nextDouble(v); if (price < MIN) { price = MIN; } } money = money - price; num--; System.out.println(getName() + "抢到了" + price + "元" ); } } } }
1
2
3
4
5
6
7
8
9
10
11
12
13
14
15
16
17
18
19
20
21
22
23
24
25
26
27
28
29
public class Main { public static void main (String[] args) { MyThread t1 = new MyThread (); MyThread t2 = new MyThread (); MyThread t3 = new MyThread (); MyThread t4 = new MyThread (); MyThread t5 = new MyThread (); t1.setName("张三" ); t2.setName("李四" ); t3.setName("王五" ); t4.setName("赵六" ); t5.setName("孙七" ); t1.start(); t2.start(); t3.start(); t4.start(); t5.start(); } }
2025.04.26
5.2 练习2:抽奖箱抽奖
需求:假设有一个抽奖箱,该抽奖箱中存放了奖励的金额,该抽奖箱内的奖项为{10, 5, 20, 50, 100, 200, 500, 800, 2, 80, 300, 700};
创建两个抽奖箱(线程)设置线程名称分别为“抽奖箱1”和“抽奖箱2”;
随机从抽奖池中获取奖项元素并打印在控制台上,格式如下:
每次抽出一个奖项就打印一个(随机)
抽奖箱1又产生了一个10元大奖
抽奖箱1又产生了一个100元大奖
抽奖箱1又产生了一个200元大奖
抽奖箱1又产生了一个800元大奖
抽奖箱1又产生了一个700元大奖
…
1
2
3
4
5
6
7
8
9
10
11
12
13
14
15
16
17
18
19
20
21
22
23
24
25
26
27
28
29
30
31
32
33
34
35
36
37
import java.util.ArrayList;import java.util.Collections;import java.util.List;import java.util.Random;public class MyThread extends Thread { ArrayList<Integer> list; public MyThread (ArrayList<Integer> list) { this .list = list; } @Override public void run () { while (true ) { synchronized (MyThread.class) { if (list.size() == 0 ) { break ; }else { Collections.shuffle(list); int prize = list.remove(0 ); System.out.println(getName() + "又产生了一个" + prize + "元大奖" ); } } try { Thread.sleep(10 ); } catch (InterruptedException e) { throw new RuntimeException (e); } } } }
1
2
3
4
5
6
7
8
9
10
11
12
13
14
15
16
17
18
19
20
21
22
23
24
25
26
27
28
29
30
31
32
33
34
35
import java.util.ArrayList;import java.util.Arrays;import java.util.Collections;public class Main { public static void main (String[] args) { ArrayList<Integer> box = new ArrayList <>(); Collections.addAll(box, 10 , 5 , 20 , 50 , 100 , 200 , 500 , 800 , 2 , 80 , 300 , 700 ); MyThread t1 = new MyThread (box); MyThread t2 = new MyThread (box); t1.setName("抽奖箱1" ); t2.setName("抽奖箱2" ); t1.start(); t2.start(); } }
六、线程池
6.1 线程池的概念
以前写多线程的弊端
线程池
用到线程的时候就创建
用完之后线程不会消失,线程会被放入线程池中
下次用到线程的时候直接从线程池中获取即可
如果线程池中的线程不够用,则创建新的线程放入线程池中
线程池的主要核心原理
创建一个池子,池子中是空的
提交任务时,池子会创建新的线程对象,任务执行完毕,线程归还给池子,下回再次提交任务时,不需要创建新的线程,直接复用已有的线程即可
但是如果提交任务时,池子中没有空闲线程,也无法创建新的线程,任务就会排队等待
6.2 线程池的实现
线程池的实现类:Executors
Executors:线程池的工具类通过调用方法返回不同类型的线程池对象
public static ExecutorService newFixedThreadPool():创建一个没有上限的线程池
public static ExecutorService newCachedThreadPool(int nThreads):创建一个有上限的线程池
示例:
1 2 3 4 5 6 7 8 9 10 public class MyRunnable implements Runnable { @Override public void run () { for (int i = 0 ; i < 5 ; i++) { System.out.println(Thread.currentThread().getName() + "---" + i); } } }
1
2
3
4
5
6
7
8
9
10
11
12
13
14
15
16
17
18
19
20
21
22
23
24
25
26
27
28
import java.util.concurrent.ExecutorService;import java.util.concurrent.Executors;public class Main { public static void main (String[] args) throws InterruptedException { ExecutorService pool = Executors.newCachedThreadPool(); pool.submit(new MyRunnable ()); Thread.sleep(1000 ); pool.submit(new MyRunnable ()); pool.shutdown(); } }
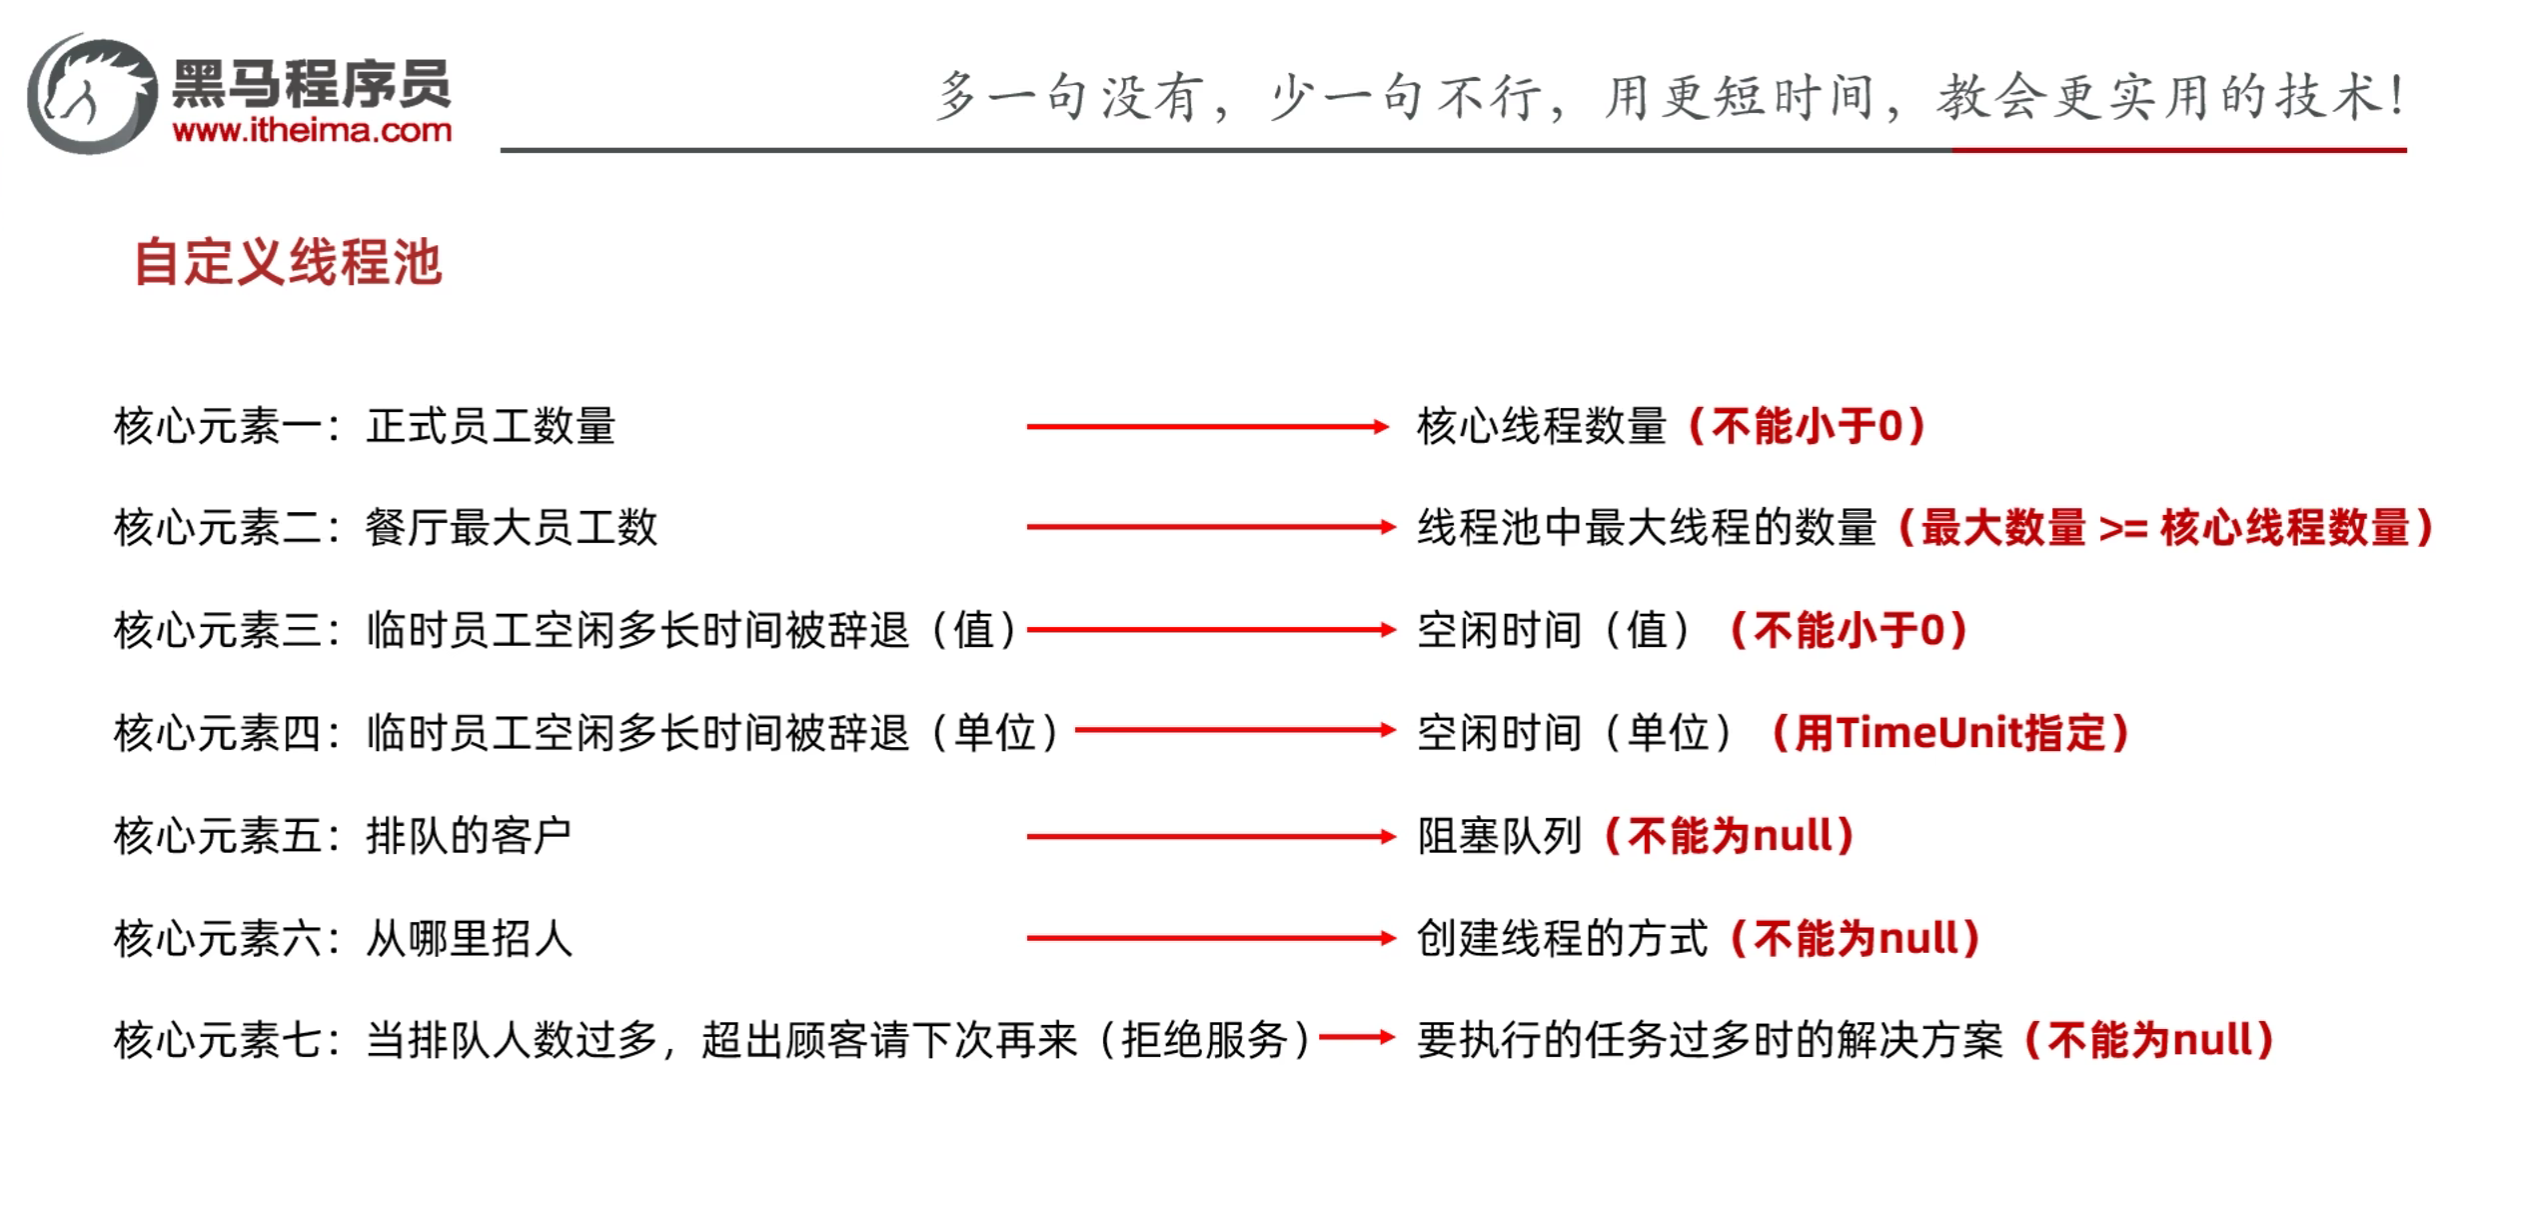
6.3 自定义线程池
自定义线程池的实现类:ThreadPoolExecutor
ThreadPoolExecutor(int corePoolSize, int maximumPoolSize, long keepAliveTime, TimeUnit unit, BlockingQueue workQueue, ThreadFactory threadFactory, RejectedExecutionHandler handler)
corePoolSize:核心线程数,线程池中最小的线程数
maximumPoolSize:最大线程数,线程池中最大的线程数
keepAliveTime:线程存活时间,超过这个时间没有任务执行,则线程会被销毁
unit:时间单位
workQueue:任务队列的实现类
ArrayBlockingQueue:有界阻塞队列,线程池中的线程数超过corePoolSize时,新的任务会被放入这个队列中
LinkedBlockingQueue:无界阻塞队列,线程池中的线程数超过corePoolSize时,新的任务会被放入这个队列中,直到队列满了才会创建新的线程
SynchronousQueue:同步阻塞队列,线程池中的线程数超过corePoolSize时,新的任务会被放入这个队列中,直到队列满了才会创建新的线程
threadFactory:线程工厂,创建线程的工厂类
handler:拒绝策略,当线程池中的线程数超过maximumPoolSize时,新的任务会被拒绝执行,抛出异常或者放入一个队列中等待执行
ThreadPoolExecutor.AbortPolicy:默认策略,丢弃任务并抛出RejectedExecutionException异常
ThreadPoolExecutor.DiscardPolicy:丢弃任务,但不抛出异常
ThreadPoolExecutor.DiscardOldestPolicy:抛弃队列中等待最久的任务,然后把当前任务加入队列中
ThreadPoolExecutor.CallerRunsPolicy:调用任务的run()方法绕过线程池直接执行
示例:
1
2
3
4
5
6
7
8
9
10
11
12
13
14
15
16
17
18
19
import java.util.concurrent.ArrayBlockingQueue;import java.util.concurrent.Executors;import java.util.concurrent.ThreadPoolExecutor;import java.util.concurrent.TimeUnit;public class Main { public static void main (String[] args) { ThreadPoolExecutor pool = new ThreadPoolExecutor ( 3 , 6 , 60 , TimeUnit.SECONDS, new ArrayBlockingQueue <>(3 ), Executors.defaultThreadFactory(), new ThreadPoolExecutor .AbortPolicy() ); } }
6.4 最大并行数
线程池应该多大
CPU密集型:最大并行数 + 1
IO密集型:最大并行数 * 期望CPU利用率 * 总时间(CPU计算时间 + 等待时间) / CPU计算时间
示例4核8线程:
CPU密集型:8 + 1 = 9
IO密集型:8 * 100% * 100% / 50% = 16
示例:
1
2
3
4
5
6
7
8
9
10
public class Main { public static void main (String[] args) { int count = Runtime.getRuntime().availableProcessors(); System.out.println(count); } }
参考资料:黑马程序员Java零基础视频教程_下部